Yamaha CVP-206 Owner's Manual - Page 97
Quick Recording, Recording Your Performances and Creating Songs - Song Creator
 |
View all Yamaha CVP-206 manuals
Add to My Manuals
Save this manual to your list of manuals |
Page 97 highlights
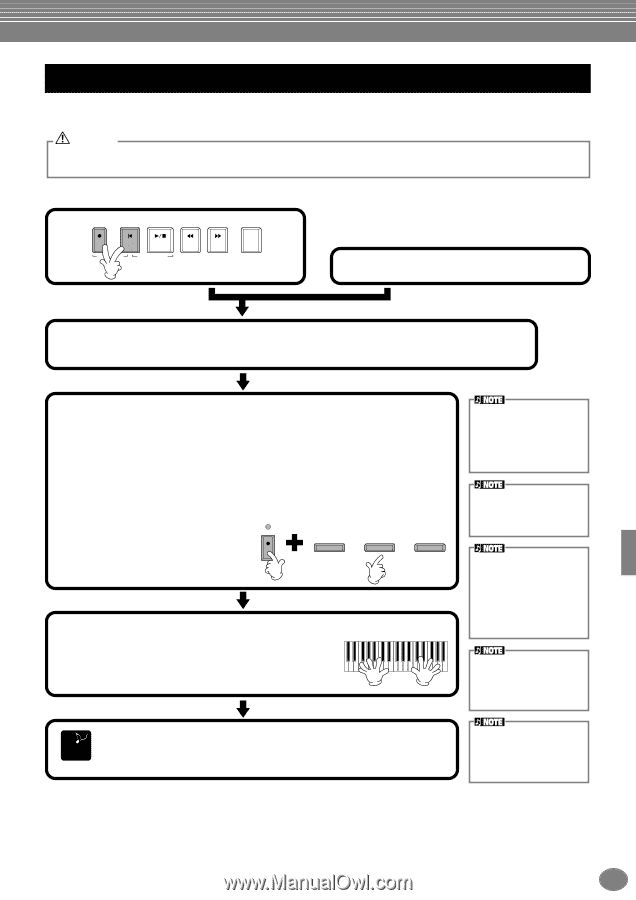
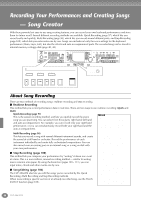
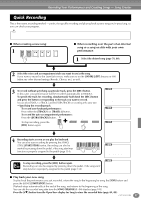
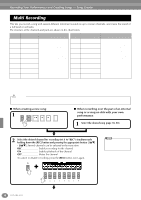
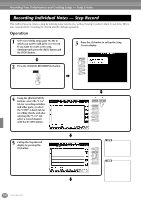
Recording Your Performances and Creating Songs - Song Creator Quick Recording This is the easiest recording method - perfect for quickly recording and playing back a piano song you're practicing, so you can check your progress. CAUTION If you wish to save the recording, make sure to store it to internal memory (USER drive) or floppy disk (page 40, 48). If you turn off the power or re-record over an existing track before you save the performance, any previous recording will be erased. ■ When creating a new song: 1 REC TOP START / STOP REW FF NEW SONG SYNC.START REPEAT ■ When recording over the part of an internal song or a song on disk with your own performance: 1 Select the desired song (page 78, 80). 2 Select the voice and accompaniment style you want to use in the song. If you want to record to the Layer/Left voices, make sure to set the [LAYER]/[LEFT] buttons to ON. Make any other desired settings (Reverb, Chorus, etc.) as well. 3 To record without specifying a particular track, press the [REC] button. In this case, your performance will be recorded automatically to TRACK 1. To specify the track for recording, simultaneously hold down the [REC] button and press the button corresponding to the track you want to record. You can select TRACK 1 or TRACK 2 and the EXTRA TRACKS for recording at the same time. • Specifying the recording track To record your keyboard performance: Press either the [TRACK 1] or [TRACK 2] button. To record the auto accompaniment performance: Press the [EXTRA TRACKS] button. REC To stop recording, press the EXTRA TRACKS (STYLE) TRACK 2 (L) TRACK 1 (R) [REC] button again. 4 Recording starts as soon as you play the keyboard. You can also start recording by pressing the SONG/ STYLE [START/STOP] button. Recording can also be started by pressing down the pedal, if the song start/stop function is properly assigned to the pedal (page 134). If the "LAYER" or "LEFT" button is on before pressing the REC button, the corresponding Layer and Left parts are automatically recorded to different channels. The performance of track 1/2 is recorded to the channel specified in the SONG SETTING display (page 132). You can overdub a second right-hand performance onto Track 2 after recording the first right-hand performance (including the layer voices) on Track 1. To do this, set the [LEFT] button to OFF and repeat steps 2 and 3. To pause, press the SONG [START/STOP] button. To resume recording, press the SONG [START/STOP] button again. END To stop recording, press the [REC] button again. Recording can also be stopped by pressing down the pedal, if the song start/ stop function is properly assigned to the pedal (page 134). You can also use the metronome click as a guide while recording. The sound of the metronome is not recorded. ■ Play back your new song To play back the performance you just recorded, return the song to the beginning by using the [TOP] button and press the SONG [START/STOP] button. Playback stops automatically at the end of the song, and returns to the beginning of the song. You can edit the recorded song data from the SONG CREATOR (1 - 16) displays (page 109). Press the [6▼] button from the Open/Save display for Song to store the recorded data (page 40, 48). CVP-206/204 97
-
 1
1 -
2
-
3
-
4
-
5
-
6
-
7
-
8
-
9
-
10
-
11
-
12
-
13
-
14
-
15
-
16
-
17
-
18
-
19
-
20
-
21
-
22
-
23
-
24
-
25
-
26
-
27
-
28
-
29
-
30
-
31
-
32
-
33
-
34
-
35
-
36
-
37
-
38
-
39
-
40
-
41
-
42
-
43
-
44
-
45
-
46
-
47
-
48
-
49
-
50
-
51
-
52
-
53
-
54
-
55
-
56
-
57
-
58
-
59
-
60
-
61
-
62
-
63
-
64
-
65
-
66
-
67
-
68
-
69
-
70
-
71
-
72
-
73
-
74
-
75
-
76
-
77
-
78
-
79
-
80
-
81
-
82
-
83
-
84
-
85
-
86
-
87
-
88
-
89
-
90
-
91
-
 92
92 -
 93
93 -
 94
94 -
 95
95 -
 96
96 -
 97
97 -
 98
98 -
 99
99 -
 100
100 -
 101
101 -
 102
102 -
103
-
104
-
105
-
106
-
107
-
108
-
109
-
110
-
111
-
112
-
113
-
114
-
115
-
116
-
117
-
118
-
119
-
120
-
121
-
122
-
123
-
124
-
125
-
126
-
127
-
128
-
129
-
130
-
131
-
132
-
133
-
134
-
135
-
136
-
137
-
138
-
139
-
140
-
141
-
142
-
143
-
144
-
145
-
146
-
147
-
148
-
149
-
150
-
151
-
152
-
153
-
154
-
155
-
156
-
157
-
158
-
159
-
160
-
161
-
162
-
163
-
164
-
165
-
166
-
167
-
168
-
169
-
170
-
171
-
172
 |
 |