Yamaha CVP-206 Owner's Manual - Page 6
Accessories, Handling the Floppy Disk Drive (FDD) and Floppy Disk - piano
 |
View all Yamaha CVP-206 manuals
Add to My Manuals
Save this manual to your list of manuals |
Page 6 highlights
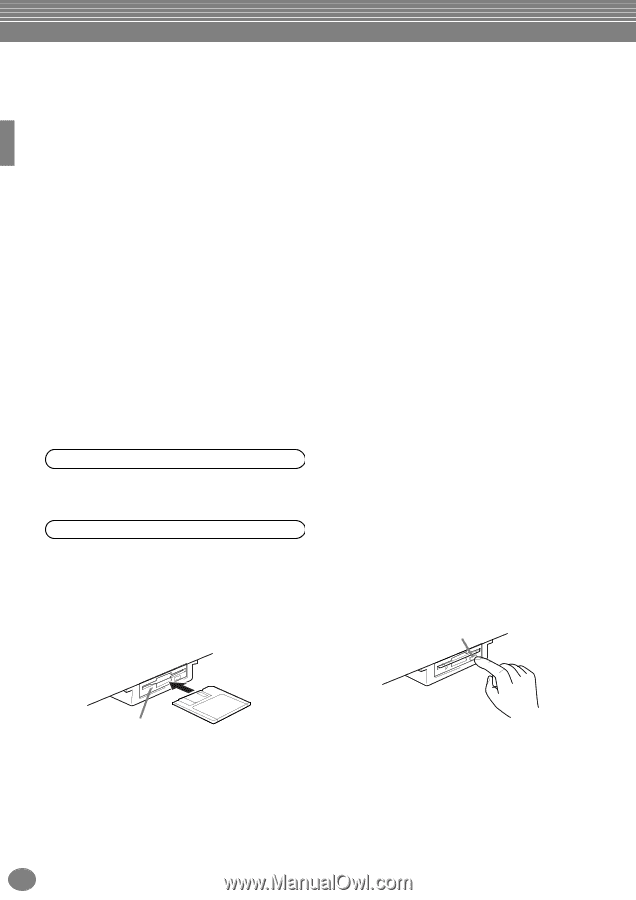
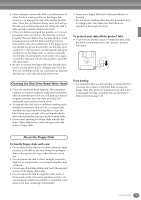
Accessories ■ "50 greats for the Piano" Disk (and Music Book) ■ Recording disk Use this blank disk to save your performance. ■ Owner's Manual This manual contains complete instructions for operating your Clavinova. ■ Data List This manual contains lists of voices, styles and parameters, etc. ■ Bench A bench may be included or optional, depending on your locale. Handling the Floppy Disk Drive (FDD) and Floppy Disk Precautions Be sure to handle floppy disks and treat the disk drive with care. Follow the important precautions below. Compatible Disk Type • 3.5" 2DD and 2HD type floppy disks can be used. Inserting/Ejecting Floppy Disks To insert a floppy disk into the disk drive: • Hold the disk so that the label of the disk is facing upward and the sliding shutter is facing forward, towards the disk slot. Carefully insert the disk into the slot, slowly pushing it all the way in until it clicks into place and the eject button pops out. To eject a floppy disk: Before ejecting the disk, be sure to confirm that data is not being written to the floppy disk. If data is currently being written to the floppy disk in the following operations, the messages "Now executing," "Now copying," and "Now formatting" appears in the display. • Moving, copying, pasting, saving, or deleting data (page 46 - 48). • Naming files and folders (page 45); creating a new folder (page 48). • Copying a disk to an another disk (page 145); formatting the disk (page 145). Eject button Drive lamp When the power is turned on, the drive lamp (at the bottom left of the drive) lights to indicate the drive can be used. 6 CVP-206/204
-
 1
1 -
 2
2 -
 3
3 -
 4
4 -
 5
5 -
 6
6 -
 7
7 -
 8
8 -
 9
9 -
 10
10 -
 11
11 -
 12
12 -
13
-
14
-
15
-
16
-
17
-
18
-
19
-
20
-
21
-
22
-
23
-
24
-
25
-
26
-
27
-
28
-
29
-
30
-
31
-
32
-
33
-
34
-
35
-
36
-
37
-
38
-
39
-
40
-
41
-
42
-
43
-
44
-
45
-
46
-
47
-
48
-
49
-
50
-
51
-
52
-
53
-
54
-
55
-
56
-
57
-
58
-
59
-
60
-
61
-
62
-
63
-
64
-
65
-
66
-
67
-
68
-
69
-
70
-
71
-
72
-
73
-
74
-
75
-
76
-
77
-
78
-
79
-
80
-
81
-
82
-
83
-
84
-
85
-
86
-
87
-
88
-
89
-
90
-
91
-
92
-
93
-
94
-
95
-
96
-
97
-
98
-
99
-
100
-
101
-
102
-
103
-
104
-
105
-
106
-
107
-
108
-
109
-
110
-
111
-
112
-
113
-
114
-
115
-
116
-
117
-
118
-
119
-
120
-
121
-
122
-
123
-
124
-
125
-
126
-
127
-
128
-
129
-
130
-
131
-
132
-
133
-
134
-
135
-
136
-
137
-
138
-
139
-
140
-
141
-
142
-
143
-
144
-
145
-
146
-
147
-
148
-
149
-
150
-
151
-
152
-
153
-
154
-
155
-
156
-
157
-
158
-
159
-
160
-
161
-
162
-
163
-
164
-
165
-
166
-
167
-
168
-
169
-
170
-
171
-
172
 |
 |