Yamaha CVP-206 Owner's Manual - Page 71
Appropriate Panel Setting for the Selected Style (ONE TOUCH SETTING), ONE TOUCH SETTING
 |
View all Yamaha CVP-206 manuals
Add to My Manuals
Save this manual to your list of manuals |
Page 71 highlights
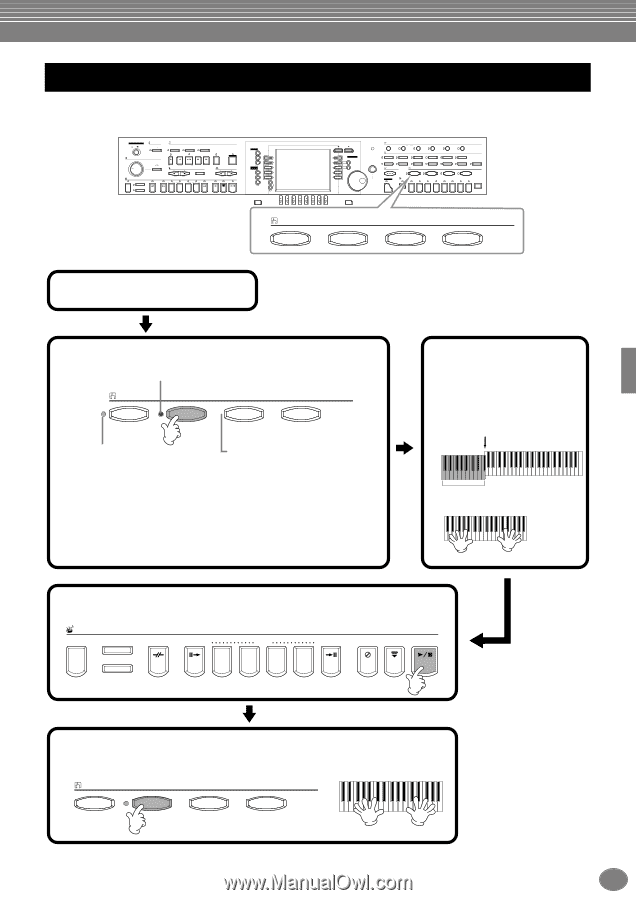
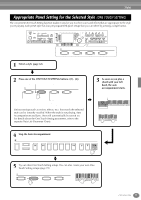
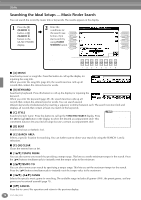
Styles Appropriate Panel Setting for the Selected Style (ONE TOUCH SETTING) The convenient One Touch Setting function makes it easy for you to select voices and effects that are appropriate to the style you're playing. Each preset style has four pre-programmed panel setups that you can select by pressing a single button. POWER ON OFF METRONOME START STOP SONG EXTRA TRACKS (STYLE) TRACK 2 (L) TRACK 1 (R) MASTER VOLUME REC TOP START / STOP REW FF REPEAT GUIDE MIN STYLE ACMP MAX AUTO FILLIN OTS LINK FADE IN / OUT BREAK INTRO NEW SONG TEMPO SYNC.START RESET MAIN A B C TAP TEMPO TRANSPOSE RESET ENDING / rit. SYNC.STOP SYNC.START START / STOP D MENU DEMO HELP A FUNCTION B DIGITAL C STUDIO SOUND CREATOR D DIGITAL RECORDING E MIXING CONSOLE BALANCE PART CHANNEL ON / OFF PART BACK NEXT VOICE PART F ON / OFF G LAYER H LEFT I J LCD CONTRAST ENTER DATA ENTRY VOICE EFFECT REVERB DSP VARIATION HARMONY / ECHO MONO LEFT HOLD VOICE PIANO & HARPSI. E.PIANO ORGAN & ACCORDION PERCUSSION BRASS WOODWIND STRINGS CHOIR & PAD MUSIC FINDER ONE TOUCH SETTING 1 2 PIANO REGISTRATION MEMORY FREEZE 1 2 3 4 GUITAR SYNTH. 3 5 6 BASS XG USER 4 7 8 MEMORY DIRECT ACCESS 1 2 3 4 5 6 7 8 EXIT ONE TOUCH SETTING 1 2 3 4 1 Select a style (page 63). 2 Press one of the ONE TOUCH SETTING buttons ([1] - [4]). LED is red - The One Touch Setting is currently selected. ONE TOUCH SETTING 1 2 3 4 LED is green - The One Touch Setting is not selected. LED is off - No One Touch Setting data. The button is not available. Various settings (such as voices, effects, etc.) that match the selected style can be instantly recalled. When the style is not playing, Auto Accompaniment and Sync. Start will automatically be turned on. For details about the One Touch Setting parameters, refer to the separate Data List (Parameter Chart). 3 As soon as you play a chord with your left hand, the auto accompaniment starts. Split point Auto Accompaniment section 4 Stop the Auto Accompaniment. STYLE ACMP AUTO FILLIN OTS LINK BREAK INTRO A MAIN B C ENDING / rit. SYNC.STOP SYNC.START START / STOP D 5 Try out other One Touch Setting setups. You can also create your own One Touch Setting setups (page 72). ONE TOUCH SETTING 1 2 3 4 CVP-206/204 71
-
 1
1 -
2
-
3
-
4
-
5
-
6
-
7
-
8
-
9
-
10
-
11
-
12
-
13
-
14
-
15
-
16
-
17
-
18
-
19
-
20
-
21
-
22
-
23
-
24
-
25
-
26
-
27
-
28
-
29
-
30
-
31
-
32
-
33
-
34
-
35
-
36
-
37
-
38
-
39
-
40
-
41
-
42
-
43
-
44
-
45
-
46
-
47
-
48
-
49
-
50
-
51
-
52
-
53
-
54
-
55
-
56
-
57
-
58
-
59
-
60
-
61
-
62
-
63
-
64
-
65
-
 66
66 -
 67
67 -
 68
68 -
 69
69 -
 70
70 -
 71
71 -
 72
72 -
 73
73 -
 74
74 -
 75
75 -
 76
76 -
77
-
78
-
79
-
80
-
81
-
82
-
83
-
84
-
85
-
86
-
87
-
88
-
89
-
90
-
91
-
92
-
93
-
94
-
95
-
96
-
97
-
98
-
99
-
100
-
101
-
102
-
103
-
104
-
105
-
106
-
107
-
108
-
109
-
110
-
111
-
112
-
113
-
114
-
115
-
116
-
117
-
118
-
119
-
120
-
121
-
122
-
123
-
124
-
125
-
126
-
127
-
128
-
129
-
130
-
131
-
132
-
133
-
134
-
135
-
136
-
137
-
138
-
139
-
140
-
141
-
142
-
143
-
144
-
145
-
146
-
147
-
148
-
149
-
150
-
151
-
152
-
153
-
154
-
155
-
156
-
157
-
158
-
159
-
160
-
161
-
162
-
163
-
164
-
165
-
166
-
167
-
168
-
169
-
170
-
171
-
172
 |
 |