Yamaha CVP-701 CVP-701 Reference Manual - Page 47
After you finish your performance, press the SONG CONTROL [STOP] button to stop
 |
View all Yamaha CVP-701 manuals
Add to My Manuals
Save this manual to your list of manuals |
Page 47 highlights
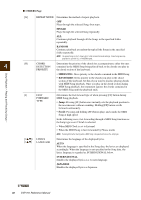
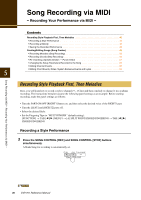
Song Recording via MIDI - Recording Your Performance via MIDI - 2 Specify the target channel and part for recording. 2-1 While holding down the SONG CONTROL [REC] button, press the [1] - [8] buttons to specify the desired channels (9 - 16) for recording. As the default setting, Style parts (Rythm1-Phrase 2) are assigned to channels 9 - 16 as illustrated on page 49. You can change the parts to be recorded by performing step 2-2. 2-2 2-1 5 2-2 Select the desired part which will be recorded to the channel specified in step 2-1 by using the [C]/[D] buttons. NOTE To cancel the recording, press the SONG CONTROL [STOP] button. 3 Press the STYLE [SYNC START] button, then play the style by specifying the chords in the chord section. Recording begins automatically as soon as you play the Style. You can also start recording by pressing SONG CONTROL [PLAY/PAUSE] button. Perform as desired, playing the Style by changing chords and/ or sections. Chord section Split Point (F ♯ 2 as default) NOTE Make sure that the STYLE [ACMP ON/OFF] button is turned on. 4 After you finish your performance, press the SONG CONTROL [STOP] button to stop recording. 5 To hear the recorded performance, press the SONG CONTROL [PLAY/PAUSE] button. This finishes recording of the Style. Now, let's record a melody to channel 1. CVP-701 Reference Manual 47
-
 1
1 -
2
-
3
-
4
-
5
-
6
-
7
-
8
-
9
-
10
-
11
-
12
-
13
-
14
-
15
-
16
-
17
-
18
-
19
-
20
-
21
-
22
-
23
-
24
-
25
-
26
-
27
-
28
-
29
-
30
-
31
-
32
-
33
-
34
-
35
-
36
-
37
-
38
-
39
-
40
-
41
-
 42
42 -
 43
43 -
 44
44 -
 45
45 -
 46
46 -
 47
47 -
 48
48 -
 49
49 -
 50
50 -
 51
51 -
 52
52 -
53
-
54
-
55
-
56
-
57
-
58
-
59
-
60
-
61
-
62
-
63
-
64
-
65
-
66
-
67
-
68
-
69
-
70
-
71
-
72
-
73
-
74
-
75
-
76
-
77
-
78
-
79
-
80
-
81
-
82
-
83
-
84
-
85
-
86
-
87
-
88
-
89
-
90
-
91
-
92
-
93
-
94
-
95
-
96
-
97
-
98
-
99
-
100
-
101
-
102
-
103
-
104
-
105
-
106
-
107
-
108
-
109
-
110
 |
 |
