Yamaha CVP-701 CVP-701 Reference Manual - Page 67
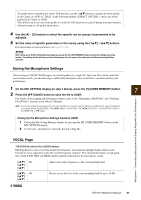
Saving the Microphone Settings, VOCAL Press the [6
 |
View all Yamaha CVP-701 manuals
Add to My Manuals
Save this manual to your list of manuals |
Page 67 highlights
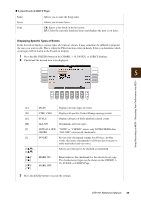
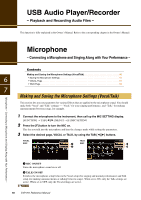
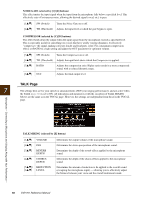
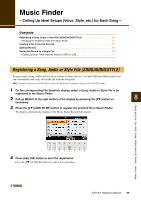
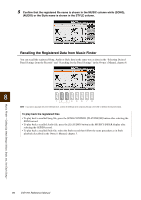
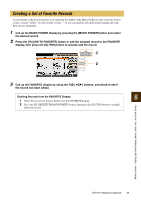
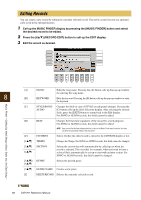
To get the most convenient use of this Talk function, use the [1] button to assign one of the pedals (Left, Center, or AUX) to "TALK" in the following display: [DIRECT ACCESS] → press one of the pedals (Left, Center, or AUX) This allows you to use one of the pedals to switch the Talk function on and off during your performance, without having to call up the menu above. 4 Use the [A] - [E] buttons to select the specific row (or group) of parameters to be adjusted. 5 Set the value of specific parameters in the row by using the [1] - [6] buttons. For information on each parameter, see page 67 - 68. NOTICE After setting, go to the Mic Setting Memory display by pressing the [H] (USER MEMORY) button and save the settings (see below section). The settings will be lost if you exit from this display or turn the power to the instrument off without executing the Save operation. Saving the Microphone Settings All the settings (VOCAL/TALK pages) are saved together as a single file. Up to ten files can be saved. For ease in future recall, you should assign a sufficiently descriptive name to the file or one that matches your performance. 1 On the MIC SETTING display (in step 3 above), press the [H] (USER MEMORY) button. 7 2 Press the [6] (SAVE) button to save the file to USER. For details on the naming and deleting procedures, refer to the "Renaming a File/Folder" and "Deleting Files/Folders" sections in the Owner's Manual. NOTE The microphone setting file can be saved only to the internal USER drive. If you want to save this setting to the USB flash drive, save the User Effect file on the display called up via [FUNCTION] → TAB [-][3] MENU2 → [G] SYSTEM → TAB [-][3] SETUP FILES → [H] (USER EFFECT FILES) → TAB [-][3] USB → [6] (SAVE). Calling Up the Microphone Settings Saved to USER 1 Call up the Mic Setting Memory display by pressing the [H] (USER MEMORY) button on the MIC SETTING display. 2 Use the [A] - [J] buttons to select the desired setting file. VOCAL Page 3-BAND EQ (selected by [A]/[B] buttons) EQ (Equalizer) is a processor that divides the frequency spectrum into multiple bands which can be boosted or cut as required to tailor the overall frequency response. This instrument features a high-grade three-band (LOW, MID and HIGH) digital equalizer function for the microphone sound. [1]/ Hz [3]/ [5] [2]/ dB [4]/ [6] Adjusts the center frequency of the corresponding band. Boosts or cuts the level of the corresponding band by up to 12 dB. Microphone - Connecting a Microphone and Singing Along with Your Performance - CVP-701 Reference Manual 67
-
 1
1 -
2
-
3
-
4
-
5
-
6
-
7
-
8
-
9
-
10
-
11
-
12
-
13
-
14
-
15
-
16
-
17
-
18
-
19
-
20
-
21
-
22
-
23
-
24
-
25
-
26
-
27
-
28
-
29
-
30
-
31
-
32
-
33
-
34
-
35
-
36
-
37
-
38
-
39
-
40
-
41
-
42
-
43
-
44
-
45
-
46
-
47
-
48
-
49
-
50
-
51
-
52
-
53
-
54
-
55
-
56
-
57
-
58
-
59
-
60
-
61
-
 62
62 -
 63
63 -
 64
64 -
 65
65 -
 66
66 -
 67
67 -
 68
68 -
 69
69 -
 70
70 -
 71
71 -
 72
72 -
73
-
74
-
75
-
76
-
77
-
78
-
79
-
80
-
81
-
82
-
83
-
84
-
85
-
86
-
87
-
88
-
89
-
90
-
91
-
92
-
93
-
94
-
95
-
96
-
97
-
98
-
99
-
100
-
101
-
102
-
103
-
104
-
105
-
106
-
107
-
108
-
109
-
110
 |
 |