Yamaha CVP-701 CVP-701 Reference Manual - Page 85
Selecting the Master EQ Type
 |
View all Yamaha CVP-701 manuals
Add to My Manuals
Save this manual to your list of manuals |
Page 85 highlights
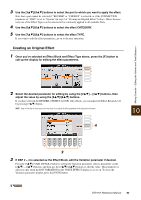
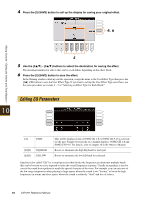
Selecting the Master EQ Type The instrument possesses a high-quality five-band digital EQ. With this function, a final effect - tone control - can be added to the output of your instrument. You can select one of the five preset EQ settings in the MEQ display. You can even create your own custom EQ settings by adjusting the frequency bands, and save the settings to one of two User Master EQ types. Gain Bandwidth (also called "Shape" or "Q") 0 Freq (Frequency) 5 bands → LOW LOWMID MID HIGHMID HIGH EQ1 EQ2 EQ3 EQ4 EQ5 1 Use the [A]/[B] buttons to select a preset Master EQ type. • FLAT: Flat EQ settings. The gain of each frequency is set to 0dB. • LOW CUT: EQ setting for decreasing the level of the low frequencies, making the sound clearer. • LOW BOOST: EQ setting for boosting the level of the low frequencies, making the sound more powerful. • HIGH CUT: EQ setting for decreasing the level of the high frequencies, making the sound more mellow. • HIGH BOOST: EQ setting for boosting the level of the high frequencies, making the sound brighter. • USER1/2: Your own custom EQ settings saved in step 4. The set parameters of the selected Master EQ type are automatically shown at the bottom of the display. 1 4 3 2, 3 Mixing Console - Editing the Volume and Tonal Balance - 10 2 Use the [E]/[J] buttons to move the cursor to the GAIN row, then use the [1] - [5] buttons to adjust the GAIN level to boost or cut each of the five bands. To boost or cut all the five bands at the same time, use the [6]/[7] buttons. 3 Adjust the Q (bandwidth) and the FREQ (center frequency) of the band selected in step 2. To adjust the bandwidth (also called "Shape" or "Q"), use the [C]/[H] buttons to move the cursor to the Q row, then use the [2] - [4] buttons. The higher the value of Q, the narrower the band width. To adjust the FREQ (center frequency), use the [D]/[I] buttons to move the cursor to the FREQ row, then use the [1] - [5] buttons. The available FREQ range is different for each band. 4 Press the [F] or [G] (STORE 1 or 2) button to save the edited Master EQ type. In the Naming display called up via this operation, assign the name then press the [8] (OK) button to store your settings as a User Master EQ Type, which can be called up via the [A]/[B] buttons. CVP-701 Reference Manual 85
-
 1
1 -
2
-
3
-
4
-
5
-
6
-
7
-
8
-
9
-
10
-
11
-
12
-
13
-
14
-
15
-
16
-
17
-
18
-
19
-
20
-
21
-
22
-
23
-
24
-
25
-
26
-
27
-
28
-
29
-
30
-
31
-
32
-
33
-
34
-
35
-
36
-
37
-
38
-
39
-
40
-
41
-
42
-
43
-
44
-
45
-
46
-
47
-
48
-
49
-
50
-
51
-
52
-
53
-
54
-
55
-
56
-
57
-
58
-
59
-
60
-
61
-
62
-
63
-
64
-
65
-
66
-
67
-
68
-
69
-
70
-
71
-
72
-
73
-
74
-
75
-
76
-
77
-
78
-
79
-
 80
80 -
 81
81 -
 82
82 -
 83
83 -
 84
84 -
 85
85 -
 86
86 -
 87
87 -
 88
88 -
 89
89 -
 90
90 -
91
-
92
-
93
-
94
-
95
-
96
-
97
-
98
-
99
-
100
-
101
-
102
-
103
-
104
-
105
-
106
-
107
-
108
-
109
-
110
 |
 |
