Yamaha CVP-701 CVP-701 Reference Manual - Page 57
Re-recording a Specific Punch In/Out, NORMAL, FIRST KEY ON, PUNCH IN AT, REPLACE ALL
 |
View all Yamaha CVP-701 manuals
Add to My Manuals
Save this manual to your list of manuals |
Page 57 highlights
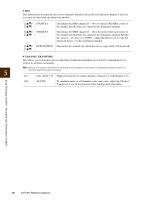
Re-recording a Specific Section - Punch In/Out When re-recording a specific section of an already-recorded Song, use the Punch IN/OUT function. In this method, only the data between the Punch In point and the Punch Out point is overwritten with the newly recorded data. Keep in mind that the notes before and after the Punch In/Out points are not recorded over, although you will hear them play back normally to guide you in and out of the Punch In/Out timing. 1 Select the Song you want to re-record. 2 Call up the operation display. [FUNCTION] → TAB [-][3] MENU2 → [B] SONG CREATOR → TAB [-][3] REC MODE 3 Determine the settings for recording. 5 Song Recording via MIDI - Recording Your Performance via MIDI - [1] - REC START [3] (Punch In) [4] - REC END [6] (Punch Out) Determines the recording start behavior. NORMAL Overwrite recording starts when pressing the SONG CONTROL [PLAY/PAUSE] button or when you play the keyboard in the Synchro Standby mode. FIRST KEY ON The Song plays back normally, then starts overwrite recording as soon as you play the keyboard. PUNCH IN AT The Song plays back normally up to the beginning of the indicated Punch In measure, then starts overwrite recording at that point. You can set the Punch In measure by pressing the [3] button. Determines the recording stop behavior, or how data is handled after recording is stopped. REPLACE ALL This deletes all data after the point at which recording is stopped. PUNCH OUT The Song position at which recording is stopped is regarded as the Punch Out point. This setting maintains all data after the point at which recording is stopped. PUNCH OUT AT Actual overwrite recording continues until the beginning of the specified Punch Out measure (set with the corresponding display button), at which point recording stops and normal playback continues. This setting maintains all data after the point at which recording is stopped. You can set the Punch Out measure by pressing the [6] buttons. CVP-701 Reference Manual 57
-
 1
1 -
2
-
3
-
4
-
5
-
6
-
7
-
8
-
9
-
10
-
11
-
12
-
13
-
14
-
15
-
16
-
17
-
18
-
19
-
20
-
21
-
22
-
23
-
24
-
25
-
26
-
27
-
28
-
29
-
30
-
31
-
32
-
33
-
34
-
35
-
36
-
37
-
38
-
39
-
40
-
41
-
42
-
43
-
44
-
45
-
46
-
47
-
48
-
49
-
50
-
51
-
 52
52 -
 53
53 -
 54
54 -
 55
55 -
 56
56 -
 57
57 -
 58
58 -
 59
59 -
 60
60 -
 61
61 -
 62
62 -
63
-
64
-
65
-
66
-
67
-
68
-
69
-
70
-
71
-
72
-
73
-
74
-
75
-
76
-
77
-
78
-
79
-
80
-
81
-
82
-
83
-
84
-
85
-
86
-
87
-
88
-
89
-
90
-
91
-
92
-
93
-
94
-
95
-
96
-
97
-
98
-
99
-
100
-
101
-
102
-
103
-
104
-
105
-
106
-
107
-
108
-
109
-
110
 |
 |
