Yamaha DTX700 Owner's Manual - Page 11
Side Panel, Setup - kit
 |
View all Yamaha DTX700 manuals
Add to My Manuals
Save this manual to your list of manuals |
Page 11 highlights
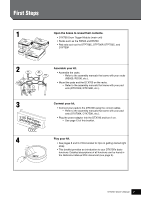
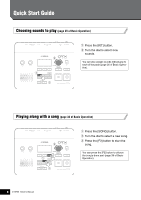
!0 [SONG] button (page 36) This button is used to access the Song page in order to select a song. !1 [MENU] button (page 20) This button is used to access the Menu area. From here, you can select various other pages in order to configure your DTX700 in many different ways. * This booklet introduces some of the basic functions available in the Menu area. For a complete description of all functions, please download the DTX700 Reference Manual from this web page: http://www.yamaha.co.jp/manual/ !2 [INST] button (page 30) This button is used to access the Instrument page in order to select instruments. [Definition] Instrument In the context of the DTX700, the term "instrument" is used to refer to each of the various percussion instruments that make up a kit. Typical examples would be snare drums, tom-toms, cymbals, and kick drums. !3 [CLICK] button (page 41) This button is used to access the Click page in order to set your DTX700's click-track (or metronome). !4 [SHIFT] button When you press this button, the functions assigned to the [F1], [F2], and [F3] buttons will change. These functions can be accessed by holding down the [SHIFT] button and pressing the corresponding function button (see page 18). Meanwhile, a number of the buttons on the DTX700's control panel have secondary functions, indicated just above the buttons themselves. These functions can also be accessed by holding down the [SHIFT] button and pressing the corresponding button. Component Names & Functions Setup !5 [>/] button (page 48) Use this button to start and stop the playback of performances that you have recorded on the DTX700. !6 [REC] button (page 48) Using this button, you can activate and deactivate recording of your performances. !7 [ ] (Click-track) button (page 41) The Click-track button is used to start and stop the DTX700's click-track (or metronome). !8 [-/DEC] button (page 18) This button is used to decrease the value at the cursor position. In addition, the selected value can be decreased in units of 10 by holding down the [SHIFT] button and pressing the [-/DEC] button or by holding down the [-/DEC] button and pressing the [+/INC] button. !9 [+/INC] button (page 18) This button is used to increase the value at the cursor position. In addition, the selected value can be increased in units of 10 by holding down the [SHIFT] button and pressing the [+/INC] button or by holding down the [+/INC] button and pressing the [-/DEC] button. @0 Sliders (page 41) The sliders are used to adjust the volumes of individual parts such as the snare and toms, and also the volume of the click-track. Side Panel qw q [USB TO HOST] port (page 52) This port is used to connect the DTX700 to a computer via a USB cable. w [USB TO DEVICE] port (page 21) This port is used to plug in a USB memory device (such as a flash drive), either directly or via a USB cable. DTX700 Owner's Manual 11
-
 1
1 -
2
-
3
-
4
-
5
-
 6
6 -
 7
7 -
 8
8 -
 9
9 -
 10
10 -
 11
11 -
 12
12 -
 13
13 -
 14
14 -
 15
15 -
 16
16 -
17
-
18
-
19
-
20
-
21
-
22
-
23
-
24
-
25
-
26
-
27
-
28
-
29
-
30
-
31
-
32
-
33
-
34
-
35
-
36
-
37
-
38
-
39
-
40
-
41
-
42
-
43
-
44
-
45
-
46
-
47
-
48
-
49
-
50
-
51
-
52
-
53
-
54
-
55
-
56
-
57
-
58
-
59
-
60
-
61
-
62
-
63
-
64
 |
 |
