Yamaha DTX700 Owner's Manual - Page 35
Adjusting the Snare Wire, Hit the snare pad i.e., the pad plugged into
 |
View all Yamaha DTX700 manuals
Add to My Manuals
Save this manual to your list of manuals |
Page 35 highlights
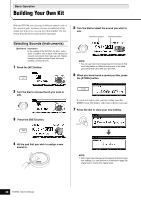
Building Your Own Kit Basic Operation Adjusting the Snare Wire With the DTX700, you can easily adjust the snare wire for the snare pad (i.e., the pad plugged into the [qSNARE] trigger input jack). In the case of pads featuring a pad controller, simply turn the controller to adjust the snare wire setting. 5 Hold down the [SHIFT] button and press the [F2] button. Pad controller Meanwhile, the following procedure can be used to adjust the setting for pads not featuring a pad controller. 1 Press the [KIT] button. 6 Turn the dial to adjust the snare wire. Higher values correspond to tighter snare wires and viceversa. An "off" setting implies that the snare wire has been fully removed from the snare. 2 Turn the dial to choose a kit. 7 Press the [STORE] button. 3 Press the [INST] button. 8 Press the dial to store your new setting. 4 Hit the snare pad (i.e., the pad plugged into the [qSNARE] trigger input jack). NOTE • The Snares function is displayed only for the pad connected via the [qSNARE] trigger input jack. DTX700 Owner's Manual 35
-
 1
1 -
2
-
3
-
4
-
5
-
6
-
7
-
8
-
9
-
10
-
11
-
12
-
13
-
14
-
15
-
16
-
17
-
18
-
19
-
20
-
21
-
22
-
23
-
24
-
25
-
26
-
27
-
28
-
29
-
 30
30 -
 31
31 -
 32
32 -
 33
33 -
 34
34 -
 35
35 -
 36
36 -
 37
37 -
 38
38 -
 39
39 -
 40
40 -
41
-
42
-
43
-
44
-
45
-
46
-
47
-
48
-
49
-
50
-
51
-
52
-
53
-
54
-
55
-
56
-
57
-
58
-
59
-
60
-
61
-
62
-
63
-
64
 |
 |
