Yamaha GW10 Owner's Manual - Page 25
The CHORUS LED will flash.
 |
View all Yamaha GW10 manuals
Add to My Manuals
Save this manual to your list of manuals |
Page 25 highlights
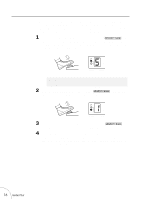
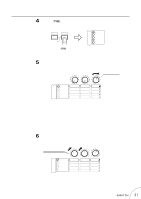
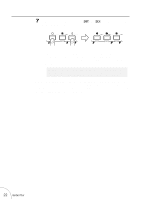
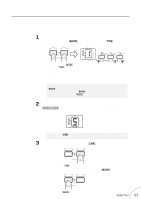
4 Press the T button repeatedly to select an effect type. For this exam- ple, select Chorus. (The CHORUS LED will flash.) BLOCK TYPE NO WRITE YES CHO CHORUS P . SHIFT WAH EQ AMP Press T repeatedly ... ... until the CHORUS LED flashes. You've now selected the Chorus effect for editing. 5 Before making any other settings, make sure that the right parameter dial is turned to at least the halfway position or higher. Set to roughly this position. CHO CHORUS P . SHIFT WAH EQ AMP SPEED PITCH L SENSE LOW TYPE FEEDBACK PITCH R FREQ MID TONE DEPTH MIX RANGE HIGH MIX While the CHORUS LED is flashing, this dial controls the Chorus Depth parameter. (The matrix on the panel clearly shows the effect/parameter/ parameter dial relationship; notice that DEPTH is in the same row as the flashing CHORUS LED, and in the same column as the right parameter dial.) This step is necessary since you may not be able to hear any changes made to the other two parameters if Chorus Depth is not set to a high enough value. 6 While playing your guitar, try adjusting the left and middle parameter dials. These control the Chorus Speed and Feedback, respectively. Adjust the left and middle parameter dials CHO CHORUS P . SHIFT WAH EQ AMP SPEED PITCH L SENSE LOW TYPE FEEDBACK PITCH R FREQ MID TONE DEPTH MIX RANGE HIGH MIX Adjust the right parameter dial as well, to "fine-tune" the sound. Guided Tour 21
-
 1
1 -
2
-
3
-
4
-
5
-
6
-
7
-
8
-
9
-
10
-
11
-
12
-
13
-
14
-
15
-
16
-
17
-
18
-
19
-
 20
20 -
 21
21 -
 22
22 -
 23
23 -
 24
24 -
 25
25 -
 26
26 -
 27
27 -
 28
28 -
 29
29 -
 30
30 -
31
-
32
-
33
-
34
-
35
-
36
-
37
-
38
-
39
-
40
-
41
-
42
-
43
-
44
-
45
-
46
-
47
-
48
-
49
-
50
-
51
-
52
-
53
-
54
-
55
-
56
-
57
 |
 |
