Yamaha GW10 Owner's Manual - Page 29
Changing The Effect Type
 |
View all Yamaha GW10 manuals
Add to My Manuals
Save this manual to your list of manuals |
Page 29 highlights
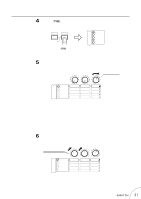
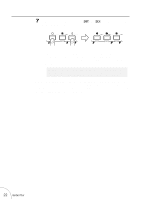
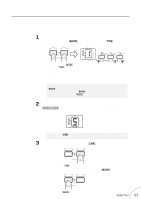
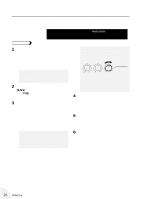
Using the Foot Controller to Turn Effect Blocks On and Off The Foot Controller can be used to instantly turn pre-assigned effect blocks on and off. The green ON OFF GROUP LEDs above the Effect Block buttons indicate which effect blocks are assigned for this. For example, if the green LEDs above H and L are lit, the Chorus and Delay blocks can be turned on or off with the Foot Controller. (For instructions on how to set the on/off group, see "Assigning Effect Block On/ Off Groups" below.) OPERATION Push the Foot Controller down to its maximum setting, then firmly press it once. The selected effect block or blocks (along with their LEDs) will appropriately turn on or off. Assigning Effect Block On/Off Groups OPERATION To set which effect blocks are to be turned on and off with the Foot Controller, press and hold the appropriate Effect Block button(s) (D, H, or L) corresponding to the effect block or blocks you wish to turn on or off. Hold the button or buttons for about one second, or until the green LEDs above the selected Effect Block buttons light. NOTE s At least one of these LEDs will always be lit in normal operation, meaning that at least one block will always be assigned for on/off control with the Foot Controller. However, you can disable this on/off switching entirely; see DISABLING THE EFFECT ON/OFF SWITCHING OF THE FOOT CONTROLLER, page 35. s CHANGING THE EFFECT TYPE OPERATION 1 Press B repeatedly until the desired block is selected. (One of the effect type LEDs in the block will flash.) 2 Press T repeatedly until the desired effect type is selected. (The selected effect type LED in the block will flash.) 3 Write (save) the new setting to memory, if desired. (See SAVING AN EFFECT PROGRAM on page 37 for details.) Reference 25
-
 1
1 -
2
-
3
-
4
-
5
-
6
-
7
-
8
-
9
-
10
-
11
-
12
-
13
-
14
-
15
-
16
-
17
-
18
-
19
-
20
-
21
-
22
-
23
-
 24
24 -
 25
25 -
 26
26 -
 27
27 -
 28
28 -
 29
29 -
 30
30 -
 31
31 -
 32
32 -
 33
33 -
 34
34 -
35
-
36
-
37
-
38
-
39
-
40
-
41
-
42
-
43
-
44
-
45
-
46
-
47
-
48
-
49
-
50
-
51
-
52
-
53
-
54
-
55
-
56
-
57
 |
 |
