Yamaha GW10 Owner's Manual - Page 39
Effect Block On/Off Control
 |
View all Yamaha GW10 manuals
Add to My Manuals
Save this manual to your list of manuals |
Page 39 highlights
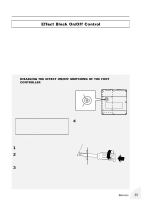
Effect Block On/Off Control The Foot Controller can also be used to instantly turn a selected effect block (or blocks) on and off. The green ON OFF GROUP LEDs above the Effect Block buttons indicate which block or blocks have been enabled for this function. To turn the selected effects on or off, push the Foot Controller down to its maximum setting, then firmly press it once. To select the effect blocks for on/off switching with the Foot Controller, press and hold down the appropriate Effect Block button(s) for about one second, until the green ON OFF GROUP LED above the button lights. Any or all effect blocks can be selected. s DISABLING THE EFFECT ON/OFF SWITCHING OF THE FOOT CONTROLLER The GW10 features a "hidden" switch for disabling effect block on/off control with the Foot Controller. Doing this also gives you increased range in the Foot Controller operation. Normally, the Foot Controller range stops not at the absolute maximum, but at the point where spring pressure starts. By disabling on/ off control, the Foot Controller range can be extended to cover up to the absolute maximum. Large screw Screw cap NOTE s Disabling the effect on/off control here also disables Tuner on/off control with the Foot Controller. However, an alternate method for turning on the Tuner function is available; see the Hint on page 41. s To disable both the mechanical spring and the effect block on/off control: 1 Turn the power off. 4 Using a Phillips screwdriver with a shaft long and thin enough to fit into the opening, carefully loosen the spring screw inside the GW10, turning it in a counterclockwise direction. Inside spring screw Loosen 2 Turn the GW10 upside down, and use a Phillips screwdriver to take out the large screw on the back plate. 3 With the screw out or sufficiently loosened, use a slotted screwdriver to pry out the plastic screw cap. Press Be careful to press down hard enough on the screw, making sure that the driver is securely in the slots of the head as you loosen it, in order to avoid stripping the head. Reference 35
-
 1
1 -
2
-
3
-
4
-
5
-
6
-
7
-
8
-
9
-
10
-
11
-
12
-
13
-
14
-
15
-
16
-
17
-
18
-
19
-
20
-
21
-
22
-
23
-
24
-
25
-
26
-
27
-
28
-
29
-
30
-
31
-
32
-
33
-
 34
34 -
 35
35 -
 36
36 -
 37
37 -
 38
38 -
 39
39 -
 40
40 -
 41
41 -
 42
42 -
 43
43 -
 44
44 -
45
-
46
-
47
-
48
-
49
-
50
-
51
-
52
-
53
-
54
-
55
-
56
-
57
 |
 |
