Yamaha GW10 Owner's Manual - Page 37
Foot Controller Operations
 |
View all Yamaha GW10 manuals
Add to My Manuals
Save this manual to your list of manuals |
Page 37 highlights
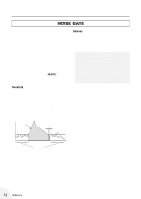
FOOT CONTROLLER OPERATIONS The Foot Controller of the GW10 can be used as a volume pedal or as a realtime controller for specific effect parameters. Moreover, when used as a volume pedal, it can be placed in one of three positions in the effect chain, and be given a minimum volume setting other than zero (for when you need to easily change between two different volume settings). The Foot Controller also features a switch (just beyond the maximum setting) for turning selected effect blocks on and off. Volume Pedal Control - Volume Position and Minimum Volume The Volume Position feature lets you specify the point in the effect chain at which the volume pedal control is placed. Minimum Volume can be set to a level somewhere between no sound at all and maximum volume, letting you use the Foot Controller to easily move between two volume settings. For example, if you set the Minimum Volume to a level somewhat less than maximum, you can instantly change from a solo level to a backing level by bringing the Foot Controller up to the minimum position. OPERATION 1 First, press B repeatedly until the Foot Controller block is selected. (One of the LEDs in the Foot Controller block will flash.) 2 To set the Volume Position for the Foot Controller, press T repeatedly until the desired position is selected. (The selected VOLUME POSITION LED will flash.) Three positions are available: q D - just before the Distortion block, w H - following the output of the Chorus block, and e L - following the output of the Delay block or at the end of the effect chain. DST q CHO DLY w e If q D is selected, the Distortion sound can be controlled with the Foot Controller. If w H is selected, the Foot Controller can be used to control the Distortion and Chorus sound, even to the point of taking out Distortion and Chorus at the minimum position but leaving the Delay sound. If e L is selected, the entire sound level is controlled with the Foot Controller. s When Wah is selected in the Chorus block and the OD/DST is active, the order of the effects changes as shown here: CHO w DST q DLY e 3 To set the Minimum Volume, lift up on the Foot Controller so that it is at the minimum position and play the connected instrument, adjusting the right parameter dial (corresponding to MIN VOL) until you reach the desired Minimum Volume. 4 Write (save) the new settings to memory, if desired. (See SAVING AN EFFECT PROGRAM on page 37 for details.) Reference 33
-
 1
1 -
2
-
3
-
4
-
5
-
6
-
7
-
8
-
9
-
10
-
11
-
12
-
13
-
14
-
15
-
16
-
17
-
18
-
19
-
20
-
21
-
22
-
23
-
24
-
25
-
26
-
27
-
28
-
29
-
30
-
31
-
 32
32 -
 33
33 -
 34
34 -
 35
35 -
 36
36 -
 37
37 -
 38
38 -
 39
39 -
 40
40 -
 41
41 -
 42
42 -
43
-
44
-
45
-
46
-
47
-
48
-
49
-
50
-
51
-
52
-
53
-
54
-
55
-
56
-
57
 |
 |