Yamaha PSR-A5000 PSR-A5000 Reference Manual_EN - Page 32
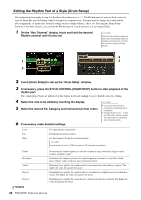
Editing the Rhythm Part of a Style Drum Setup, If necessary
 |
View all Yamaha PSR-A5000 manuals
Add to My Manuals
Save this manual to your list of manuals |
Page 32 highlights
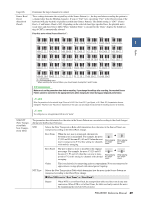
Editing the Rhythm Part of a Style (Drum Setup) The explanations here apply to step 5 of the Basic Procedure on page 21. The Rhythm parts of a preset Style consist of a preset Drum Kit, and each drum sound is assigned to a separate note. You may want to change the sound and the note assignments, or make more detailed settings such as volume balance, effect, etc. By using the Drum Setup function of the Style Creator, you can edit the Rhythm part of a Style and save it as an original Style. 1 On the "Rec Channel" display, touch and hold the desired Rhythm channel until it turns red. NOTE If different drum sounds are assigned to each section of the selected channel, the sounds are set to that of the current section in order to use the Drum Setup function. 4 1 5 2 2 Touch [Drum Setup] to call up the "Drum Setup" window. 3 If necessary, press the STYLE CONTROL [START/STOP] button to start playback of the rhythm part. The sounds played back are indicated on the display keyboard, making it easy to find the notes for editing. 4 Select the note to be edited by touching the display. 5 Select the desired Kit, Category and Instrument (in that order). 6 If necessary, make detailed settings. NOTE • You can also select the note by pressing the corresponding note on the keyboard. • The Upper Octave is set to "-1" when the "Drum Setup" window is opened. The original amount is loaded back when closing the window. Level Pan Pitch For adjusting the volume level. Determines the stereo position. For fine tuning of the pitch in cent increments. NOTE In musical terms a "cent" is 1/100th of a semitone. (100 cents equal one semitone.) Cutoff Resonance Attack Decay 1 Decay 2 NEXT PAGE Determines the cutoff frequency or effective frequency range of the filter. Higher values result in a brighter sound. Determines the emphasis given to the cutoff frequency (resonance), set in Filter Cutoff above. Higher values result in a more pronounced effect. Determines how quickly the sound reaches its maximum level after the key is played. The higher the value, the quicker the attack. Determines how quickly the sound reaches its sustain level (a slightly lower level than maximum). The higher the value, the quicker the decay. Determines how quickly the sound decays to silence after the key is released. The higher the value, the quicker the decay. 32 PSR-A5000 Reference Manual
-
 1
1 -
2
-
3
-
4
-
5
-
6
-
7
-
8
-
9
-
10
-
11
-
12
-
13
-
14
-
15
-
16
-
17
-
18
-
19
-
20
-
21
-
22
-
23
-
24
-
25
-
26
-
 27
27 -
 28
28 -
 29
29 -
 30
30 -
 31
31 -
 32
32 -
 33
33 -
 34
34 -
 35
35 -
 36
36 -
 37
37 -
38
-
39
-
40
-
41
-
42
-
43
-
44
-
45
-
46
-
47
-
48
-
49
-
50
-
51
-
52
-
53
-
54
-
55
-
56
-
57
-
58
-
59
-
60
-
61
-
62
-
63
-
64
-
65
-
66
-
67
-
68
-
69
-
70
-
71
-
72
-
73
-
74
-
75
-
76
-
77
-
78
-
79
-
80
-
81
-
82
-
83
-
84
-
85
-
86
-
87
-
88
-
89
-
90
-
91
-
92
-
93
-
94
-
95
-
96
-
97
-
98
-
99
-
100
-
101
-
102
-
103
-
104
-
105
-
106
-
107
-
108
-
109
-
110
-
111
-
112
-
113
-
114
-
115
-
116
-
117
-
118
-
119
-
120
-
121
-
122
-
123
-
124
-
125
-
126
-
127
-
128
-
129
-
130
-
131
-
132
-
133
 |
 |
