Yamaha PSR-E473 PSR-E473/PSR-EW425 Owners Manual - Page 33
Setting the Fingering Type, Setting the Smart Chord Key
 |
View all Yamaha PSR-E473 manuals
Add to My Manuals
Save this manual to your list of manuals |
Page 33 highlights
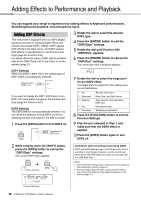
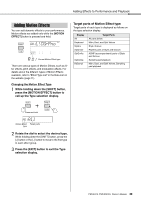
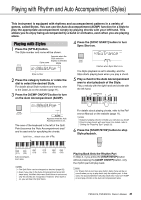
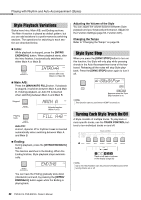
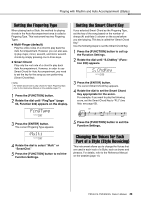
Playing with Rhythm and Auto Accompaniment (Styles) Setting the Fingering Type When playing back a Style, the method for playing chords in the Auto Accompaniment area is called a Fingering Type. This instrument has two Fingering Types. Multi-Finger (default) Play the entire notes of a chord to play back the Auto Accompaniment. However, you can also easily play major, minor, seventh, and minor seventh chords by simply pressing one to three keys. Smart Chord Play only the root note of a chord to play back Auto Accompaniment. However, in order to use Smart Chord for Auto Accompaniment, you need to set the key for the song you are performing (Smart Chord Key). NOTE For details about how to play chords for each Fingering Type, refer to the Reference Manual on the website (page 11). 1 Press the [FUNCTION] button. 2 Rotate the dial until "FingType" (page 63, Function 032) appears on the display. FingType 032 3 Press the [ENTER] button. The current Fingering Type appears. 1Multi 032 4 Rotate the dial to select "Multi" or "SmartChd." 5 Press the [FUNCTION] button to exit the Function Settings. Setting the Smart Chord Key If you selected Smart Chord as the Fingering Type, set the key of the song based on the number of sharps (#) and flats (b) shown on the score before you start playing. This key is called the "Smart Chord Key." Use the following steps to set the Smart Chord Key. 1 Press the [FUNCTION] button to call up the Function Settings. 2 Rotate the dial until "S.ChdKey" (Function 033) appears. S.ChdKey 033 3 Press the [ENTER] button. The current Smart Chord Key appears. 4 Rotate the dial to set the Smart Chord Key appropriate for the score. For example, if you want to play the following score, set the Smart Chord Key to "FL2" (two flats; see page 63). 5 Press the [FUNCTION] button to exit the Function Settings. Changing the Voices for Each Part of a Style (Style Revoicing) This instrument allows you to change the Voices that are used in each track of a Style, such as drums and phrases. For details, refer to the Reference Manual on the website (page 11). PSR-E473, PSR-EW425 Owner's Manual 33
-
 1
1 -
2
-
3
-
4
-
5
-
6
-
7
-
8
-
9
-
10
-
11
-
12
-
13
-
14
-
15
-
16
-
17
-
18
-
19
-
20
-
21
-
22
-
23
-
24
-
25
-
26
-
27
-
 28
28 -
 29
29 -
 30
30 -
 31
31 -
 32
32 -
 33
33 -
 34
34 -
 35
35 -
 36
36 -
 37
37 -
 38
38 -
39
-
40
-
41
-
42
-
43
-
44
-
45
-
46
-
47
-
48
-
49
-
50
-
51
-
52
-
53
-
54
-
55
-
56
-
57
-
58
-
59
-
60
-
61
-
62
-
63
-
64
-
65
-
66
-
67
-
68
-
69
-
70
-
71
-
72
-
73
-
74
-
75
-
76
 |
 |
