Yamaha PSR-EW410 PSR-E463 PSR-EW410 Owners Manual - Page 13

Rear Panel, GROOVE CREATOR/SONG/STYLE Control

Page 13 highlights

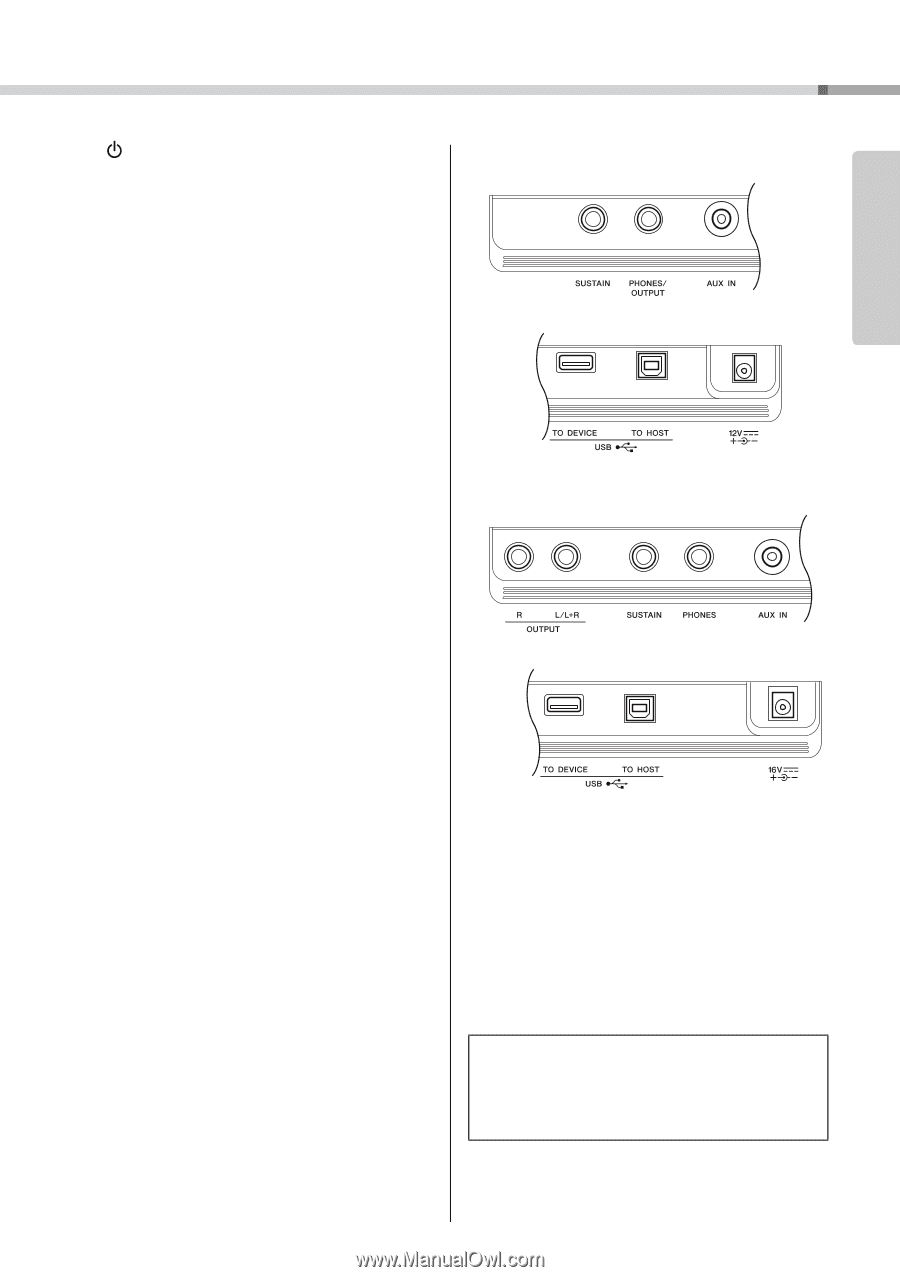
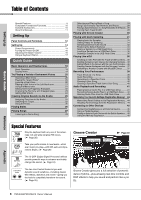
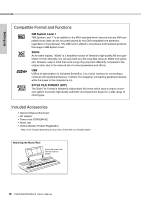
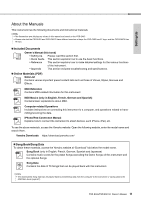
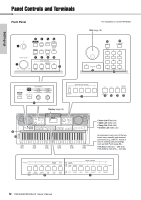
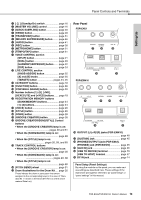
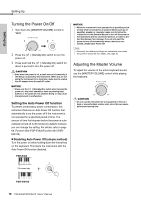
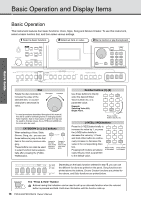
Setting Up Panel Controls and Terminals q [ ] (Standby/On) switch page 16 w [MASTER VOLUME] control page 16 e [QUICK SAMPLING] button page 20 r [DEMO] button page 28 t [TRANSPOSE] button page 51 y [MELODY SUPPRESSOR] button......... page 46 u [AUDIO] button page 41 i [REC] button page 38 o [METRONOME] button page 21 !0 [TEMPO/TAP] button page 61 !1 VOICE CONTROL section [SPLIT] button page 21 [DUAL] button page 20 [HARMONY/ARPEGGIO] button ....... page 22 [DSP] button page 24 !2 LIVE CONTROL section [KNOB ASSIGN] button page 25 [A] and [B] knobs page 25 [TARGET] button pages 24, 25 !3 CATEGORY buttons page 18 !4 [FUNCTION] button page 66 !5 [PORTABLE GRAND] button page 20 !6 Number buttons [1]-[9], [-/NO], [0/EXECUTE] and [+/YES] buttons ...... page 18 !7 REGISTRATION MEMORY buttons [BANK/MEMORY] buttons page 44 [1]-[4] buttons page 44 !8 [VOICE] button page 20 !9 [STYLE] button page 26 @0 [SONG] button page 28 @1 [GROOVE CREATOR] button page 30 @2 GROOVE CREATOR/SONG/STYLE Control buttons • When the [GROOVE CREATOR] lamp is on: pages 30 and 61 • When the [SONG/AUDIO] lamp is on: page 28 • When the [STYLE] lamp is on: pages 26, 59, and 60 @3 TRACK CONTROL buttons • When the [GROOVE CREATOR] lamp is on: page 30 • When the [SONG/AUDIO] lamp is on: pages 29, 38 • When the [STYLE] lamp is on: page 60 @4 [PITCH BEND] wheel page 51 @5 Drum illustrations for the Drum Kit ..... page 20 These indicate the drum or percussion instrument assigned to the corresponding keys (in the case of "Standard Kit 1," shown in the Drum/SFX Kit List of the online material Data List). Rear Panel PSR-E463 @7 @8 @9 #0 #1 PSR-EW410 @6 @7 @8 @9 #0 #1 @6 OUTPUT [L/L+R]/[R] jacks (PSR-EW410) page 48 @7 [SUSTAIN] jack page 45 @8 [PHONES/OUTPUT] jack (PSR-E463), [PHONES] jack (PSR-EW410 page 45 @9 [AUX IN] jack page 46 #0 [USB TO DEVICE] terminal page 70 [USB TO HOST] terminal page 47 #1 DC IN jack page 14 Panel Setup (Panel Settings) By using the controls on the panel, you can make various settings as described here. These settings of the instrument are together referred to as "panel setup" or "panel settings" in this manual. PSR-E463/PSR-EW410 Owner's Manual 13

  • 1
  • 2
  • 3
  • 4
  • 5
  • 6
  • 7
  • 8
  • 9
  • 10
  • 11
  • 12
  • 13
  • 14
  • 15
  • 16
  • 17
  • 18
  • 19
  • 20
  • 21
  • 22
  • 23
  • 24
  • 25
  • 26
  • 27
  • 28
  • 29
  • 30
  • 31
  • 32
  • 33
  • 34
  • 35
  • 36
  • 37
  • 38
  • 39
  • 40
  • 41
  • 42
  • 43
  • 44
  • 45
  • 46
  • 47
  • 48
  • 49
  • 50
  • 51
  • 52
  • 53
  • 54
  • 55
  • 56
  • 57
  • 58
  • 59
  • 60
  • 61
  • 62
  • 63
  • 64
  • 65
  • 66
  • 67
  • 68
  • 69
  • 70
  • 71
  • 72
  • 73
  • 74
  • 75
  • 76
  • 77
  • 78
  • 79
  • 80
  • 81
  • 82
  • 83
  • 84
  • 85
  • 86
  • 87
  • 88

Panel Controls and Terminals
PSR-E463/PSR-E
W
410
O
w
ner’s Man
u
al
13
Settin
g
Up
q
[
] (Standby/On) switch
....................
page 16
w
[MASTER VOLUME] control
.................
page 16
e
[QUICK SAMPLING] button
..................
page 20
r
[DEMO] button
.......................................
page 28
t
[TRANSPOSE] button
...........................
page 51
y
[MELODY SUPPRESSOR] button
.........
page 46
u
[AUDIO] button
......................................
page 41
i
[REC] button
..........................................
page 38
o
[METRONOME] button
..........................
page 21
!
0
[TEMPO/TAP] button
.............................
page 61
!
1
VOICE CONTROL section
[SPLIT] button
....................................
page 21
[DUAL] button
....................................
page 20
[HARMONY/ARPEGGIO] button
.......
page 22
[DSP] button
.......................................
page 24
!
2
LIVE CONTROL section
[KNOB ASSIGN] button
.....................
page 25
[A] and [B] knobs
..............................
page 25
[TARGET] button
.......................
pages 24, 25
!
3
CATEGORY buttons
..............................
page 18
!
4
[FUNCTION] button
...............................
page 66
!
5
[PORTABLE GRAND] button
................
page 20
!
6
Number buttons [1]–[9], [-/NO],
[0/EXECUTE] and [+/YES] buttons
......
page 18
!
7
REGISTRATION MEMORY buttons
[BANK/MEMORY] buttons
.................
page 44
[1]–[4] buttons
....................................
page 44
!
8
[VOICE] button
......................................
page 20
!
9
[STYLE] button
......................................
page 26
@
0
[SONG] button
.......................................
page 28
@
1
[GROOVE CREATOR] button
................
page 30
@
2
GROOVE CREATOR/SONG/STYLE Control
buttons
• When the [GROOVE CREATOR] lamp is on:
..................................
pages 30 and 61
• When the [SONG/AUDIO] lamp is on:
................................................
page 28
• When the [STYLE] lamp is on:
...........................
pages 26, 59, and 60
@
3
TRACK CONTROL buttons
• When the [GROOVE CREATOR] lamp is on:
................................................
page 30
• When the [SONG/AUDIO] lamp is on:
........................................
pages 29, 38
• When the [STYLE] lamp is on:
................................................
page 60
@
4
[PITCH BEND] wheel
............................
page 51
@
5
Drum illustrations for the Drum Kit
.....
page 20
These indicate the dr
u
m or perc
u
ssion instr
u
ment
assigned to the corresponding keys (in the case of “Stan-
dard Kit 1,” sho
w
n in the Dr
u
m/SFX Kit List of the online
material Data List).
Rear Panel
@
6
OUTPUT [L/L+R]/[R] jacks (PSR-EW410)
................................................
page 48
@
7
[SUSTAIN] jack
......................................
page 45
@
8
[PHONES/OUTPUT] jack (PSR-E463),
[PHONES] jack (PSR-EW410)
..............
page 45
@
9
[AUX IN] jack
.........................................
page 46
#
0
[USB TO DEVICE] terminal
..................
page 70
[USB TO HOST] terminal
......................
page 47
#
1
DC IN jack
...............................................
page 14
Panel Setup (Panel Settin
g
s)
By
u
sing the controls on the panel, yo
u
can make
v
ari-
o
u
s settings as descri
b
ed here. These settings of the
instr
u
ment are together referred to as “panel set
u
p” or
“panel settings” in this man
u
al.
@
7
@
8
@
9
#
0
#
1
@
7
@6
@
8
@
9
#
0
#
1
PSR-EW410
PSR-E463