Yamaha PSR-EW410 PSR-E463 PSR-EW410 Owners Manual - Page 37
Creating Greater Excitement with the Retrigger Function
 |
View all Yamaha PSR-EW410 manuals
Add to My Manuals
Save this manual to your list of manuals |
Page 37 highlights
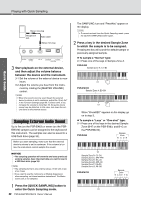
Quick Guide Playing Like a DJ! 5 Now try rotating knob A back and forth slowly with the rhythm. Notice that you can get a completely different sound and feel, even with the same rhythmic phrase. 6 As in the steps above, press the [KNOB ASSIGN] button and try using the second and third items. REVERB/CHORUS controls the acoustic ambience, or produces a rich and warm layered effect. DSP controls one of 10 different effects, such as rotary speaker and distortion. For details, refer to page 57. NOTE • When switching the [LIVE CONTROL] row, make sure to set the target to BACKING. The target is conveniently saved for each function. • When using c, press the [DSP] button to turn on the DSP function. The DSP icon appears on the display. 3 While checking the Beat marks " " and Measure number in the display, press and hold the section [C] button at the point just before the Measure count reaches 005. 4 While holding down the section [C] button, rotate knob B according to the following illustration. The beats become more rapid according to the knob position. • Only selecting a function combination will not affect the sound even if the knob arrow is not at the center position. The selected function only works when the knob is moved. Creating Greater Excitement with the Retrigger Function Press the section [C] button to switch to Section C and listen to the rhythm. The beats become increasingly more rapid after the Measure 005, and this effect creates intensity and excitement. You can raise the emotional level of your own performance with a similar "rapid-fire" effect with the Retrigger function and Live Control Knobs. 1 While checking the display, press the [KNOB ASSIGN] button several times to select b. SECT C 008 2 Rotate knob B about 90° to the left. 5 Release the section [C] button at the dynamic peak to return to normal playback of the Groove . Switching to Another Groove with Musical Climax 1 While checking the Beat marks " " on the display, press the [MUSICAL CLI- MAX] button at an appropriate timing, just before when the Measure changes from 008 back to 001. The Groove starts building to a climax with an 8-measure lead-in (negative count). M.Climax −08 2 Just as the lead-in approaches 0, use the number buttons to enter a different Groove number. The timing may be a little difficult, but with practice you can seamlessly switch to another Groove after the Musical Climax-just like a pro DJ! NOTE • By memorizing the next Groove to a Registration Memory setting, you can easily switch Grooves with just a single button press (page 44). PSR-E463/PSR-EW410 Owner's Manual 37
-
 1
1 -
2
-
3
-
4
-
5
-
6
-
7
-
8
-
9
-
10
-
11
-
12
-
13
-
14
-
15
-
16
-
17
-
18
-
19
-
20
-
21
-
22
-
23
-
24
-
25
-
26
-
27
-
28
-
29
-
30
-
31
-
 32
32 -
 33
33 -
 34
34 -
 35
35 -
 36
36 -
 37
37 -
 38
38 -
 39
39 -
 40
40 -
 41
41 -
 42
42 -
43
-
44
-
45
-
46
-
47
-
48
-
49
-
50
-
51
-
52
-
53
-
54
-
55
-
56
-
57
-
58
-
59
-
60
-
61
-
62
-
63
-
64
-
65
-
66
-
67
-
68
-
69
-
70
-
71
-
72
-
73
-
74
-
75
-
76
-
77
-
78
-
79
-
80
-
81
-
82
-
83
-
84
-
85
-
86
-
87
-
88
 |
 |
