Yamaha PSR-EW410 PSR-E463 PSR-EW410 Owners Manual - Page 31
Playing with Quick Sampling, Playing back the Samples, Getting Ready for Sampling
 |
View all Yamaha PSR-EW410 manuals
Add to My Manuals
Save this manual to your list of manuals |
Page 31 highlights
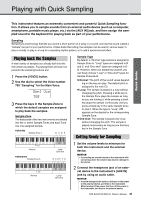
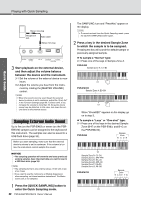
Playing with Quick Sampling Quick Guide This instrument features an extremely convenient and powerful Quick Sampling function. It allows you to sample sounds from an external audio device (such as a computer, smartphone, portable music player, etc.) via the [AUX IN] jack, and then assign the sampled sound to the keyboard for playing back as part of your performance. Sampling Sampling is a technology that lets you record a short portion of a song or a sound, and use the sound (called a "sample") as part of your performance. Unlike Audio Recording, the samples can be used in various ways: to play a melody, to play in a loop for a repeating rhythm pattern, or to add a special sound effect. Playing back the Samples A wide variety of samples are already built into this instrument as presets. Try playing them and see how powerful the sampling features are! 1 Press the [VOICE] button. 2 Use the dial to select the Voice number 759 "Sampling" for the Main Voice. Smpl Vce 759 3 Press the keys in the Sample Zone to which the default samples are assigned to play back the samples. Sample Zone The keyboards of the two instruments are divided into five or seven Sample Zones and each Zone has one assigned sample. PSR-E463 Sample Zone A B CDE Sample Type By default, a "Normal" type sample is assigned to Sample Zone A, "Loop" types are assigned to B and C, and "One-shot" types are assigned to D- G. However, when you sample by yourself, you can freely choose "Loop" or "One-shot" types for Sample Zones B-G. Normal: The pitch of the sound varies depend- ing on the key you play. The default pitch is assigned to the note C3. Loop: The sample is played in a loop without changing the pitch. Pressing a white key in the Sample Zone plays the sample as long as you are holding it, while pressing a black key plays the sample continuously until you press a black key in the same Sample Zone to stop it. When the type is "Loop," appears on the display for the corresponding Sample Zone. One-shot: The sample is played only once without changing the pitch. The sample is played continuously as long as you hold any key in the Sample Zone. Getting Ready for Sampling C3 Normal PSR-EW410 Sample Zone A C3 Normal Loop/ One-shot B C DE FG Loop/ One-shot 1 Set the volume levels to minimum for both this instrument and the external device. NOTICE • Connecting an external device to the instrument without turning down the volume may result in damage to the device. 2 Connect the headphone jack of an external device to the instrument's [AUX IN] jack by using an audio cable. NOTICE • To avoid damage to the devices, first turn on the power to the external device, and then to the instrument. When turning off the power, first turn off the power to the instrument, and then to the external device. PSR-E463/PSR-EW410 Owner's Manual 31
-
 1
1 -
2
-
3
-
4
-
5
-
6
-
7
-
8
-
9
-
10
-
11
-
12
-
13
-
14
-
15
-
16
-
17
-
18
-
19
-
20
-
21
-
22
-
23
-
24
-
25
-
 26
26 -
 27
27 -
 28
28 -
 29
29 -
 30
30 -
 31
31 -
 32
32 -
 33
33 -
 34
34 -
 35
35 -
 36
36 -
37
-
38
-
39
-
40
-
41
-
42
-
43
-
44
-
45
-
46
-
47
-
48
-
49
-
50
-
51
-
52
-
53
-
54
-
55
-
56
-
57
-
58
-
59
-
60
-
61
-
62
-
63
-
64
-
65
-
66
-
67
-
68
-
69
-
70
-
71
-
72
-
73
-
74
-
75
-
76
-
77
-
78
-
79
-
80
-
81
-
82
-
83
-
84
-
85
-
86
-
87
-
88
 |
 |
