Yamaha PSR-EW410 PSR-E463 PSR-EW410 Owners Manual - Page 33
Sampling, the end of the sound or phrase you want
 |
View all Yamaha PSR-EW410 manuals
Add to My Manuals
Save this manual to your list of manuals |
Page 33 highlights
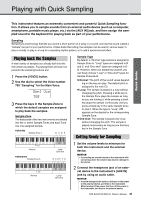
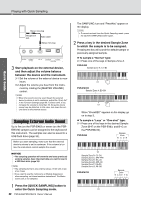
Playing with Quick Sampling Quick Guide 2-2 When "Loop?Y/N" appears on the display, press the [+/YES] button to select "Loop" sampling, or press [-/NO] to select "Oneshot" sampling. You cannot change the type after sampling. When "PressREC" appears on the display, go on to step 3. 3 Pause playback on the external device at the beginning of the sound or phrase you want to sample. 4 Press the [REC] button, and then start playback on the external device to start sampling. While sampling the sound, "REC" appears and glowing icon of selected the Sample Zone on the display. Sampling pEC Do not disconnect the USB flash drive during the sampling operation. The operation may become unstable, and sampling may not be performed properly. 5 Stop playback on the external device at the end of the sound or phrase you want to sample. 6 Press the [REC] button to stop sampling. "Writing!" appears briefly on the display, and then the sample is stored to the instrument. NOTE • If the input volume from the external device is too low, "LowInput" appears on the display and cannot sample the sound. Raise the external device's volume to maximum, and then adjust the output volume on this instrument by rotating the [MASTER VOLUME] control. After that, try sampling again from step 3. • Sampling time is limited to a maximum of 9.6 seconds. When the time limit is reached, sampling stops automatically and the recorded sample (up to that point) is stored to the instrument. 7 Check if the sample is assigned successfully. For "Normal" types, press the C3 key. For "Loop" and "One-shot" types, press any one key in the Sample Zone to which you assigned the sample. Any silence at the beginning and end of the sam- ple can be automatically cut by the Blank Cut function (page 69). If you are not satisfied with the sample, return to step 2 and try sampling again. To sample and assign to another Sample Zone, go on to step 2 again. 8 Press the [QUICK SAMPLING] button to exit from the Quick Sampling mode. 9 Try playing the samples. Exiting from the Quick Sampling mode automatically selects the Voice number 759 "Smpl Vce" for the Main Voice. Try playing it on the keyboard. NOTICE To avoid damage to the external device, disconnect the device in this way: 1 Set the volume levels to minimum for both this instrument and the external device. 2 Disconnect the audio cable from the instrument, and then from the external device. To sample during audio playback Once you are familiar with the sampling operation, try starting and stopping sampling while the sound of the external device is playing back. 1. Execute steps 1-2 in "Sampling the External Audio Sound" on page 32. 2. Pause playback on the external device at a few measures before the sound or phrase you want to sample. 3. Start playback on the external device. 4. Press the [REC] button at the desired point to start sampling. 5. Press the [REC] button again at the desired point to stop sampling. 6. Stop playback on the external device, and then check what you have just sampled. NOTE • If there is silence in the audio that is cut automatically but you want to keep it, turn off the Blank Cut function (page 69). PSR-E463/PSR-EW410 Owner's Manual 33
-
 1
1 -
2
-
3
-
4
-
5
-
6
-
7
-
8
-
9
-
10
-
11
-
12
-
13
-
14
-
15
-
16
-
17
-
18
-
19
-
20
-
21
-
22
-
23
-
24
-
25
-
26
-
27
-
 28
28 -
 29
29 -
 30
30 -
 31
31 -
 32
32 -
 33
33 -
 34
34 -
 35
35 -
 36
36 -
 37
37 -
 38
38 -
39
-
40
-
41
-
42
-
43
-
44
-
45
-
46
-
47
-
48
-
49
-
50
-
51
-
52
-
53
-
54
-
55
-
56
-
57
-
58
-
59
-
60
-
61
-
62
-
63
-
64
-
65
-
66
-
67
-
68
-
69
-
70
-
71
-
72
-
73
-
74
-
75
-
76
-
77
-
78
-
79
-
80
-
81
-
82
-
83
-
84
-
85
-
86
-
87
-
88
 |
 |
