Yamaha PSR-EW410 PSR-E463 PSR-EW410 Owners Manual - Page 30
Playing with Groove Creator
 |
View all Yamaha PSR-EW410 manuals
Add to My Manuals
Save this manual to your list of manuals |
Page 30 highlights
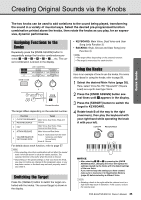
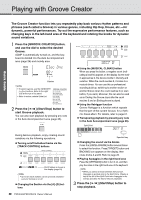
Playing with Groove Creator Quick Guide The Groove Creator function lets you repeatedly play back various rhythm patterns and phrases (each called a Groove) in various genres, including Hip Hop, House, etc.-for dynamic, powerful performances. Try out the expressive performance features, such as changing keys in the left-hand area of the keyboard and rotating the knobs for dynamic sound variations. 1 Press the [GROOVE CREATOR] button, and use the dial to select the desired Groove. ACMP is automatically turned on, and the keyboard is divided into the Auto Accompaniment area (page 26) and melody area. Elec Dnc 001 Flashes NOTE • To select a genre, use the CATEGORY [] buttons. Refer to the right side at the top of the panel. • Refer to online material Data List. 2 Press the [ ] (Start/Stop) button to start Groove playback. You can also start playback by pressing any note in the Auto Accompaniment area (page 26). SECT B Using the [MUSICAL CLIMAX] button When you press the button, a negative count (indicating a lead-in) appears on the display. As the leadin approaches 0, the Groove builds in intensity and variation. When the count reaches 0, it comes to a musical climax. You can use this as professional sounding build-up, switching to another section or another Groove when the count reaches 0 (or even before, if you want). Moreover, this can also be used as an Ending; the Groove stops after the count reaches 0 and an Ending phrase is played. Using the Retrigger function Groove Retrigger is a function which repeats the first part of the current Groove, for a rhythmic break effect. For details, refer to page 61. Transposing playback by pressing any note in the Auto Accompaniment area (page 26). Split Point SECT B During Groove playback, enjoy creating sound variations via the following operations. Turning on/off individual tracks via the [TRACK CONTROL] buttons On/off status is shown in the display (page 19) NOTE • Up to two track buttons can be pressed simultaneously for turning on or off. Changing the Section via the [A]-[D] buttons 30 PSR-E463/PSR-EW410 Owner's Manual Specified key Changing the sound via the Knobs Press the [KNOB ASSIGN] button several times to select the function. Press [TARGET] button and BACKING icon appears on the display, then rotate knobs A and B. Refer to page 25. Playing Arpeggios in the right-hand area Press the [ARPEGGIO] button to turn it on, and then play the notes in the right-hand area of the keyboard. NOTE • When you select a Voice between 292 and 301, Arpeggio is applied only to the Split Voice. Playing a key to the left of the Split Point turns Arpeggio on as well as specifies the key for Groove playback. 3 Press the [ ] (Start/Stop) button to stop playback.
-
 1
1 -
2
-
3
-
4
-
5
-
6
-
7
-
8
-
9
-
10
-
11
-
12
-
13
-
14
-
15
-
16
-
17
-
18
-
19
-
20
-
21
-
22
-
23
-
24
-
 25
25 -
 26
26 -
 27
27 -
 28
28 -
 29
29 -
 30
30 -
 31
31 -
 32
32 -
 33
33 -
 34
34 -
 35
35 -
36
-
37
-
38
-
39
-
40
-
41
-
42
-
43
-
44
-
45
-
46
-
47
-
48
-
49
-
50
-
51
-
52
-
53
-
54
-
55
-
56
-
57
-
58
-
59
-
60
-
61
-
62
-
63
-
64
-
65
-
66
-
67
-
68
-
69
-
70
-
71
-
72
-
73
-
74
-
75
-
76
-
77
-
78
-
79
-
80
-
81
-
82
-
83
-
84
-
85
-
86
-
87
-
88
 |
 |
