Yamaha PSR-EW410 PSR-E463 PSR-EW410 Owners Manual - Page 36
Playing Like a DJ!, Creating an Intro Part with the Track On/Off Controls
 |
View all Yamaha PSR-EW410 manuals
Add to My Manuals
Save this manual to your list of manuals |
Page 36 highlights
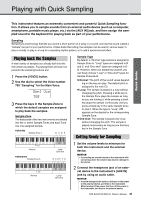
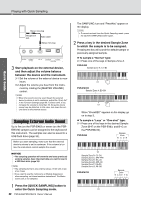
Playing Like a DJ! Quick Guide The dynamic Groove Creator function and Live Control Knobs give you powerful tools to sound just like a pro DJ! Since the Grooves and section variations change seamlessly without breaks in the rhythm, performing is truly easy. Still, a sense of rhythm is important. So, turn up the volume, feel the rhythm in your body, and work the buttons and knobs-as if you were in front of the dance floor! In this example using Groove number 001 (Elec Dnc.), you'll learn how to take one Groove and transform it in a variety of ways. Creating an Intro Part Building Excitement and Interest Adding Effects Creating Greater Excitement Switching to Another Groove Creating an Intro Part with the Track On/Off Controls 1 Press the [GROOVE CREATOR] button, and select Groove 001 with the dial or number buttons. 2 Use the [TRACK CONTROL] buttons to turn on tracks [1], [2] and [3], and turn off tracks [4], [5] and [6], so that only the rhythm plays back. Elec Dnc 001 001 3 Press the section [A] button to play back Section A (shown as "SECT A" in the display). 4 Press the [ back. ] button to start play- 5 While checking the Beat marks " " and Measure number as they change on the display, wait until the fourth beat of Measure 008 (just before Measure 001 starts again), and then press the track [6] button to turn on track [6]. SECT A 008 Building Excitement and Interest by Changing Sections 1 While checking the Beat marks " " as they change on the display, press the section [B] button at a musically appro- priate time to switch to Section B. Even if your timing is slightly off, the section will naturally change in time with the rhythm. 2 With the same timing as in step 1, press the section [C] or [D] button to build up the Groove. Adding Effects to the Groove with the Live Control Knobs 1 While checking the display, press the [KNOB ASSIGN] button several times (as needed) to select z. 2 While checking the display, press the [TARGET] button once or twice to select BACKING. SECT C 3 Rotate knob A fully to the right, and then rotate knob B fully to the left. 6 With the same timing as in step 5, simultaneously press the track [4] and [5] buttons to turn on tracks [4] and [5]. NOTE • Only up to two tracks can be turned on and off at the same time, so press only two buttons. 36 PSR-E463/PSR-EW410 Owner's Manual 4 Rotate knob A slowly to the right to change the muffled sound to a clear, bright sound. Move it slowly in time with the rhythm.
-
 1
1 -
2
-
3
-
4
-
5
-
6
-
7
-
8
-
9
-
10
-
11
-
12
-
13
-
14
-
15
-
16
-
17
-
18
-
19
-
20
-
21
-
22
-
23
-
24
-
25
-
26
-
27
-
28
-
29
-
30
-
 31
31 -
 32
32 -
 33
33 -
 34
34 -
 35
35 -
 36
36 -
 37
37 -
 38
38 -
 39
39 -
 40
40 -
 41
41 -
42
-
43
-
44
-
45
-
46
-
47
-
48
-
49
-
50
-
51
-
52
-
53
-
54
-
55
-
56
-
57
-
58
-
59
-
60
-
61
-
62
-
63
-
64
-
65
-
66
-
67
-
68
-
69
-
70
-
71
-
72
-
73
-
74
-
75
-
76
-
77
-
78
-
79
-
80
-
81
-
82
-
83
-
84
-
85
-
86
-
87
-
88
 |
 |
