Yamaha PSR-SX900 PSR-SX900/PSR-SX700 Reference Manual - Page 111
Controller Function Settings, Assigning Specific Functions to the Pedals and Panel Buttons (
 |
View all Yamaha PSR-SX900 manuals
Add to My Manuals
Save this manual to your list of manuals |
Page 111 highlights
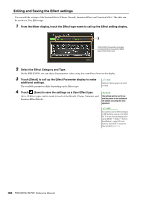
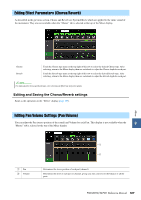
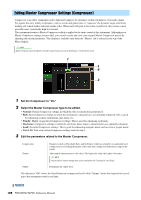
10 Controller Function Settings Contents Assigning Specific Functions to the Pedals and Panel Buttons (Assignable 111 • Assignable Functions (Assignable display 112 Editing the Assign Types of the Live Control Knobs (Live Control 117 • Assignable Functions (Live Control display 118 Assigning Specific Functions to the Pedals and Panel Buttons (Assignable) You can assign various functions to foot pedals connected to the FOOT PEDAL jacks, as well as the ASSIGNABLE buttons and the [ROTARY SP/ASSIGNABLE] button. The operation display can be called up via [MENU] [Assignable]. 1 Controller Function Settings 3 1 Touch to select the desired pedal or button. NOTE Touching it again calls up the function list. 2 Select the function for the pedal or button. As described in the Owner's Manual, shortcuts can also be assigned to the ASSIGNABLE buttons. For information about each function, refer to pages 112-116. NOTE 3 You can also assign other functions to Make necessary settings of the selected function shown at the the pedal-Voice Guide Controller 10 bottom of the display. (page 131), Punch In/Out of Song You can make detailed settings of the selected function, such as which parts are (page 71) and Registration Sequence (page 87). If you assign multiple func- affected by the function, etc. If you want to change the function name that appears tions to the pedal, the priority is: Voice on the pop-up window, touch [Rename] and enter the desired name. Up to 50 char- Guide Controller Punch In/Out of acters can be used. Song Registration Sequence Functions assigned here 4 If necessary, set the polarity of the pedal by touching (Menu). Depending on the pedal you've connected to the instrument, it may work in the opposite way (i.e., pressing it has no effect, but releasing it does). If such a case occurs, use this setting to reverse the polarity. Hiding the pop-up window when the ASSIGNABLE buttons are pressed When you press one of the ASSIGNABLE buttons, the pop-up window displaying the assigned function status is shown. You can also set the pop-up window to be hidden. To do so, touch (Menu) on the Assignable display, and then set the "Popup Window" to Off. PSR-SX900/SX700 Reference Manual 111
-
 1
1 -
2
-
3
-
4
-
5
-
6
-
7
-
8
-
9
-
10
-
11
-
12
-
13
-
14
-
15
-
16
-
17
-
18
-
19
-
20
-
21
-
22
-
23
-
24
-
25
-
26
-
27
-
28
-
29
-
30
-
31
-
32
-
33
-
34
-
35
-
36
-
37
-
38
-
39
-
40
-
41
-
42
-
43
-
44
-
45
-
46
-
47
-
48
-
49
-
50
-
51
-
52
-
53
-
54
-
55
-
56
-
57
-
58
-
59
-
60
-
61
-
62
-
63
-
64
-
65
-
66
-
67
-
68
-
69
-
70
-
71
-
72
-
73
-
74
-
75
-
76
-
77
-
78
-
79
-
80
-
81
-
82
-
83
-
84
-
85
-
86
-
87
-
88
-
89
-
90
-
91
-
92
-
93
-
94
-
95
-
96
-
97
-
98
-
99
-
100
-
101
-
102
-
103
-
104
-
105
-
 106
106 -
 107
107 -
 108
108 -
 109
109 -
 110
110 -
 111
111 -
 112
112 -
 113
113 -
 114
114 -
 115
115 -
 116
116 -
117
-
118
-
119
-
120
-
121
-
122
-
123
-
124
-
125
-
126
-
127
-
128
-
129
-
130
-
131
-
132
-
133
-
134
-
135
-
136
-
137
-
138
-
139
 |
 |
