Yamaha PSR-SX900 PSR-SX900/PSR-SX700 Reference Manual - Page 15
Saving and Calling up Your Custom Chord Sequences (Chord Looper) (PSR-SX900)
 |
View all Yamaha PSR-SX900 manuals
Add to My Manuals
Save this manual to your list of manuals |
Page 15 highlights
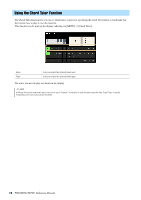
Styles Saving and Calling up Your Custom Chord Sequences (Chord Looper) (PSR-SX900) On the Chord Looper display, you can memorize the recorded chord sequence of the Chord Looper function to one of the eight memories for easy recall. You can save all eight memorized data slots as a single Chord Looper Bank (*.clb) file or export a single memory as a Chord Looper Data (*.cld) file. Operation display is called up via: [MENU] [Chord Looper]. Data Structure on the Chord Looper display 1 Chord Looper Bank (*.clb) file [Save] Load Chord Looper Bank 1 2 3 4 5 6 7 8 Memorize [Memory] Load (Touch memory number to select) Current Chord Looper data (not displayed) Recording [Rec/Stop] Loop Playback [On/Off] [Export] [Import] [Clear] Chord Looper Data (*.cld) file This section covers how to memorize, save/recall, and export/import the recorded data. Memorizing the Recorded Chord Looper Data 3 2 Same as the CHORD LOOPER [REC/STOP] and [ON/OFF] buttons. 1 Record the desired chord sequence. For details on recording the chord sequence, see page 14 or refer to the Owner's Manual. 2 Touch [Memory] on the Chord Looper display. A guidance message appears on the display. 3 Touch the desired number to memorize. The data is memorized, and the content of the memorized data is shown on the corresponding area. NOTICE If you turn the power off at this point, the Memory will be cleared. To save the memorized data as a file, see pages 16 and 17. PSR-SX900/SX700 Reference Manual 15
-
 1
1 -
2
-
3
-
4
-
5
-
6
-
7
-
8
-
9
-
 10
10 -
 11
11 -
 12
12 -
 13
13 -
 14
14 -
 15
15 -
 16
16 -
 17
17 -
 18
18 -
 19
19 -
 20
20 -
21
-
22
-
23
-
24
-
25
-
26
-
27
-
28
-
29
-
30
-
31
-
32
-
33
-
34
-
35
-
36
-
37
-
38
-
39
-
40
-
41
-
42
-
43
-
44
-
45
-
46
-
47
-
48
-
49
-
50
-
51
-
52
-
53
-
54
-
55
-
56
-
57
-
58
-
59
-
60
-
61
-
62
-
63
-
64
-
65
-
66
-
67
-
68
-
69
-
70
-
71
-
72
-
73
-
74
-
75
-
76
-
77
-
78
-
79
-
80
-
81
-
82
-
83
-
84
-
85
-
86
-
87
-
88
-
89
-
90
-
91
-
92
-
93
-
94
-
95
-
96
-
97
-
98
-
99
-
100
-
101
-
102
-
103
-
104
-
105
-
106
-
107
-
108
-
109
-
110
-
111
-
112
-
113
-
114
-
115
-
116
-
117
-
118
-
119
-
120
-
121
-
122
-
123
-
124
-
125
-
126
-
127
-
128
-
129
-
130
-
131
-
132
-
133
-
134
-
135
-
136
-
137
-
138
-
139
 |
 |
