ZyXEL MES3500-24F User Guide - Page 173
Table 51, Label, Description
 |
View all ZyXEL MES3500-24F manuals
Add to My Manuals
Save this manual to your list of manuals |
Page 173 highlights
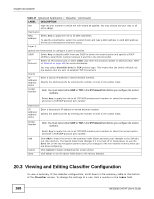
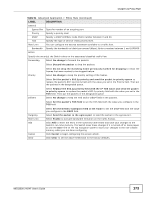
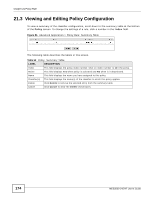
Chapter 21 Policy Rule Table 51 Advanced Application > Policy Rule (continued) LABEL General Egress Port Priority DSCP TOS Rate Limit Bandwidth Action DESCRIPTION Type the number of an outgoing port. Specify a priority level. Specify a DSCP (DiffServ Code Point) number between 0 and 63. Specify the type of service (TOS) priority level. You can configure the desired bandwidth available to a traffic flow. Specify the bandwidth in kilobit per second (Kbps). Enter a number between 1 and 1000000. Specify the action(s) the Switch takes on the associated classified traffic flow. Forwarding Select No change to forward the packets. Select Discard the packet to drop the packets. Priority Select Do not drop the matching frame previously marked for dropping to retain the frames that were marked to be dropped before. Select No change to keep the priority setting of the frames. Select Set the packet's 802.1p priority and send the packet to priority queue to replace the packet's 802.1p priority field with the value you set in the Priority field. Then put the packets in the designated queue. Diffserv Select Replace the 802.1p priority field with the IP TOS value and send the packet to priority queue to replace the packet's 802.1p priority field with the value you set in the TOS field. Then put the packets in the designated queue. Select No change to keep the TOS and/or DSCP fields in the packets. Select Set the packet's TOS field to set the TOS field with the value you configure in the TOS field. Outgoing Rate Limit Add Cancel Clear Select Set the Diffserv Codepoint field in the frame to set the DSCP field with the value you configure in the DSCP field. Select Send the packet to the egress port to send the packet to the egress port. Select Enable to activate bandwidth limitation on the traffic flow(s). Click Add to insert the entry in the summary table below and save your changes to the Switch's run-time memory. The Switch loses these changes if it is turned off or loses power, so use the Save link on the top navigation panel to save your changes to the non-volatile memory when you are done configuring. Click Cancel to begin configuring this screen afresh. Click Clear to set the above fields back to the factory defaults. MES3500-24/24F User's Guide 173
-
 1
1 -
2
-
3
-
4
-
5
-
6
-
7
-
8
-
9
-
10
-
11
-
12
-
13
-
14
-
15
-
16
-
17
-
18
-
19
-
20
-
21
-
22
-
23
-
24
-
25
-
26
-
27
-
28
-
29
-
30
-
31
-
32
-
33
-
34
-
35
-
36
-
37
-
38
-
39
-
40
-
41
-
42
-
43
-
44
-
45
-
46
-
47
-
48
-
49
-
50
-
51
-
52
-
53
-
54
-
55
-
56
-
57
-
58
-
59
-
60
-
61
-
62
-
63
-
64
-
65
-
66
-
67
-
68
-
69
-
70
-
71
-
72
-
73
-
74
-
75
-
76
-
77
-
78
-
79
-
80
-
81
-
82
-
83
-
84
-
85
-
86
-
87
-
88
-
89
-
90
-
91
-
92
-
93
-
94
-
95
-
96
-
97
-
98
-
99
-
100
-
101
-
102
-
103
-
104
-
105
-
106
-
107
-
108
-
109
-
110
-
111
-
112
-
113
-
114
-
115
-
116
-
117
-
118
-
119
-
120
-
121
-
122
-
123
-
124
-
125
-
126
-
127
-
128
-
129
-
130
-
131
-
132
-
133
-
134
-
135
-
136
-
137
-
138
-
139
-
140
-
141
-
142
-
143
-
144
-
145
-
146
-
147
-
148
-
149
-
150
-
151
-
152
-
153
-
154
-
155
-
156
-
157
-
158
-
159
-
160
-
161
-
162
-
163
-
164
-
165
-
166
-
167
-
 168
168 -
 169
169 -
 170
170 -
 171
171 -
 172
172 -
 173
173 -
 174
174 -
 175
175 -
 176
176 -
 177
177 -
 178
178 -
179
-
180
-
181
-
182
-
183
-
184
-
185
-
186
-
187
-
188
-
189
-
190
-
191
-
192
-
193
-
194
-
195
-
196
-
197
-
198
-
199
-
200
-
201
-
202
-
203
-
204
-
205
-
206
-
207
-
208
-
209
-
210
-
211
-
212
-
213
-
214
-
215
-
216
-
217
-
218
-
219
-
220
-
221
-
222
-
223
-
224
-
225
-
226
-
227
-
228
-
229
-
230
-
231
-
232
-
233
-
234
-
235
-
236
-
237
-
238
-
239
-
240
-
241
-
242
-
243
-
244
-
245
-
246
-
247
-
248
-
249
-
250
-
251
-
252
-
253
-
254
-
255
-
256
-
257
-
258
-
259
-
260
-
261
-
262
-
263
-
264
-
265
-
266
-
267
-
268
-
269
-
270
-
271
-
272
-
273
-
274
-
275
-
276
-
277
-
278
-
279
-
280
-
281
-
282
-
283
-
284
-
285
-
286
-
287
-
288
-
289
-
290
-
291
-
292
-
293
-
294
-
295
-
296
-
297
-
298
-
299
-
300
-
301
-
302
-
303
-
304
-
305
-
306
-
307
-
308
-
309
-
310
-
311
-
312
-
313
-
314
-
315
-
316
-
317
-
318
-
319
-
320
-
321
-
322
-
323
-
324
-
325
-
326
-
327
-
328
-
329
-
330
-
331
-
332
-
333
-
334
-
335
-
336
-
337
-
338
-
339
-
340
-
341
-
342
-
343
-
344
-
345
-
346
-
347
-
348
-
349
 |
 |
