ZyXEL MES3500-24F User Guide - Page 230
ARP Inspection Port Con
 |
View all ZyXEL MES3500-24F manuals
Add to My Manuals
Save this manual to your list of manuals |
Page 230 highlights
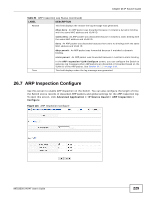
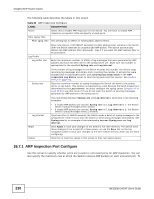
Chapter 26 IP Source Guard The following table describes the labels in this screen. Table 84 ARP Inspection Configure LABEL Active Filter Aging Time Filter aging time DESCRIPTION Select this to enable ARP inspection on the Switch. You still have to enable ARP inspection on specific VLAN and specify trusted ports. This setting has no effect on existing MAC address filters. Log Profile Log buffer size Enter how long (1-2147483647 seconds) the MAC address filter remains in the Switch after the Switch identifies an unauthorized ARP packet. The Switch automatically deletes the MAC address filter afterwards. Type 0 if you want the MAC address filter to be permanent. Enter the maximum number (1-1024) of log messages that were generated by ARP packets and have not been sent to the syslog server yet. Make sure this number is appropriate for the specified Syslog rate and Log interval. Syslog rate If the number of log messages in the Switch exceeds this number, the Switch stops recording log messages and simply starts counting the number of entries that were dropped due to unavailable buffer. Click Clearing log status table in the ARP Inspection Log Status screen to clear the log and reset this counter. See Section 26.6.2 on page 228. Type the maximum number of syslog messages the Switch can send to the syslog server in one batch. This number is expressed as a rate because the batch frequency is determined by the Log Interval. You must configure the syslog server (Chapter 40 on page 313) to use this. Enter 0 if you do not want the Switch to send log messages generated by ARP packets to the syslog server. The relationship between Syslog rate and Log interval is illustrated in the following examples: Log interval Apply Cancel • 4 invalid ARP packets per second, Syslog rate is 5, Log interval is 1: the Switch sends 4 syslog messages every second. • 6 invalid ARP packets per second, Syslog rate is 5, Log interval is 2: the Switch sends 5 syslog messages every 2 seconds. Type how often (1-86400 seconds) the Switch sends a batch of syslog messages to the syslog server. Enter 0 if you want the Switch to send syslog messages immediately. See Syslog rate for an example of the relationship between Syslog rate and Log interval. Click Apply to save your changes to the Switch's run-time memory. The Switch loses these changes if it is turned off or loses power, so use the Save link on the top navigation panel to save your changes to the non-volatile memory when you are done configuring. Click this to reset the values in this screen to their last-saved values. 26.7.1 ARP Inspection Port Configure Use this screen to specify whether ports are trusted or untrusted ports for ARP inspection. You can also specify the maximum rate at which the Switch receives ARP packets on each untrusted port. To 230 MES3500-24/24F User's Guide
-
 1
1 -
2
-
3
-
4
-
5
-
6
-
7
-
8
-
9
-
10
-
11
-
12
-
13
-
14
-
15
-
16
-
17
-
18
-
19
-
20
-
21
-
22
-
23
-
24
-
25
-
26
-
27
-
28
-
29
-
30
-
31
-
32
-
33
-
34
-
35
-
36
-
37
-
38
-
39
-
40
-
41
-
42
-
43
-
44
-
45
-
46
-
47
-
48
-
49
-
50
-
51
-
52
-
53
-
54
-
55
-
56
-
57
-
58
-
59
-
60
-
61
-
62
-
63
-
64
-
65
-
66
-
67
-
68
-
69
-
70
-
71
-
72
-
73
-
74
-
75
-
76
-
77
-
78
-
79
-
80
-
81
-
82
-
83
-
84
-
85
-
86
-
87
-
88
-
89
-
90
-
91
-
92
-
93
-
94
-
95
-
96
-
97
-
98
-
99
-
100
-
101
-
102
-
103
-
104
-
105
-
106
-
107
-
108
-
109
-
110
-
111
-
112
-
113
-
114
-
115
-
116
-
117
-
118
-
119
-
120
-
121
-
122
-
123
-
124
-
125
-
126
-
127
-
128
-
129
-
130
-
131
-
132
-
133
-
134
-
135
-
136
-
137
-
138
-
139
-
140
-
141
-
142
-
143
-
144
-
145
-
146
-
147
-
148
-
149
-
150
-
151
-
152
-
153
-
154
-
155
-
156
-
157
-
158
-
159
-
160
-
161
-
162
-
163
-
164
-
165
-
166
-
167
-
168
-
169
-
170
-
171
-
172
-
173
-
174
-
175
-
176
-
177
-
178
-
179
-
180
-
181
-
182
-
183
-
184
-
185
-
186
-
187
-
188
-
189
-
190
-
191
-
192
-
193
-
194
-
195
-
196
-
197
-
198
-
199
-
200
-
201
-
202
-
203
-
204
-
205
-
206
-
207
-
208
-
209
-
210
-
211
-
212
-
213
-
214
-
215
-
216
-
217
-
218
-
219
-
220
-
221
-
222
-
223
-
224
-
 225
225 -
 226
226 -
 227
227 -
 228
228 -
 229
229 -
 230
230 -
 231
231 -
 232
232 -
 233
233 -
 234
234 -
 235
235 -
236
-
237
-
238
-
239
-
240
-
241
-
242
-
243
-
244
-
245
-
246
-
247
-
248
-
249
-
250
-
251
-
252
-
253
-
254
-
255
-
256
-
257
-
258
-
259
-
260
-
261
-
262
-
263
-
264
-
265
-
266
-
267
-
268
-
269
-
270
-
271
-
272
-
273
-
274
-
275
-
276
-
277
-
278
-
279
-
280
-
281
-
282
-
283
-
284
-
285
-
286
-
287
-
288
-
289
-
290
-
291
-
292
-
293
-
294
-
295
-
296
-
297
-
298
-
299
-
300
-
301
-
302
-
303
-
304
-
305
-
306
-
307
-
308
-
309
-
310
-
311
-
312
-
313
-
314
-
315
-
316
-
317
-
318
-
319
-
320
-
321
-
322
-
323
-
324
-
325
-
326
-
327
-
328
-
329
-
330
-
331
-
332
-
333
-
334
-
335
-
336
-
337
-
338
-
339
-
340
-
341
-
342
-
343
-
344
-
345
-
346
-
347
-
348
-
349
 |
 |