ZyXEL NWA1121-NI User Guide - Page 86
Security: WPA-PSK, WPA2-PSK, WPA2-PSK-MIX, Security Mode
 |
View all ZyXEL NWA1121-NI manuals
Add to My Manuals
Save this manual to your list of manuals |
Page 86 highlights
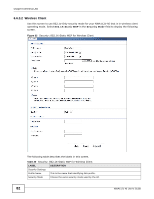
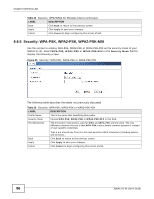
Chapter 6 Wireless LAN Table 22 Security: WPA/WPA2 for Wireless Client (continued) LABEL DESCRIPTION Back Click Back to return to the previous screen. Apply Click Apply to save your changes. Cancel Click Cancel to begin configuring this screen afresh. 6.6.5 Security: WPA-PSK, WPA2-PSK, WPA2-PSK-MIX Use this screen to employ WPA-PSK, WPA2-PSK or WPA2-PSK-MIX as the security mode of your NWA1121-NI. Select WPA-PSK, WPA2-PSK or WPA2-PSK-MIX in the Security Mode field to display the following screen. Figure 35 Security: WPA-PSK, WPA2-PSK or WPA2-PSK-MIX The following table describes the labels not previously discussed Table 23 Security: WPA-PSK, WPA2-PSK or WPA2-PSK-MIX LABEL Profile Name Security Mode Pre-Shared Key DESCRIPTION This is the name that identifying this profile. Choose WPA-PSK, WPA2-PSK or WPA2-PSK-MIX in this field. The encryption mechanisms used for WPA and WPA-PSK are the same. The only difference between the two is that WPA-PSK uses a simple common password, instead of user-specific credentials. Back Apply Cancel Type a pre-shared key from 8 to 63 case-sensitive ASCII characters (including spaces and symbols). Click Back to return to the previous screen. Click Apply to save your changes. Click Cancel to begin configuring this screen afresh. 86 NWA1121-NI User's Guide
-
 1
1 -
2
-
3
-
4
-
5
-
6
-
7
-
8
-
9
-
10
-
11
-
12
-
13
-
14
-
15
-
16
-
17
-
18
-
19
-
20
-
21
-
22
-
23
-
24
-
25
-
26
-
27
-
28
-
29
-
30
-
31
-
32
-
33
-
34
-
35
-
36
-
37
-
38
-
39
-
40
-
41
-
42
-
43
-
44
-
45
-
46
-
47
-
48
-
49
-
50
-
51
-
52
-
53
-
54
-
55
-
56
-
57
-
58
-
59
-
60
-
61
-
62
-
63
-
64
-
65
-
66
-
67
-
68
-
69
-
70
-
71
-
72
-
73
-
74
-
75
-
76
-
77
-
78
-
79
-
80
-
 81
81 -
 82
82 -
 83
83 -
 84
84 -
 85
85 -
 86
86 -
 87
87 -
 88
88 -
 89
89 -
 90
90 -
 91
91 -
92
-
93
-
94
-
95
-
96
-
97
-
98
-
99
-
100
-
101
-
102
-
103
-
104
-
105
-
106
-
107
-
108
-
109
-
110
-
111
-
112
-
113
-
114
-
115
-
116
-
117
-
118
-
119
-
120
-
121
-
122
-
123
-
124
-
125
-
126
-
127
-
128
-
129
-
130
-
131
-
132
-
133
-
134
-
135
-
136
-
137
-
138
-
139
-
140
-
141
-
142
-
143
-
144
-
145
-
146
-
147
-
148
-
149
-
150
-
151
-
152
-
153
-
154
-
155
-
156
-
157
-
158
-
159
-
160
-
161
-
162
-
163
-
164
-
165
-
166
-
167
-
168
-
169
-
170
-
171
-
172
-
173
-
174
-
175
-
176
-
177
-
178
-
179
-
180
-
181
-
182
-
183
-
184
-
185
-
186
-
187
-
188
-
189
-
190
-
191
-
192
-
193
-
194
-
195
-
196
-
197
-
198
-
199
-
200
-
201
-
202
-
203
-
204
-
205
-
206
 |
 |
