ZyXEL P-304 User Guide - Page 23
WAN 10M Port, LAN 10/100M Ports, UPLINK Button, Connecting the Prestige to a Cable Modem
 |
View all ZyXEL P-304 manuals
Add to My Manuals
Save this manual to your list of manuals |
Page 23 highlights
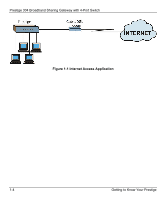
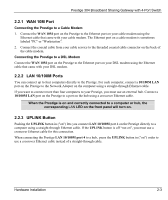
Prestige 304 Broadband Sharing Gateway with 4-Port Switch 2.2.1 WAN 10M Port Connecting the Prestige to a Cable Modem 1. Connect the WAN 10M port on the Prestige to the Ethernet port on your cable modem using the Ethernet cable that came with your cable modem. The Ethernet port on a cable modem is sometimes labeled "PC" or "Workstation". 2. Connect the coaxial cable from your cable service to the threaded coaxial cable connector on the back of the cable modem. Connecting the Prestige to a DSL Modem Connect the WAN 10M port on the Prestige to the Ethernet port on your DSL modem using the Ethernet cable that came with your DSL modem. 2.2.2 LAN 10/100M Ports You can connect up to four computers directly to the Prestige. For each computer, connect a 10/100M LAN port on the Prestige to the Network Adapter on the computer using a straight-through Ethernet cable. If you want to connect more than four computers to your Prestige, you must use an external hub. Connect a 10/100M LAN port on the Prestige to a port on the hub using a crossover Ethernet cable. When the Prestige is on and correctly connected to a computer or hub, the corresponding LAN LED on the front panel will turn on. 2.2.3 UPLINK Button Pushing the UPLINK button in ("on") lets you connect LAN 10/100M port 4 on the Prestige directly to a computer using a straight-through Ethernet cable. If the UPLINK button is off "not on", you must use a crossover Ethernet cable for this connection. When connecting the Prestige LAN 10/100M port 4 to a hub, press the UPLINK button in ("on") order to use a crossover Ethernet cable instead of a straight-through cable. Hardware Installation 2-3
-
 1
1 -
2
-
3
-
4
-
5
-
6
-
7
-
8
-
9
-
10
-
11
-
12
-
13
-
14
-
15
-
16
-
17
-
 18
18 -
 19
19 -
 20
20 -
 21
21 -
 22
22 -
 23
23 -
 24
24 -
 25
25 -
 26
26 -
 27
27 -
 28
28 -
29
-
30
-
31
-
32
-
33
-
34
-
35
-
36
-
37
-
38
-
39
-
40
-
41
-
42
-
43
-
44
-
45
-
46
-
47
-
48
-
49
-
50
-
51
-
52
-
53
-
54
-
55
-
56
-
57
-
58
-
59
-
60
-
61
-
62
-
63
-
64
-
65
-
66
-
67
-
68
-
69
-
70
-
71
-
72
-
73
-
74
-
75
-
76
-
77
-
78
-
79
-
80
-
81
-
82
-
83
 |
 |
