ZyXEL P-304 User Guide - Page 29
Introducing the Web Configurator, Accessing the Prestige Web Configurator, Navigating the Prestige
 |
View all ZyXEL P-304 manuals
Add to My Manuals
Save this manual to your list of manuals |
Page 29 highlights
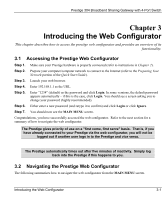
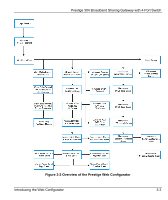
Prestige 304 Broadband Sharing Gateway with 4-Port Switch Chapter 3 Introducing the Web Configurator This chapter describes how to access the prestige web configurator and provides an overview of its functionality. 3.1 Accessing the Prestige Web Configurator Step 1. Make sure your Prestige hardware is properly connected (refer to instructions in Chapter 2). Step 2. Prepare your computer/computer network to connect to the Internet (refer to the Preparing Your Network portion of the Quick Start Guide). Step 3. Launch your web browser. Step 4. Enter 192.168.1.1 as the URL. Step 5. Enter "1234" (default) as the password and click Login. In some versions, the default password appears automatically - if this is the case, click Login. You should see a screen asking you to change your password (highly recommended). Step 6. Either enter a new password (and retype it to confirm) and click Login or click Ignore. Step 7. You should now see the MAIN MENU screen. Congratulations, you have successfully accessed the web configurator. Refer to the next section for a summary of how to navigate the web configurator. The Prestige gives priority of use on a "first come, first serve" basis. That is, if you have already connected to your Prestige via the web configurator, you will not be logged out if another user logs in to the Prestige and vice versa. The Prestige automatically times out after five minutes of inactivity. Simply log back into the Prestige if this happens to you. 3.2 Navigating the Prestige Web Configurator The following summarizes how to navigate the web configurator from the MAIN MENU screen. Introducing the Web Configurator 3-1
-
 1
1 -
2
-
3
-
4
-
5
-
6
-
7
-
8
-
9
-
10
-
11
-
12
-
13
-
14
-
15
-
16
-
17
-
18
-
19
-
20
-
21
-
22
-
23
-
 24
24 -
 25
25 -
 26
26 -
 27
27 -
 28
28 -
 29
29 -
 30
30 -
 31
31 -
 32
32 -
 33
33 -
 34
34 -
35
-
36
-
37
-
38
-
39
-
40
-
41
-
42
-
43
-
44
-
45
-
46
-
47
-
48
-
49
-
50
-
51
-
52
-
53
-
54
-
55
-
56
-
57
-
58
-
59
-
60
-
61
-
62
-
63
-
64
-
65
-
66
-
67
-
68
-
69
-
70
-
71
-
72
-
73
-
74
-
75
-
76
-
77
-
78
-
79
-
80
-
81
-
82
-
83
 |
 |
