1994 Chevrolet Astro Owner's Manual - Page 237
1994 Chevrolet Astro Manual
Page 237 highlights
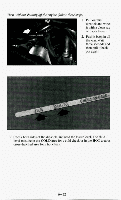
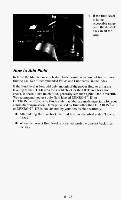
8. Grasp the bottom of the instrument panel extension andinstall the top into the groove first. Then, push the bottom of the extension into place. 9. Install the two nuts and two screws on the extension. Air Cleaner To Remove the Air Cleaner Filter: If you have the 4.3L engine (VIN Code Z) with the round air cleaner, you must first remove the engine cover before changingthe filter. (See "Engine Cover" earlier in this section.) After removing the engine cover, unscrew the wing nuts to take the coveroff the air cleaner. After changing the filter, put the cover back on and be sure the wing nuts properly tightened. Be sure are air cleaner lid is correctly positioned to seal out dust and contaminants that are harmful to your engine. 6-19
-
 1
1 -
2
-
3
-
4
-
5
-
6
-
7
-
8
-
9
-
10
-
11
-
12
-
13
-
14
-
15
-
16
-
17
-
18
-
19
-
20
-
21
-
22
-
23
-
24
-
25
-
26
-
27
-
28
-
29
-
30
-
31
-
32
-
33
-
34
-
35
-
36
-
37
-
38
-
39
-
40
-
41
-
42
-
43
-
44
-
45
-
46
-
47
-
48
-
49
-
50
-
51
-
52
-
53
-
54
-
55
-
56
-
57
-
58
-
59
-
60
-
61
-
62
-
63
-
64
-
65
-
66
-
67
-
68
-
69
-
70
-
71
-
72
-
73
-
74
-
75
-
76
-
77
-
78
-
79
-
80
-
81
-
82
-
83
-
84
-
85
-
86
-
87
-
88
-
89
-
90
-
91
-
92
-
93
-
94
-
95
-
96
-
97
-
98
-
99
-
100
-
101
-
102
-
103
-
104
-
105
-
106
-
107
-
108
-
109
-
110
-
111
-
112
-
113
-
114
-
115
-
116
-
117
-
118
-
119
-
120
-
121
-
122
-
123
-
124
-
125
-
126
-
127
-
128
-
129
-
130
-
131
-
132
-
133
-
134
-
135
-
136
-
137
-
138
-
139
-
140
-
141
-
142
-
143
-
144
-
145
-
146
-
147
-
148
-
149
-
150
-
151
-
152
-
153
-
154
-
155
-
156
-
157
-
158
-
159
-
160
-
161
-
162
-
163
-
164
-
165
-
166
-
167
-
168
-
169
-
170
-
171
-
172
-
173
-
174
-
175
-
176
-
177
-
178
-
179
-
180
-
181
-
182
-
183
-
184
-
185
-
186
-
187
-
188
-
189
-
190
-
191
-
192
-
193
-
194
-
195
-
196
-
197
-
198
-
199
-
200
-
201
-
202
-
203
-
204
-
205
-
206
-
207
-
208
-
209
-
210
-
211
-
212
-
213
-
214
-
215
-
216
-
217
-
218
-
219
-
220
-
221
-
222
-
223
-
224
-
225
-
226
-
227
-
228
-
229
-
230
-
231
-
 232
232 -
 233
233 -
 234
234 -
 235
235 -
 236
236 -
 237
237 -
 238
238 -
 239
239 -
 240
240 -
 241
241 -
 242
242 -
243
-
244
-
245
-
246
-
247
-
248
-
249
-
250
-
251
-
252
-
253
-
254
-
255
-
256
-
257
-
258
-
259
-
260
-
261
-
262
-
263
-
264
-
265
-
266
-
267
-
268
-
269
-
270
-
271
-
272
-
273
-
274
-
275
-
276
-
277
-
278
-
279
-
280
-
281
-
282
-
283
-
284
-
285
-
286
-
287
-
288
-
289
-
290
-
291
-
292
-
293
-
294
-
295
-
296
-
297
-
298
-
299
-
300
-
301
-
302
-
303
-
304
-
305
-
306
-
307
-
308
-
309
-
310
-
311
-
312
-
313
-
314
-
315
-
316
-
317
-
318
-
319
-
320
-
321
-
322
-
323
-
324
-
325
-
326
-
327
-
328
-
329
-
330
-
331
-
332
-
333
-
334
-
335
-
336
-
337
-
338
-
339
-
340
 |
 |

8.
Grasp the
bottom
of
the
instrument
panel
extension
and
install
the
top
9.
Install the
two
nuts
and two screws
on
the
extension.
into
the
groove first. Then, push
the
bottom
of
the
extension
into
place.
Air
Cleaner
To
Remove
the
Air
Cleaner
Filter:
If
you
have
the
4.3L
engine
(VIN
Code
Z)
with
the
round air cleaner,
you
must first remove
the
engine
cover
before
changing
the
filter.
(See
“Engine
Cover” earlier
in
this section.) After
removing
the
engine
cover,
unscrew
the
wing
nuts to take
the
cover
off
the
air
cleaner.
After
changing
the
filter,
put
the
cover
back
on
and
be
sure
the
wing
nuts
are properly tightened. Be
sure
air cleaner
lid
is
correctly positioned
to
seal
out
dust
and
contaminants
that
are harmful
to
your
engine.
6-19