2011 Mercedes CLS-Class Owner's Manual - Page 183
2011 Mercedes CLS-Class Manual
Page 183 highlights
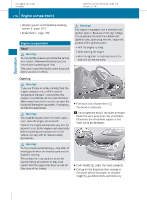
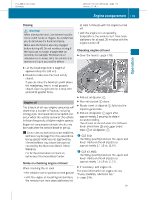
219_AKB; 4; 54, en-US d2ureepe, 2009-05-11T16:21:02+02:00 - Seite 181 Version: 2.11.8.1 Engine compartment G Warning! RUse 181 The coolant level is correct if the level Rfor In order to avoid any potentially serious burns: extreme caution when opening the hood if there are any signs of steam or coolant leaking from the cooling system, or if the coolant temperature indicator indicates that the coolant is overheated. not remove the cap on the coolant expansion tank if the coolant temperature is above 158‡ (70†). Allow the engine to cool down before removing the cap. The coolant expansion tank contains hot fluid and is under pressure. a rag, slowly open the cap approximately 1/2 turn counterclockwise to relieve excess pressure. If opened immediately, scalding hot fluid and steam will be blown out under pressure. not spill antifreeze on hot engine parts. Antifreeze contains ethylene glycol which may burn if it comes into contact with hot engine parts. cold coolant: reaches marking bar = in coolant expansion tank ; (1.5 cm) higher Rfor warm coolant: is approximately 0.6 in X RDo RUsing Washer system and headlamp cleaning system G Warning! Washer solvent/antifreeze is highly flammable. Do not spill washer solvent/ antifreeze on hot engine parts, because it may ignite and burn. You could be seriously burned. RDo ! Always use washer solvent/antifreeze where temperatures may fall below freezing point. Failure to do so could result in damage to the washer system/fluid reservoir. ! Only use washer fluid which is suitable for plastic lenses. Improper washer fluid can damage the plastic lenses of the headlamps. ! Do not use distilled or deionized water in the washer fluid reservoir. Otherwise, the washer fluid level sensor could be damaged. Fluid for the washer system and the headlamp cleaning system is supplied from the washer fluid reservoir. During all seasons, use MB Windshield Washer Concentrate "MB SummerFit". Mix it with water or premixed washer solvent/ antifreeze depending on the ambient temperature (Y page 302). Z X Using a rag, slowly open cap : approximately 1/2 turn counterclockwise to relieve excess pressure. X Continue turning cap : counterclockwise and remove it. Operation Add coolant as required. X Screw cap : back on and tighten it. For more information on coolant, see the "Technical data" section (Y page 297) and (Y page 300).
-
 1
1 -
2
-
3
-
4
-
5
-
6
-
7
-
8
-
9
-
10
-
11
-
12
-
13
-
14
-
15
-
16
-
17
-
18
-
19
-
20
-
21
-
22
-
23
-
24
-
25
-
26
-
27
-
28
-
29
-
30
-
31
-
32
-
33
-
34
-
35
-
36
-
37
-
38
-
39
-
40
-
41
-
42
-
43
-
44
-
45
-
46
-
47
-
48
-
49
-
50
-
51
-
52
-
53
-
54
-
55
-
56
-
57
-
58
-
59
-
60
-
61
-
62
-
63
-
64
-
65
-
66
-
67
-
68
-
69
-
70
-
71
-
72
-
73
-
74
-
75
-
76
-
77
-
78
-
79
-
80
-
81
-
82
-
83
-
84
-
85
-
86
-
87
-
88
-
89
-
90
-
91
-
92
-
93
-
94
-
95
-
96
-
97
-
98
-
99
-
100
-
101
-
102
-
103
-
104
-
105
-
106
-
107
-
108
-
109
-
110
-
111
-
112
-
113
-
114
-
115
-
116
-
117
-
118
-
119
-
120
-
121
-
122
-
123
-
124
-
125
-
126
-
127
-
128
-
129
-
130
-
131
-
132
-
133
-
134
-
135
-
136
-
137
-
138
-
139
-
140
-
141
-
142
-
143
-
144
-
145
-
146
-
147
-
148
-
149
-
150
-
151
-
152
-
153
-
154
-
155
-
156
-
157
-
158
-
159
-
160
-
161
-
162
-
163
-
164
-
165
-
166
-
167
-
168
-
169
-
170
-
171
-
172
-
173
-
174
-
175
-
176
-
177
-
 178
178 -
 179
179 -
 180
180 -
 181
181 -
 182
182 -
 183
183 -
 184
184 -
 185
185 -
 186
186 -
 187
187 -
 188
188 -
189
-
190
-
191
-
192
-
193
-
194
-
195
-
196
-
197
-
198
-
199
-
200
-
201
-
202
-
203
-
204
-
205
-
206
-
207
-
208
-
209
-
210
-
211
-
212
-
213
-
214
-
215
-
216
-
217
-
218
-
219
-
220
-
221
-
222
-
223
-
224
-
225
-
226
-
227
-
228
-
229
-
230
-
231
-
232
-
233
-
234
-
235
-
236
-
237
-
238
-
239
-
240
-
241
-
242
-
243
-
244
-
245
-
246
-
247
-
248
-
249
-
250
-
251
-
252
-
253
-
254
-
255
-
256
-
257
-
258
-
259
-
260
-
261
-
262
-
263
-
264
-
265
-
266
-
267
-
268
-
269
-
270
-
271
-
272
-
273
-
274
-
275
-
276
-
277
-
278
-
279
-
280
-
281
-
282
-
283
-
284
-
285
-
286
-
287
-
288
-
289
-
290
-
291
-
292
-
293
-
294
-
295
-
296
-
297
-
298
-
299
-
300
-
301
-
302
-
303
-
304
-
305
-
306
-
307
-
308
 |
 |