3Ware 9550SXU16MLB10 User Guide - Page 102
Enabling or Disabling the Write Cache through 3BM, Enter, Maintain Unit, Array's Write Cache, State
 |
UPC - 693494971613
View all 3Ware 9550SXU16MLB10 manuals
Add to My Manuals
Save this manual to your list of manuals |
Page 102 highlights
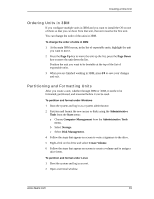
Configuring Units The page refreshes, and a message at the top confirms the change you have made. For more information about the write cache settings, see the reference section, "Controller Settings Page" on page 53. Enabling or Disabling the Write Cache through 3BM 1 At the main 3BM screen, select the unit by highlighting it and pressing Enter. An asterisk appears in the left-most column to indicate that it is selected. 2 Tab to the Maintain Unit button and press Enter. 3 In the Maintain Array screen, Tab to the field Array's Write Cache State. Figure 38. Unit Write Cache State in 3BM The current setting-Enabled or Disabled-is shown. (The initial default setting is for write cache to be enabled.) 4 Press Enter to display the choices, use the arrow keys to select the setting you want, and press Enter again to choose it. 5 Tab to the OK button and press Enter to select it. You return to the main 3BM screen. 6 When you are finished making changes, press F8 to save them and exit 3BM. 96 3ware 9000 Series Serial ATA RAID Controller User Guide
-
 1
1 -
2
-
3
-
4
-
5
-
6
-
7
-
8
-
9
-
10
-
11
-
12
-
13
-
14
-
15
-
16
-
17
-
18
-
19
-
20
-
21
-
22
-
23
-
24
-
25
-
26
-
27
-
28
-
29
-
30
-
31
-
32
-
33
-
34
-
35
-
36
-
37
-
38
-
39
-
40
-
41
-
42
-
43
-
44
-
45
-
46
-
47
-
48
-
49
-
50
-
51
-
52
-
53
-
54
-
55
-
56
-
57
-
58
-
59
-
60
-
61
-
62
-
63
-
64
-
65
-
66
-
67
-
68
-
69
-
70
-
71
-
72
-
73
-
74
-
75
-
76
-
77
-
78
-
79
-
80
-
81
-
82
-
83
-
84
-
85
-
86
-
87
-
88
-
89
-
90
-
91
-
92
-
93
-
94
-
95
-
96
-
 97
97 -
 98
98 -
 99
99 -
 100
100 -
 101
101 -
 102
102 -
 103
103 -
 104
104 -
 105
105 -
 106
106 -
 107
107 -
108
-
109
-
110
-
111
-
112
-
113
-
114
-
115
-
116
-
117
-
118
-
119
-
120
-
121
-
122
-
123
-
124
-
125
-
126
-
127
-
128
-
129
-
130
-
131
-
132
-
133
-
134
-
135
-
136
-
137
-
138
-
139
-
140
-
141
-
142
-
143
-
144
-
145
-
146
-
147
-
148
-
149
-
150
-
151
-
152
-
153
-
154
-
155
-
156
-
157
-
158
-
159
-
160
-
161
-
162
-
163
-
164
-
165
-
166
-
167
-
168
-
169
-
170
-
171
-
172
-
173
-
174
-
175
-
176
-
177
-
178
-
179
-
180
-
181
-
182
-
183
-
184
-
185
-
186
-
187
-
188
-
189
-
190
-
191
-
192
-
193
-
194
-
195
-
196
-
197
-
198
-
199
-
200
-
201
-
202
 |
 |
