3Ware 9550SXU16MLB10 User Guide - Page 92
Type of configuration, Name of the unit (optional), Stripe size, if appropriate for the RAID level
 |
UPC - 693494971613
View all 3Ware 9550SXU16MLB10 manuals
Add to My Manuals
Save this manual to your list of manuals |
Page 92 highlights
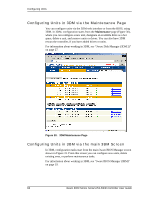
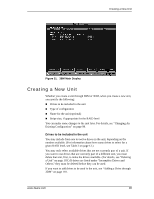
Configuring Units Type of configuration Available configuration types include RAID 0, RAID 1, RAID 5, RAID 10, RAID 50, and Single Disk. For information about the different RAID levels, see "Understanding RAID Concepts and Levels" on page 8. Note: Creating a unit erases all data on all drives. Although creating a RA1D 1 (mirror) creates a unit that will have a duplicate of data on both drives after it is put in use, creating a RAID 1 cannot be used to make a backup copy of data that currently exists on a single drive unless you migrate from a RAID 1 to two individual single disks. Name of the unit (optional) Units can be given names. These names will be visible in 3DM and CLI. Stripe size, if appropriate for the RAID level In general, smaller stripe sizes are better for sequential I/O, such as video, and larger stripe sizes are better for random I/O (such as databases). Striping size is not applicable for RAID 1, because it is a mirrored array without striping. Using the default stripe size of 64KB usually gives you the best performance for mixed I/Os. If your application has some specific I/O pattern (purely sequential or purely random), you might want to experiment with smaller or larger stripe size. Creating a Unit through 3DM 1 In 3DM, choose Management > Maintenance. 2 In the Available Drives list, select the drives you want to include in the unit by marking the checkbox in front of the Port number for each one. If you are creating single drive units (single disks or hot spares), you can configure multiple drives at once. (For details about this screen, see "Maintenance Page" on page 58.) 3 Click Create Unit. 4 In the dialog box that appears, select the RAID configuration you want. 5 If stripe size applies to the RAID type you select, select a Stripe Size. 86 3ware 9000 Series Serial ATA RAID Controller User Guide
-
 1
1 -
2
-
3
-
4
-
5
-
6
-
7
-
8
-
9
-
10
-
11
-
12
-
13
-
14
-
15
-
16
-
17
-
18
-
19
-
20
-
21
-
22
-
23
-
24
-
25
-
26
-
27
-
28
-
29
-
30
-
31
-
32
-
33
-
34
-
35
-
36
-
37
-
38
-
39
-
40
-
41
-
42
-
43
-
44
-
45
-
46
-
47
-
48
-
49
-
50
-
51
-
52
-
53
-
54
-
55
-
56
-
57
-
58
-
59
-
60
-
61
-
62
-
63
-
64
-
65
-
66
-
67
-
68
-
69
-
70
-
71
-
72
-
73
-
74
-
75
-
76
-
77
-
78
-
79
-
80
-
81
-
82
-
83
-
84
-
85
-
86
-
 87
87 -
 88
88 -
 89
89 -
 90
90 -
 91
91 -
 92
92 -
 93
93 -
 94
94 -
 95
95 -
 96
96 -
 97
97 -
98
-
99
-
100
-
101
-
102
-
103
-
104
-
105
-
106
-
107
-
108
-
109
-
110
-
111
-
112
-
113
-
114
-
115
-
116
-
117
-
118
-
119
-
120
-
121
-
122
-
123
-
124
-
125
-
126
-
127
-
128
-
129
-
130
-
131
-
132
-
133
-
134
-
135
-
136
-
137
-
138
-
139
-
140
-
141
-
142
-
143
-
144
-
145
-
146
-
147
-
148
-
149
-
150
-
151
-
152
-
153
-
154
-
155
-
156
-
157
-
158
-
159
-
160
-
161
-
162
-
163
-
164
-
165
-
166
-
167
-
168
-
169
-
170
-
171
-
172
-
173
-
174
-
175
-
176
-
177
-
178
-
179
-
180
-
181
-
182
-
183
-
184
-
185
-
186
-
187
-
188
-
189
-
190
-
191
-
192
-
193
-
194
-
195
-
196
-
197
-
198
-
199
-
200
-
201
-
202
 |
 |
