Asus A8R-MVP A8R-MVP User's Manual for English Edtion
Asus A8R-MVP Manual
 |
View all Asus A8R-MVP manuals
Add to My Manuals
Save this manual to your list of manuals |
Asus A8R-MVP manual content summary:
- Asus A8R-MVP | A8R-MVP User's Manual for English Edtion - Page 1
A8R-MVP Motherboard - Asus A8R-MVP | A8R-MVP User's Manual for English Edtion - Page 2
the express written permission of ASUSTeK COMPUTER INC. ("ASUS"). Product warranty or service will not be extended if: (1) the product is AS A COMMITMENT BY ASUS. ASUS ASSUMES NO RESPONSIBILITY OR LIABILITY FOR ANY ERRORS OR INACCURACIES THAT MAY APPEAR IN THIS MANUAL, INCLUDING THE PRODUCTS AND - Asus A8R-MVP | A8R-MVP User's Manual for English Edtion - Page 3
guide ix A8R-MVP specifications summary xi Chapter 1: Product introduction 1.1 Welcome 1-1 1.2 Package contents 1-1 1.3 Special features 1-2 1.3.1 Product highlights 1-2 1.3.3 Innovative ASUS features 1-4 Chapter 2: Hardware information 2.1 Before you proceed 2-1 2.2 Motherboard overview - Asus A8R-MVP | A8R-MVP User's Manual for English Edtion - Page 4
switch 3-2 Chapter 4: BIOS setup 4.1 Managing and updating your BIOS 4-1 4.1.1 ASUS Update utility 4-1 4.1.2 Creating a bootable floppy disk 4-4 4.1.3 ASUS EZ Flash utility 4-5 4.1.4 AFUDOS utility 4-6 4.1.5 ASUS CrashFree BIOS 2 utility 4-9 4.2 BIOS setup program 4-11 4.2.1 BIOS menu screen - Asus A8R-MVP | A8R-MVP User's Manual for English Edtion - Page 5
18 4.4.2 CPU Configuration 4-22 4.4.3 Chipset Configuration 4-26 4.4.4 Onboard Devices Configuration 4-27 4.4.5 PCI PnP 4-29 4.4.6 LAN Cable Status 4-30 4.4.7 USB Configuration 4-30 4.5 Power menu 4-32 4.5.1 Suspend Mode 4-32 4.5.2 Repost Video on S3 Resume 4-32 4.5.3 ACPI 2.0 Support 4-32 - Asus A8R-MVP | A8R-MVP User's Manual for English Edtion - Page 6
® RAID configurations 5-25 5.5 Creating a RAID driver disk 5-33 Chapter 6: A T I® MVP technology support 6.1 Overview 6-1 6.2 Hardware installation 6-2 6.2.1 Installing a single graphics card 6-2 6.2.2 Installing CrossFire™ graphics cards 6-3 6.3 Software information 6-6 6.3.1 Installing the - Asus A8R-MVP | A8R-MVP User's Manual for English Edtion - Page 7
and used in accordance with manufacturer's instructions, may cause harmful interference to radio by turning the equipment off and on, the user is encouraged to try to correct the interference by for connection of the monitor to the graphics card is required to assure compliance with FCC regulations - Asus A8R-MVP | A8R-MVP User's Manual for English Edtion - Page 8
service technician or your retailer. Operation safety • Before installing the motherboard and adding devices on it, carefully read all the manuals and staples away from connectors, slots, sockets and circuitry. • Avoid dust, technical problems with the product, contact a qualified service technician - Asus A8R-MVP | A8R-MVP User's Manual for English Edtion - Page 9
of the BIOS parameters are also provided. • Chapter 5: Software support This chapter describes the contents of the support CD that comes with the motherboard package. • C h a p t e r 6 : A T I® M V P t e c h n o l o g y s u p p o r t This chapter tells how to install ATI® MVP graphics cards. Where - Asus A8R-MVP | A8R-MVP User's Manual for English Edtion - Page 10
following symbols used throughout this manual. D A N G E R / W A R N I N G : Information to prevent injury to yourself when trying to complete a task. C A U T I O N : Information to prevent damage to the components when trying to complete a task. I M P O R T A N T : Instructions that you MUST follow - Asus A8R-MVP | A8R-MVP User's Manual for English Edtion - Page 11
A8R-MVP specifications summary CPU Chipset System bus Memory Expansion slots CrossFire™ Storage AI Audio LAN IEEE 1394a USB BIOS features Special features Socket 939 for AMD Athlon™ 64FX/Athlon™ 64 X2/ Athlon™ 64/Sempron™ processor* AMD64 architecture enables simultaneous 32- and 64-bit computing - Asus A8R-MVP | A8R-MVP User's Manual for English Edtion - Page 12
A8R-MVP specifications summary Overclocking ASUS PEG Link AI Overclocking (intelligent CPU frequency tuner) Precision Tweaker: - vDIMM: 8-step DRAM voltage control - vCore: Adjustable CPU voltage at 0.025 increment - Stepless Frequency Selection (SFS) allows FSB tuning from 200 MHz up to 400 MHz - Asus A8R-MVP | A8R-MVP User's Manual for English Edtion - Page 13
This chapter describes the motherboard features and the new technologies it supports 1Product information - Asus A8R-MVP | A8R-MVP User's Manual for English Edtion - Page 14
Chapter summary 1 1.1 Welcome 1-1 1.2 Package contents 1-1 1.3 Special features 1-2 ASUS A8R-MVP - Asus A8R-MVP | A8R-MVP User's Manual for English Edtion - Page 15
Card 1 x 2-port USB 2.0/Game module A p p l i c a t i o n C D s ASUS motherboard support CD D o c u m e n t a t i o n User guide If any of the above items is damaged or missing, contact your retailer. In single card mode, install the MVP Switch Card on the black PCI Express slot. ASUS A8R-MVP - Asus A8R-MVP | A8R-MVP User's Manual for English Edtion - Page 16
Product highlights Latest processor technology The motherboard comes with a 939-pin surface mount, Zero Insertion Force (ZIF) socket that supports AMD Athlon™ 64/Athlon™ 64 FX/Athlon™ 64 X2/Sempron™ processors. With an integrated low-latency high-bandwidth memory controller and a highly-scalable - Asus A8R-MVP | A8R-MVP User's Manual for English Edtion - Page 17
The motherboard implements the Universal Serial Bus (USB) 2.0 specification, dramatically increasing the connection speed from the 12 Mbps bandwidth on USB 1.1 to a fast 480 Mbps on USB 2.0. USB 2.0 is backward compatible with USB 1.1. See pages 2-20 and 2-24 for details. ASUS A8R-MVP 1-3 - Asus A8R-MVP | A8R-MVP User's Manual for English Edtion - Page 18
your PCI Express graphics card performance, allowing the motherboard to automatically adjust the PCI Express graphics link mode to the correct frequency based on the system configuration. Four additional settings are available for overclocking the PEG Link Mode. See page 4-20 for details. ASUS Q-Fan - Asus A8R-MVP | A8R-MVP User's Manual for English Edtion - Page 19
BIOS automatically restores the CPU default setting for each parameter. ASUS EZ Flash BIOS With the ASUS EZ Flash, you can easily update the system BIOS even before loading the operating system. No need to use a DOS-based utility or boot from a floppy disk. See page 4-5 for details. ASUS A8R-MVP - Asus A8R-MVP | A8R-MVP User's Manual for English Edtion - Page 20
1-6 Chapter 1: Product introduction - Asus A8R-MVP | A8R-MVP User's Manual for English Edtion - Page 21
This chapter lists the hardware setup procedures that you have to perform when installing system components. It includes description of the jumpers and connectors on the motherboard. 2 Hardware information - Asus A8R-MVP | A8R-MVP User's Manual for English Edtion - Page 22
Chapter summary 2 2.1 Before you proceed 2-1 2.2 Motherboard overview 2-2 2.3 Central Processing Unit (CPU 2-5 2.4 System memory 2-10 2.5 Expansion slots 2-14 2.6 Jumper 2-18 2.7 Connectors 2-19 ASUS A8R-MVP - Asus A8R-MVP | A8R-MVP User's Manual for English Edtion - Page 23
before removing or plugging in any motherboard component. The illustration below shows the location of the onboard LED. A8R-MVP ® A8R-MVP Onboard LED SB_PWR ON Standby Power OFF Powered Off Make sure to connect the EZPlug when using two PCI Express graphics cards and a 20-pin ATX power supply - Asus A8R-MVP | A8R-MVP User's Manual for English Edtion - Page 24
the image below. 2.2.2 Screw holes Place nine (9) screws into the holes indicated by circles to secure the motherboard to the chassis. Do not overtighten the screws! Doing so can damage the motherboard. Place this side towards the rear of the chassis A8R-MVP ® 2-2 Chapter 2: Hardware information - Asus A8R-MVP | A8R-MVP User's Manual for English Edtion - Page 25
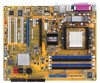
(64 bit,184-pin module) PARALLEL PORT Socket 939 PRI_IDE COM1 Bottom: USB1 USB2 Top: 1394 USB2.0 Top: T: USB3 RJ-45 B: USB4 Top:Line In Center:Line Out Below:Mic In CHA_FAN CD AUX USB78_WFG EZ_PLUG ATI Radeon® Xpress 200 CrossFire™ AAFP PCIEX16_2 AD1986A PCIEX1_1 A8R-MVP PCIEX16_1 - Asus A8R-MVP | A8R-MVP User's Manual for English Edtion - Page 26
slots 2. PCI slots 3. PCI Express x1 slot 4. PCI Express x16 slots Page 2-10 2-16 2-16 2-16 Jumper 1. Clear RTC RAM (3-pin CLRTC) Page 2-18 Rear panel connectors 1. PS/2 mouse port 2. Parallel port 3. IEEE 1394a port 4. LAN (RJ-45) port 5. Line In port 6. Line Out port 7. Microphone port 8. USB - Asus A8R-MVP | A8R-MVP User's Manual for English Edtion - Page 27
939-pin ZIF socket on the motherboard. A8R-MVP ® A8R-MVP CPU Socket 939 2. Unlock the socket by pressing the lever sideways, then lift it up to a 90°-100° angle. Socket lever Make sure that the socket lever is lifted up to 90°-100° angle, otherwise the CPU does not fit in completely. ASUS A8R-MVP - Asus A8R-MVP | A8R-MVP User's Manual for English Edtion - Page 28
NOT force the CPU into the socket to prevent bending the pins and damaging the CPU! 5. When the CPU is in place, push down the socket lever to secure the CPU. The lever clicks on the side tab to indicate that it is locked. 6. Install a CPU heatsink and fan following the instructions that came with - Asus A8R-MVP | A8R-MVP User's Manual for English Edtion - Page 29
base Retention bracket Retention bracket lock Your boxed CPU heatsink and fan assembly should come with installation instructions for the CPU, heatsink, and the retention mechanism. If the instructions in this section do not match the CPU documentation, follow the latter. ASUS A8R-MVP 2-7 - Asus A8R-MVP | A8R-MVP User's Manual for English Edtion - Page 30
the retention module base. 3. Align the other end of the retention bracket (near the retention bracket lock) to the retention module base. A clicking sound denotes that the retention bracket is in place. Make sure that the fan and heatsink assembly perfectly fits the retention mechanism module base - Asus A8R-MVP | A8R-MVP User's Manual for English Edtion - Page 31
and heatsink assembly is in place, connect the CPU fan cable to the connector on the motherboard labeled CPU_FAN. CPU_FAN A8R-MVP ® A8R-MVP CPU fan connector Do not forget to connect the CPU fan connector! Hardware monitoring errors can occur if you fail to plug this connector. ASUS A8R-MVP 2-9 - Asus A8R-MVP | A8R-MVP User's Manual for English Edtion - Page 32
Overview The motherboard comes with four 184-pin Double Data Rate (DDR) Dual Inline Memory Modules (DIMM) sockets. The following figure illustrates the location of the sockets: DIMM_A1 DIMM_A2 DIMM_B1 DIMM_B2 A8R-MVP ® A8R-MVP 184-pin DDR DIMM sockets Channel Channel 1 Channel 2 Sockets DIMM_A1 - Asus A8R-MVP | A8R-MVP User's Manual for English Edtion - Page 33
memory because of address space allocation for other critical functions. This limitation applies to Windows® XP 32-bit version operating system since it does not support identical DIMMs in all four sockets OR • install identical DIMM pair in DIMM_A1 and DIMM_B1 (blue sockets) ASUS A8R-MVP 2-11 - Asus A8R-MVP | A8R-MVP User's Manual for English Edtion - Page 34
black slots as one pair of Dual-channel memory configuration. C - Supports 4 modules inserted into both the blue and black slots as two pairs of Dual-channel memory configuration S S - Single-sided D S - Double-sided Visit the ASUS website (www.asus.com) for the latest Qualified Vendors List. 2-12 - Asus A8R-MVP | A8R-MVP User's Manual for English Edtion - Page 35
DIMM: 2 1. Simultaneously press the retaining clips outward to unlock the DIMM. 1 1 DDR DIMM notch Support the DIMM lightly with your fingers when pressing the retaining clips. The DIMM might get damaged when it flips out with extra force. 2. Remove the DIMM from the socket. ASUS A8R-MVP 2-13 - Asus A8R-MVP | A8R-MVP User's Manual for English Edtion - Page 36
slots and the expansion cards that they support. Make sure to unplug the power cord before adding or removing expansion cards. Failure to do so may cause you physical injury and damage motherboard components. 2.5.1 Installing an expansion card To install an expansion card: 1. Before installing the - Asus A8R-MVP | A8R-MVP User's Manual for English Edtion - Page 37
- shared - - - - - - shared - - - - - When using PCI cards on shared slots, ensure that the drivers support "Share IRQ" or that the cards do not need IRQ assignment; otherwise, conflicts will arise between the two PCI groups, making the system unstable and the card inoperable. ASUS A8R-MVP 2-15 - Asus A8R-MVP | A8R-MVP User's Manual for English Edtion - Page 38
This motherboard supports PCI Express x1 network cards, SCSI cards and other cards that comply with the PCI Express specifications. The following figure shows a network card installed on the PCI Express x1 slot. 2.5.6 Two PCI Express x16 slots This motherboard supports two ATI CrossFire™ PCI Express - Asus A8R-MVP | A8R-MVP User's Manual for English Edtion - Page 39
) slot Card Type Speed MVP Switch Card NA PCIe devices (non-VGA) x8, x4, x1 ATI graphics card x8 * Install the MVP Switch Card on the black PCI Express slot. Remove it only when you want to install other devices. ** Install two ATI graphics cards from the same GPU family. ASUS A8R-MVP 2-17 - Asus A8R-MVP | A8R-MVP User's Manual for English Edtion - Page 40
® A8R-MVP Clear RTC RAM CLRTC 12 23 Normal (Default) Clear RTC You do not need to clear the RTC when the system hangs due to overclocking. For system failure due to overclocking, use the C.P.R. (CPU Parameter Recall) feature. Shut down and reboot the system so the BIOS can automatically reset - Asus A8R-MVP | A8R-MVP User's Manual for English Edtion - Page 41
Local Area Network (LAN) through a network hub. Refer to the table below for the LAN port LED indications. LAN port LED indications ACT microphone. Refer to the audio configuration table on the next page for the function of the audio ports in 2, 4, or 6-channel configuration. ASUS A8R-MVP 2-19 - Asus A8R-MVP | A8R-MVP User's Manual for English Edtion - Page 42
two 4-pin Universal Serial Bus (USB) ports are available for connecting USB 2.0 devices. 1 0 . S e r i a l p o r t. This 9-pin COM1 port is for pointing devices or other serial devices. 1 1 . C o a x i a l S / P D I F O u t p o r t . This port connects an external audio output device via a coaxial - Asus A8R-MVP | A8R-MVP User's Manual for English Edtion - Page 43
A8R-MVP Floppy disk drive connector 2 . IDE connectors (40-1 pin PRI_IDE, 40-1 pin SEC_IDE) This connector is for an Ultra DMA 133/100/66 signal cable. The Ultra DMA 133/100/66 signal cable has three connectors: a blue connector for the primary IDE connector on the motherboard . ASUS A8R-MVP 2-21 - Asus A8R-MVP | A8R-MVP User's Manual for English Edtion - Page 44
BIOS if you want to use the Serial ATA RAID feature. See section "4.3.5 Storage Configuration" for details. A8R-MVP ® SATA4 GND RSATA_TXP4 RSATA_TXN4 GND RSATA_RXP4 RSATA_RXN4 GND A8R-MVP SATA to support S3 function). • Install the Windows® 2000 Service Pack 4 or the Windows® XP Service - Asus A8R-MVP | A8R-MVP User's Manual for English Edtion - Page 45
may damage the motherboard components. These are not jumpers! DO NOT place jumper caps on the fan connectors. CPU_FAN Rotation +12V GND A8R-MVP ® A8R-MVP Fan connectors CHA_FAN GND +12V Rotation PWR_FAN Rotation +12V GND Only the CPU_FAN and CHA_FAN connectors support the ASUS Q-Fan 2 feature - Asus A8R-MVP | A8R-MVP User's Manual for English Edtion - Page 46
+5V USB_P6USB_P6+ GND NC USB+5V USB_P8USB_P8+ GND NC A8R-MVP ® USB78_WFG 1 A8R-MVP USB 2.0 connectors USB56 1 USB+5V USB_P5USB_P5+ GND USB+5V USB_P7USB_P7+ GND Never connect a 1 3 9 4 c a b l e to the USB connectors. Doing so will damage the motherboard! 6 . Power connectors (24-pin EATXPWR - Asus A8R-MVP | A8R-MVP User's Manual for English Edtion - Page 47
will be unstable. • The ATX 12 V Specification 2.0 compliant (400 W) PSU has been tested to support the below configuration: CPU: Memory: Graphics card: Hard disk: ATAPI: AMD FX-57 512 MB DDR (x4) PCI Express x16 ATI X850 SATA HD (x2) CD-ROM (x1) • Use of a PSU with a higher power output is - Asus A8R-MVP | A8R-MVP User's Manual for English Edtion - Page 48
of the system chassis. +12V TPB2+ GND TPA2+ GND +12V TPB2GND TPA2- A8R-MVP ® 1 IE1394_1 A8R-MVP IEEE 1394 connector NEVER connect a U S B c a b l e to the IEEE 1394a connector. Doing so will damage the motherboard! 9 . Chassis intrusion connector (4-1 pin CHASSIS) This connector is for a chassis - Asus A8R-MVP | A8R-MVP User's Manual for English Edtion - Page 49
allow you to receive stereo audio input from sound sources such as a CD-ROM, TV tuner, or MPEG card. A8R-MVP ® CD (Black) AUX (White) Left Audio Channel Ground Ground Right Audio Channel Left Audio Channel Ground Ground Right Audio Channel A8R-MVP Internal audio connectors ASUS A8R-MVP 2-27 - Asus A8R-MVP | A8R-MVP User's Manual for English Edtion - Page 50
supports several chassis-mounted functions. PLED SPEAKER PANEL A8R-MVP IDE_LED RESET ® PWRSW * Requires an ATX power supply. A8R-MVP System Panel connector The sytem panel connector is color-coded The IDE LED lights up or flashes when data is read from or you to hear system beeps and warnings. • Power - Asus A8R-MVP | A8R-MVP User's Manual for English Edtion - Page 51
This chapter describes the power up Powerin3g up sequence, the vocal POST messages, and ways of shutting down the system. - Asus A8R-MVP | A8R-MVP User's Manual for English Edtion - Page 52
Chapter summary 3 3.1 Starting up for the first time 3-1 3.2 Powering off the computer 3-2 ASUS A8R-MVP - Asus A8R-MVP | A8R-MVP User's Manual for English Edtion - Page 53
beeps followed by four short beeps Error Keyboard controller error Refresh Time error No master drive detected Floppy controller failure Hardware component failure 7. At power on, hold down the key to enter the BIOS Setup. Follow the instructions in Chapter 4. ASUS A8R-MVP 3-1 - Asus A8R-MVP | A8R-MVP User's Manual for English Edtion - Page 54
to shut down the computer. 3. The power supply should turn off after Windows® shuts down. If you are using Windows® XP: 1. Click the S t a r t button then select T u BIOS setting. Pressing the power switch for more than four seconds lets the system enter the soft-off mode regardless of the BIOS - Asus A8R-MVP | A8R-MVP User's Manual for English Edtion - Page 55
This chapter tells how to change the system settings through the BIOS Setup menus. Detailed descriptions of the BIOS parameters are also provided. 4 BIOS setup - Asus A8R-MVP | A8R-MVP User's Manual for English Edtion - Page 56
Chapter summary 4 4.1 Managing and updating your BIOS 4-1 4.2 BIOS setup program 4-11 4.3 Main menu 4-14 4.4 Advanced menu 4-18 4.5 Power menu 4-32 4.6 Boot menu 4-37 4.7 Exit menu 4-42 ASUS A8R-MVP - Asus A8R-MVP | A8R-MVP User's Manual for English Edtion - Page 57
you to manage, save, and update the motherboard BIOS in Windows® environment. The ASUS Update utility allows you to: • Save the current BIOS file • Download the latest BIOS file from the Internet • Update the BIOS from an updated BIOS file • Update the BIOS directly from the Internet, and • View - Asus A8R-MVP | A8R-MVP User's Manual for English Edtion - Page 58
update the BIOS using this utility. Updating the BIOS through the Internet To update the BIOS through the Internet: 1. Launch the ASUS Update utility from the Windows® desktop by clicking S t a r t > P r o g r a m s > A S U S > A S U S U p d a t e > A S U S U p d a t e. The ASUS Update main window - Asus A8R-MVP | A8R-MVP User's Manual for English Edtion - Page 59
d a t e. The ASUS Update main window appears. 2. Select U p d a t e B I O S f r o m a f i l e option from the drop-down menu, then click N e x t. 3. Locate the BIOS file from the O p e n window, then click S a v e. 4. Follow the screen instructions to complete the update process. ASUS A8R-MVP 4-3 - Asus A8R-MVP | A8R-MVP User's Manual for English Edtion - Page 60
the Windows® 2000 CD to the optical drive. c. Click S t a r t, then select R u n. d. From the Open field, type D:\bootdisk\makeboot a: assuming that D: is your optical drive. e. Press , then follow screen instructions to continue. 2. Copy the original or the latest motherboard BIOS file - Asus A8R-MVP | A8R-MVP User's Manual for English Edtion - Page 61
+ during the Power-On Self Tests (POST). To update the BIOS using EZ Flash: 1. Visit the ASUS website (www.asus.com) to download the latest BIOS file for the motherboard and rename the same to A 8 R - M V P . R O M. 2. Save the BIOS file to a floppy disk, then restart the system. 3. Press - Asus A8R-MVP | A8R-MVP User's Manual for English Edtion - Page 62
BIOS screen displays may not be exactly the same as shown. 1. Copy the AFUDOS utility (afudos.exe) from the motherboard support CD to the bootable floppy disk you created earlier. 2. Boot the system in DOS mode, then at the prompt type: afudos /o[filename] where the [filename] is any user-assigned - Asus A8R-MVP | A8R-MVP User's Manual for English Edtion - Page 63
reserved. WARNING!! Do not turn off power during flash BIOS Reading file ..... done Reading flash .... done Advance Check........ Erasing flash .... done Writing flash .... 0x0008CC00 (9%) Do not shut down or reset the system while updating the BIOS to prevent system boot failure! ASUS A8R-MVP 4-7 - Asus A8R-MVP | A8R-MVP User's Manual for English Edtion - Page 64
the BIOS update process is completed. Reboot the system from the hard disk drive. A:\>afudos /iA8R-MVP.ROM AMI Firmware Update Utility - Version 1.19(ASUS V2.07(03.11.24BB)) Copyright (C) 2003 American Megatrends, Inc. All rights reserved. WARNING!! Do not turn off power during flash BIOS Reading - Asus A8R-MVP | A8R-MVP User's Manual for English Edtion - Page 65
BIOS recovery... Checking for floppy... Floppy found! Reading file "A8R-MVP.ROM". Completed. Start flashing... DO NOT shut down or reset the system while updating the BIOS! Doing so can cause system boot failure! 4. Restart the system after the utility completes the updating process. ASUS A8R-MVP - Asus A8R-MVP | A8R-MVP User's Manual for English Edtion - Page 66
"A8R-MVP.ROM". Completed. Start flashing... DO NOT shut down or reset the system while updating the BIOS! Doing so can cause system boot failure! 4. Restart the system after the utility completes the updating process. The recovered BIOS may not be the latest BIOS version for this motherboard. Visit - Asus A8R-MVP | A8R-MVP User's Manual for English Edtion - Page 67
under the Exit Menu. See section "4.7 Exit Menu." • The BIOS setup screens shown in this section are for reference purposes only, and may not exactly match what you see on your screen. • Visit the ASUS website (www.asus.com) to download the latest BIOS file for this motherboard. ASUS A8R-MVP 4-11 - Asus A8R-MVP | A8R-MVP User's Manual for English Edtion - Page 68
items Menu bar Configuration fields General help Main Advanced BIOS SETUP UTILITY Power Boot Exit System Time System Date Legacy Slave Fourt IDE Master Fourth IDE Slave Storage Configuration System Information [ST320410A] [ASUS CD-S520/A] [Not Detected] [Not Detected] [Not Detected] [Not - Asus A8R-MVP | A8R-MVP User's Manual for English Edtion - Page 69
that is not user-configurable. A PCI Latency Timer Allocate IRQ to PCI VGA Palette Snooping PCI IDE BusMaster [No] [64] [Yes] [Disabled] [Enabled] Pop-up window 4.2.9 General help Scroll bar At the top right corner of the menu screen is a brief description of the selected item. ASUS A8R-MVP - Asus A8R-MVP | A8R-MVP User's Manual for English Edtion - Page 70
how to navigate through them. Main Advanced System Time System Date Legacy Diskette A BIOS SETUP UTILITY Power Boot Exit [10:55:25] [Mon 10/25/2005] [1. Master Fourth IDE Slave Storage Configuration System Information [ST320410A] [ASUS CD-S520/A] [Not Detected] [Not Detected] [Not Detected - Asus A8R-MVP | A8R-MVP User's Manual for English Edtion - Page 71
, Inc. The BIOS automatically detects the monitoring). These values are not user-configurable. These items show supports multi-sector transfer feature. When set to [Disabled], the data transfer from and to the device occurs one sector at a time. Configuration options: [Disabled] [Auto] ASUS A8R-MVP - Asus A8R-MVP | A8R-MVP User's Manual for English Edtion - Page 72
32-bit data transfer. Configuration options: [Disabled] [Enabled] 4.3.5 Storage Configuration Main Storage Configuration BIOS SETUP UTILITY Serial ATA Controller Onboard SATA Boot ROM SATA Mode Selection [Enabled] [Disabled] [Emulated PATA Mode] Options Disabled Enabled Select Screen Select - Asus A8R-MVP | A8R-MVP User's Manual for English Edtion - Page 73
Serial ATA RAID. Configuration options: [Disabled] [Enabled] SATA Mode Selection [Emulated PATA Mode] Allows you to select BIOS Displays the auto-detected BIOS information. Processor Displays the auto-detected CPU specification. System Memory Displays the auto-detected system memory. ASUS A8R-MVP - Asus A8R-MVP | A8R-MVP User's Manual for English Edtion - Page 74
BIOS SETUP UTILITY Power Boot Exit Jumperfree Configuration CPU Configuration Chipset Onboard Devices Configuration PCI PnP LAN Cable Status USB Configuration BIOS SETUP UTILITY Configure System Frequency/Voltage AI Overclocking PCIE Frequency [Auto] [100] FID/VID Change DDR Voltage PCI- - Asus A8R-MVP | A8R-MVP User's Manual for English Edtion - Page 75
[Manual]. Processor Frequency Multiplier [x4] Allows you to set the processor frequency multiplier. Configuration options: [x4] [x4.5] [x5]... [x25.5] Processor Voltage [1.350 V] Allows you to set the processor voltage. Configuration options: [1.350 V] [1.325 V] [1.300 V]... [0.800 V] ASUS A8R-MVP - Asus A8R-MVP | A8R-MVP User's Manual for English Edtion - Page 76
) link mode. Setting this item to [Auto] allows the motherboard to automatically adjust the PCI Express graphics link mode to the correct frequency based on the system configuration. Three additional settings are available for overclocking the PEG Link Mode. Configuration options: [Auto] [Disabled - Asus A8R-MVP | A8R-MVP User's Manual for English Edtion - Page 77
I O v e r c l o c k i n g item to [Ovrerclock Profile]. Overclock Options [Overclock 5%] Allows you to overclock the CPU speed through the available preset values. Configuration options: [Overclock 3%] [Overclock 5%] [Overclock 10%] [Overclock 15%] [Overclock 20%] [Overclock 30%] ASUS A8R-MVP 4-21 - Asus A8R-MVP | A8R-MVP User's Manual for English Edtion - Page 78
Configuration The items in this menu show the CPU-related information that the BIOS automatically detects. Advanced BIOS SETUP UTILITY CPU Configuration Module Version: 14.08 Physical Count: 1 Logical Count: 2 AMD Athlon(tm) 64 X2 Dual Core Processor 4600+ Revision: E6 Cache L1: 128*2 KB Cache - Asus A8R-MVP | A8R-MVP User's Manual for English Edtion - Page 79
Memory Timing Configuration Advanced BIOS SETUP UTILITY Memory Configuration Memclock Mode MCT Timing Mode User Config Mode Burst Length HardWare Memory Hole [Auto] [Auto] [Auto] [4 Beats] [Disabled] MEMCLK can be set by the code MHz] [133 MHz] [166 MHz] [183 MHz] [200 MHz] ASUS A8R-MVP 4-23 - Asus A8R-MVP | A8R-MVP User's Manual for English Edtion - Page 80
TRWT [Auto] Configuration options: [Auto] [1 CLK] [2 CLK]... [6 CLK] User Config Mode [Auto] Configuration options: [Auto] [Manual] The following items appear when the U s e r C o n f i g M o d e item is set to [Manual]. Read Preamble [ 5.5ns] Configuration options: [2.0ns] [2.5ns] [3.0ns]... [9.5ns - Asus A8R-MVP | A8R-MVP User's Manual for English Edtion - Page 81
while memory is not being used improves performance. Configuration options: [Disabled] [40ns] [80ns] [160ns] [320ns] [640ns] [1.28us] [2.56us] [5.12us] [10.2us] [20.5 us] [41.0us] [81.9us] [163.8us] [327.7us] [655.4us] [1.31ms] [2.62ms] [5.24ms] [10.49ms] [20.97ms] [42.00ms] [84.00ms] ASUS A8R-MVP - Asus A8R-MVP | A8R-MVP User's Manual for English Edtion - Page 82
] [10.49ms] [20.97ms] [42.00ms] [84.00ms] 4.4.3 Chipset Configuration The Chipset menu allows you to change the advanced chipset settings. Select an item then press to display the sub-menu. Advanced BIOS SETUP UTILITY ATI RD480 Chipset Configuration Dual-slot configuration RD800 HT PLL - Asus A8R-MVP | A8R-MVP User's Manual for English Edtion - Page 83
Advanced BIOS SETUP UTILITY Onboard Devices HD Audio Onboard LAN Onboard LAN Boot ROM Onboard IEEE1394 [Enabled] [Enabled] [Disabled] [Enabled Configure ITE8712 Super IO Chipset you to select the Parallel Port mode. Configuration options: [Normal] [EPP] [ECP] [EPP+ECP] ASUS A8R-MVP 4-27 - Asus A8R-MVP | A8R-MVP User's Manual for English Edtion - Page 84
you to select the MIDI Port address or to disable the port. Configuration options: [Disabled] [300] [330] MIDI IRQ Select [IRQ5] This item allows the BIOS to select the MIDI port IRQs. Configuration options: [IRQ5] [IRQ7] [IRQ10] [IRQ11] 4-28 Chapter - Asus A8R-MVP | A8R-MVP User's Manual for English Edtion - Page 85
card even if requested. Configuration options: [No] [Yes] IRQ-xx assigned to [PCI Device] When set to [PCI Device], the specific IRQ is free for use of PCI/PnP devices. When set to [Reserved], the IRQ is reserved for legacy ISA devices. Configuration options: [PCI Device] [Reserved] ASUS A8R-MVP - Asus A8R-MVP | A8R-MVP User's Manual for English Edtion - Page 86
-2004, American Megatrends, Inc. POST Check LAN Cable [Disabled] Allows you to enable or disable LAN cable check during POST. When enabled, the BIOS SETUP UTILITY USB Configuration Module Version - 2.24.0-10.4 USB Devices Enabled: None USB Controller Legacy USB Support USB 2.0 Controller Mode BIOS - Asus A8R-MVP | A8R-MVP User's Manual for English Edtion - Page 87
USB device into a USB port. USB Mass Storage Device Configuration USB Mass Storage Reset Delay [Auto] Sets the USB mass storage reset delay time in seconds. Configuration options: [10] [20] [30] [40] Emulation Type [Auto] Configuration options: [Auto] [Floppy] [Forced FDD] [HD] [CDROM] ASUS A8R-MVP - Asus A8R-MVP | A8R-MVP User's Manual for English Edtion - Page 88
Only] [S3 Only] [Auto] 4.5.2 Repost Video on S3 Resume [No] Determines whether to invoke VGA BIOS POST on S3/STR resume. Configuration options: [No] [Yes] 4.5.3 ACPI 2.0 Support [No] Allows you to add more tables for Advanced Configuration and Power Interface (ACPI) 2.0 specifications. Configuration - Asus A8R-MVP | A8R-MVP User's Manual for English Edtion - Page 89
BIOS SETUP UTILITY Power Power Button Mode Restore on AC Power Loss Power On By PS/2 Keyboard Power On By PS/2 Mouse Power On By RTC Alarm Power On By External Modems Power On By PCI disable RTC to generate a wake event. Configuration options: [Disabled] [Enabled] ASUS A8R-MVP 4-33 - Asus A8R-MVP | A8R-MVP User's Manual for English Edtion - Page 90
computer is off causes an initialization string that turns the system power on. Power On By PCI Devices [Disabled] When set to [Enabled], this parameter allows you to turn on the system through a PCI LAN or modem card. This feature requires an ATX power supply that provides at least 1A on the +5VSB - Asus A8R-MVP | A8R-MVP User's Manual for English Edtion - Page 91
CPU QFan Control Chassis QFan Control BIOS SETUP UTILITY Power [32.5ºC/90.5ºF] [36.0ºC/96.5ºF] [3813 RPM] [N/A] [N/A] [ 1.320V] [ 3.345V] [ 5.094V] [11.880V] [Disabled] [Disabled] CPU the motherboard, the field shows N/A. Select [Ignore] from the item options to disable CPU fan ASUS A8R-MVP 4-35 - Asus A8R-MVP | A8R-MVP User's Manual for English Edtion - Page 92
CPU temperature at which the power management feature starts. Use the / key or use the numeric keypad to set the value. Valid values range from [0] to [100]. Chassis QFan Control [Disabled] Allows you to enable or disable the ASUS values range from [0] to [100]. 4-36 Chapter 4: BIOS setup - Asus A8R-MVP | A8R-MVP User's Manual for English Edtion - Page 93
to [100]. ChassisFan Full-speed Temperature[XXX] Allows you to set the CPU temperature at which the chassis fan runs at full speed. Use the / to display the sub-menu. Main Advanced Boot Settings BIOS SETUP UTILITY Power Boot Exit Boot Device Priority Boot Settings ASUS A8R-MVP 4-37 - Asus A8R-MVP | A8R-MVP User's Manual for English Edtion - Page 94
Device Priority 1st Boot Device 2nd Boot Device 3rd Boot Device BIOS SETUP UTILITY Boot [1st FLOPPY DRIVE] [PM-ST320410A] [PS-ASUS CD-S520/A] Specifies the boot sequence from the availabe devices. priority sequence from the available devices in a RAID configuration. 4-38 Chapter 4: BIOS setup - Asus A8R-MVP | A8R-MVP User's Manual for English Edtion - Page 95
Support [Auto] Allows you to enable or disable support for PS/2 mouse. Configuration options: [Disabled] [Enabled] [Auto] Wait for 'F1' If Error [Enabled] When set to Enabled, the system waits for the F1 key to be pressed when error occurs. Configuration options: [Disabled] [Enabled] ASUS A8R-MVP - Asus A8R-MVP | A8R-MVP User's Manual for English Edtion - Page 96
security settings. Select an item then press to display the configuration options. Security Settings BIOS SETUP UTILITY Boot Supervisor Password : Not Installed User Password : Not Installed Change Supervisor Password to change password. again to disabled password - Asus A8R-MVP | A8R-MVP User's Manual for English Edtion - Page 97
viewing and changing all the fields in the Setup utility. Change User Password Select this item to set or change the user password. The User Password item on top of the screen shows the default N o t I n s t a l l e d. After you set a password, this item shows I n s t a l l e d. ASUS A8R-MVP 4-41 - Asus A8R-MVP | A8R-MVP User's Manual for English Edtion - Page 98
your password successfully. To change the user password, follow the same steps as in setting a user password. Password Check [Setup] When set to [Setup], BIOS checks for user password when accessing the Setup utility. When set to [Always], BIOS checks for user password both when accessing Setup and - Asus A8R-MVP | A8R-MVP User's Manual for English Edtion - Page 99
other than System Date, System Time, and Password, the BIOS asks for a confirmation before exiting. Discard Changes This window appears. Select [ O k ] to load default values. Select E x i t & S a v e C h a n g e s or make other changes before saving the values to the non-volatile RAM. ASUS A8R-MVP - Asus A8R-MVP | A8R-MVP User's Manual for English Edtion - Page 100
4-44 Chapter 4: BIOS setup - Asus A8R-MVP | A8R-MVP User's Manual for English Edtion - Page 101
This chapter describes the contents of the support CD that comes with the motherboard package. 5 Software support - Asus A8R-MVP | A8R-MVP User's Manual for English Edtion - Page 102
Chapter summary 5 5.1 Installing an operating system 5-1 5.2 Support CD information 5-1 5.3 Software information 5-8 5.4 RAID configurations 5-24 5.5 Creating a RAID driver disk 5-33 ASUS A8R-MVP - Asus A8R-MVP | A8R-MVP User's Manual for English Edtion - Page 103
. Click an icon to display support CD/motherboard information Click an item to install If A u t o r u n is NOT enabled in your computer, browse the contents of the support CD to locate the file ASSETUP.EXE from the BIN folder. Double-click the A S S E T U P . E X E to run the CD. ASUS A8R-MVP 5-1 - Asus A8R-MVP | A8R-MVP User's Manual for English Edtion - Page 104
the AMD Cool 'n' Quiet™ driver. ADI 1986A Audio Driver Executes the wizard to install the ADI SoundMAX® AD1986A audio driver and application. Marvell Yukon Gigabit Driver Installs the driver for the Marvell® Yukon™ 88E8001 PCI interface Gigabit LAN . USB 2.0 Driver Installs the USB 2.0 driver. The - Asus A8R-MVP | A8R-MVP User's Manual for English Edtion - Page 105
monitors the fan speed, CPU temperature, and system voltages, and alerts you of any detected problems. This utility helps you keep your computer in healthy operating condition. ASUS Update The ASUS Update utility that allows you to update the motherboard BIOS in Windows® environment. This utility - Asus A8R-MVP | A8R-MVP User's Manual for English Edtion - Page 106
PDF). Microsoft DirectX 9.0c Installs the Microsoft® DirectX® 9.0c driver. The Microsoft® DirectX® 9.0c is a multimedia technology that enhances computer graphics and sound ® website (www.microsoft.com) for updates. ASUS Cool 'n' Quiet Utility Installs the AMD Cool 'n' Quiet™ software. Anti-virus - Asus A8R-MVP | A8R-MVP User's Manual for English Edtion - Page 107
folder of the user manual. Most user manual files are in Portable Document Format (PDF). Install the Adobe® Acrobat® Reader from the U t i l i t i e s m e n u before opening a user manual file. ULi SATA/RAID User's Manual Allows you to open the ULI Serial ATA/RAID user's manual. ASUS A8R-MVP 5-5 - Asus A8R-MVP | A8R-MVP User's Manual for English Edtion - Page 108
t tab to display the ASUS contact information. You can also find this information on the inside front cover of this user guide. 5.2.7 Other information The icons on the top right corner of the screen give additional information on the motherboard and the contents of the support CD. Click an icon to - Asus A8R-MVP | A8R-MVP User's Manual for English Edtion - Page 109
the support CD contents in graphical format. Technical support Form Displays the ASUS Technical Support Request Form that you have to fill out when requesting technical support. Filelist Displays the contents of the support CD and a brief description of each in text format. ASUS A8R-MVP 5-7 - Asus A8R-MVP | A8R-MVP User's Manual for English Edtion - Page 110
support CD have wizards that will conveniently guide you through the installation. View the online help or readme file that came with the software application for more information. 5.3.1 ASUS MyLogo™ The ASUS BIOS file, then click N e x t. The ASUS MyLogo window appears. 6. From the left window pane - Asus A8R-MVP | A8R-MVP User's Manual for English Edtion - Page 111
the boot image to your desired size by selecting a value on the R a t i o box. 9. When the screen returns to the ASUS Update utility, flash the original BIOS to load the new boot logo. 10. After flashing the BIOS, restart the computer to display the new boot logo during POST. ASUS A8R-MVP 5-9 - Asus A8R-MVP | A8R-MVP User's Manual for English Edtion - Page 112
on the Virtual Cable Tester™ main window is disabled if no problem is detected on the LAN cable(s) connected to the LAN port(s). • If you want the system to check the LAN cable before entering the OS, enable the P O S T C h e c k L A N c a b l e item in the BIOS. 5-10 Chapter 5: Software support - Asus A8R-MVP | A8R-MVP User's Manual for English Edtion - Page 113
of your system and change the utility configuration. By default, the main window displays the P r e f e r e n c e section. You can close or restore the P r e f e r e n c e section by clicking on the triangle on the main window right handle. Click to close the Preference panel ASUS A8R-MVP 5-11 - Asus A8R-MVP | A8R-MVP User's Manual for English Edtion - Page 114
memory, CPU usage window Shows/Hides the P r e f e r e n c e section Minimizes the application Closes the application Sensor alert When a system sensor detects a problem, the main window using the Preference section in the main window. Click the box before each preference to activate or deactivate. - Asus A8R-MVP | A8R-MVP User's Manual for English Edtion - Page 115
display the current value of a system sensor such as fan rotation, CPU temperature, and voltages. The hardware monitor panels come in two display modes window. You cannot adjust the sensor threshold values in a small monitoring panel. Click to increase value Click to decrease value ASUS A8R-MVP - Asus A8R-MVP | A8R-MVP User's Manual for English Edtion - Page 116
display WMI browser Click to display the WMI (Windows Management Instrumentation) browser. This browser displays various Windows® management information. Click an item from the left before D M I I n f o r m a t i o n to display the available information. 5-14 Chapter 5: Software support - Asus A8R-MVP | A8R-MVP User's Manual for English Edtion - Page 117
tab lists all logical drives. Click a hard disk drive to display the information on the right panel. The pie chart at the bottom of the window represents the used (blue) and the available HDD space. ASUS A8R-MVP 5-15 - Asus A8R-MVP | A8R-MVP User's Manual for English Edtion - Page 118
available physical memory. The pie chart at the bottom of the window represents the used (blue) and the available physical memory. Configuring PC Probe II Click to view and adjust the sensor threshold values. The C o n f i g window has two tabs configuration 5-16 Chapter 5: Software support - Asus A8R-MVP | A8R-MVP User's Manual for English Edtion - Page 119
The motherboard supports the AMD Cool 'n' Quiet™ Technology that dynamically and automatically change the CPU speed, voltage, and amount of power depending on the task the CPU performs. Enabling Cool 'n' Quiet™ Technology To enable Cool 'n' Quiet™ Technology: 1. Turn on the system and enter BIOS by - Asus A8R-MVP | A8R-MVP User's Manual for English Edtion - Page 120
time CPU Frequency and voltage. Make sure to install the Cool 'n' Quiet™ software from the motherboard support CD. Refer to section "5.2.3 Utilities menu" for details. To launch the Cool 'n' Quiet™ program: 1. If you are using Windows® 2000, click the S t a r t button. Select Programs-> ASUS -> Cool - Asus A8R-MVP | A8R-MVP User's Manual for English Edtion - Page 121
or 6-channel speakers for this setup. • SoundMAX® requires Microsoft® Windows® 2000/XP. Make sure that one of these operating systems is installed before installing SoundMAX®. If the SoundMAX® audio utility is correctly installed, you will find the SoundMAX® icon on the taskbar. ASUS A8R-MVP 5-19 - Asus A8R-MVP | A8R-MVP User's Manual for English Edtion - Page 122
A X® icon to display the S o u n d M A X® Control Panel. Audio Setup Wizard By clicking the icon from the SoundMAX® control panel, you can easily configure your audio settings. Simply follow succeeding screen instructions and begin enjoying High Definition Audio. 5-20 Chapter 5: Software support - Asus A8R-MVP | A8R-MVP User's Manual for English Edtion - Page 123
Jack configuration This screen helps you configure your computer's audio ports, depending on the audio devices you have installed. Adjust speaker volume This screen helps you adjust speaker volume. read pre-written text to allow the AudioWizard to adjust the volume as you speak. ASUS A8R-MVP 5-21 - Asus A8R-MVP | A8R-MVP User's Manual for English Edtion - Page 124
e r e n c e s page. This page allows you to change various audio settings. General options Click the G e n e r a l tab to choose your v i r o n m e n t tab allows you to optimize your audio listening environment. You can setup your speakers, choose from different acoustic environments, and enable - Asus A8R-MVP | A8R-MVP User's Manual for English Edtion - Page 125
Microphone options Click the L i s t e n i n g E n v i r o n m e n t tab allows you to optimize your microphone input settings. ASUS A8R-MVP 5-23 - Asus A8R-MVP | A8R-MVP User's Manual for English Edtion - Page 126
controller integrated in the ULI M1575 Southbridge that allows you to configure Serial ATA hard disk drives as RAID sets. The motherboard supports the following RAID configurations. R A I D 0 (Data striping) optimizes two identical hard disk drives to read and write data in parallel, interleaved - Asus A8R-MVP | A8R-MVP User's Manual for English Edtion - Page 127
a t i o n, and set the O n b o a r d S A T A B o o t R O M item to [Enabled]. 3. Press to save the changes and exit. 4. During POST, press . The RAID BIOS setup screens shown in this section are for reference only, and may not exactly match the items on your screen. ASUS A8R-MVP 5-25 - Asus A8R-MVP | A8R-MVP User's Manual for English Edtion - Page 128
RAID BIOS Setup Utility (c) 2005 ULi : XXXXXXXXXXX Channel 2 Master: XXXXXXXXXXX Channel 3 Master: XXXXXXXXXXX Mode SATA 2 SATA 2 SATA 2 SATA 2 Capacity XXXXX MB XXXXX MB XXXXX MB XXXXX MB RAID Array the next item E n t e r : Confirms a selected item E S C : Exit 5-26 Chapter 5: Software support - Asus A8R-MVP | A8R-MVP User's Manual for English Edtion - Page 129
set: 1. From the ULI RAID BIOS Setup utility menu, move the SATA 2 SATA 2 SATA 2 SATA 2 Capacity XXXXX MB XXXXX MB XXXXX MB XXXXX MB RAID Array/Type RAID A/0x2 RAID A/0x2 RAID Array A RAID Array B RAID Array C Capacity : XXXXX GB : : RAID Type 0X2 Stripe Size 16K RAID Name RAID0 ASUS A8R-MVP - Asus A8R-MVP | A8R-MVP User's Manual for English Edtion - Page 130
Creating a RAID 1 configuration To create a RAID 1 set: 1. From the ULI RAID BIOS Setup utility menu, move the cursor to C r e a t e R A I D 1 M i r r o r i n g f o r R e l XXXXXXXXXXX Channel 3 Master: XXXXXXXXXXX Mode SATA 2 SATA 2 SATA 2 SATA 2 Capacity XXXXX MB XXXXX MB XXXXX MB XXXXX MB RAID - Asus A8R-MVP | A8R-MVP User's Manual for English Edtion - Page 131
Channel 3 Master: XXXXXXXXXXX Mode SATA 2 SATA 2 SATA 2 SATA 2 Capacity XXXXX MB XXXXX MB 0+1 X4 Stripe Size RAID Name RAID01 Creating a JBOD configuration To create a JBOD set: 1. From the ULI RAID BIOS Setup utility menu, move the cursor to C r e a t e J B O D f o r i ASUS A8R-MVP 5-29 - Asus A8R-MVP | A8R-MVP User's Manual for English Edtion - Page 132
SATA 2 SATA 2 Capacity XXXXX MB XXXXX MB XXXXX MB XXXXX MB RAID Array/Type RAID A/JBOD RAID A/JBOD RAID Array A RAID Array B RAID Array C Capacity : XXXXX MB : : RAID Type JBOD Stripe Size RAID Name RAIDJ Setting the Stripe Size To set the stripe size: 1. From the ULI RAID BIOS Setup utility - Asus A8R-MVP | A8R-MVP User's Manual for English Edtion - Page 133
list at the bottom of the screen. Deleting All RAID configurations To delete all RAID sets: 1. From the ULI RAID BIOS Setup utility menu, move the cursor to D e l e t e A l l R A I D S e t t i n g s & P a r t i t i the RAID Array items from the list at the bottom of the screen. ASUS A8R-MVP 5-31 - Asus A8R-MVP | A8R-MVP User's Manual for English Edtion - Page 134
array. To rebuild a RAID array: 1. From the ULI RAID BIOS Setup utility menu, move the cursor to R e b u i Creating a RAID 5 configuration To create a RAID 5 set: 1. From the ULI RAID BIOS Setup utility menu, move the cursor to C r e a t e R A I : XXXXXXXXXXX Mode SATA 2 SATA 2 SATA 2 Capacity XXXXX - Asus A8R-MVP | A8R-MVP User's Manual for English Edtion - Page 135
1. During the OS installation, the system prompts you to press the F6 key to install third-party SCSI or RAID driver. 2. Press then insert the floppy disk with RAID driver into the floppy disk drive. 3. Follow the succeeding screen instructions to complete the installation. ASUS A8R-MVP 5-33 - Asus A8R-MVP | A8R-MVP User's Manual for English Edtion - Page 136
5-34 Chapter 5: Software support - Asus A8R-MVP | A8R-MVP User's Manual for English Edtion - Page 137
This chapter tells how to install CrossFire™ graphics cards to avail of ATI's Multi-Video Processing technology. 6 ATI® MVP technology support - Asus A8R-MVP | A8R-MVP User's Manual for English Edtion - Page 138
Chapter summary 6 6.1 Overview 6-1 6.2 Hardware installation 6-2 6.3 Software information 6-6 ASUS A8R-MVP - Asus A8R-MVP | A8R-MVP User's Manual for English Edtion - Page 139
as the ASUS A8R-MVP motherboard. • Make sure that your power supply unit (PSU) can provide at least the minimum power required by your system. See "6. Power connectors" on page 2-24 for details. • Visit the ATI website or download the Radeon® X850 Crossfire™ Edition User's Guide from the support CD - Asus A8R-MVP | A8R-MVP User's Manual for English Edtion - Page 140
6.2 Hardware installation 6.2.1 Installing a single graphics card 1. Install a PCI Express x16 graphics card on the blue slot. To avail of the card full x16 bandwidth, install the ASUS MVP Switch Card on the black slot; otherwise, the card will run only at x8 speed. 2. Connect one end of the - Asus A8R-MVP | A8R-MVP User's Manual for English Edtion - Page 141
6.2.2 Installing CrossFire™ graphics cards Before ins talling a CrossFire™ system, refer to the user guide that came with the ATI CrossFire™ Edition graphics card. To install the graphics cards: 1. Remove the MVP Switch Card if one is installed. 2. Prepare one CrossFire™ Edition graphics card, which - Asus A8R-MVP | A8R-MVP User's Manual for English Edtion - Page 142
4. Insert the CrossFire™ Edition (Master) graphics card into the blue slot. Make sure that the card is properly seated on the slot. 5. Connect one end of the external cable to the Slave graphics card. 6-4 C h a p t e r 6 : A T I® M V P t e c h n o l o g y s u p p o r t - Asus A8R-MVP | A8R-MVP User's Manual for English Edtion - Page 143
source from the power supply to the graphics cards. 8 6 7 9. Boot up your computer, and press during POST to enter the BIOS setup. 10. Set the Dual-slot configuration item in the BIOS to [Auto] or [Dual Video Cards]. See section "4.4.3 Chipset Configuration" for details. ASUS A8R-MVP 6-5 - Asus A8R-MVP | A8R-MVP User's Manual for English Edtion - Page 144
device drivers. The ATI CrossFire™ technology supports only the following operating systems: • Windows® XP 32-bit (Home or Professional) with Service Pack 2 (SP2) • Windows® XP Professional 64-bit Edition. 1. Turn on your system and log in with administrator rights. 2. Windows® auto-detects the ASUS - Asus A8R-MVP | A8R-MVP User's Manual for English Edtion - Page 145
. 8. A status window appears, indicating the progress of the installation. 9. The S e t u p C o m p l e t e window appears, indicating that the driver files have been copied to your computer. Click Y e s to restart your computer now or N o to restart later. Click F i n i s h. ASUS A8R-MVP 6-7 - Asus A8R-MVP | A8R-MVP User's Manual for English Edtion - Page 146
your desktop orientation. Launching the Catalyst™ Control Center There are several ways to launch the Catalyst™ Control Center: • On the Windows® task bar, click S t a r t > ATI Catalyst™ Control Center > Catalyst™ Control Center • Double-click the Catalyst™ Control Center desktop shortcut. • On the - Asus A8R-MVP | A8R-MVP User's Manual for English Edtion - Page 147
users to access and configure the complete features of the software • Set to A d v a n c e view to enable the CrossFire™ function. • Make sure that the Dual-slot configuration item in the BIOS is set to [Auto] or [Dual Video Cards] if you want to enable the CrossFire™ function. ASUS A8R-MVP - Asus A8R-MVP | A8R-MVP User's Manual for English Edtion - Page 148
™: 1. Set the view to A d v a n c e. 2. Click the C r o s s f i r e ™ item in G r a p h i c s S e t t i n g s. 3. In the CrossFire™ Settings dialog, tick the box opposite E n a b l e C r o s s F i r e ™. 4. Click OK to effect the setting. 3 2 4 Hotkeys Click the H o t k e y s tab on the Catalyst - Asus A8R-MVP | A8R-MVP User's Manual for English Edtion - Page 149
3D applications. Preferences Click the P r e f e r e n c e s tab on the Catalyst™ Control Center to select a language, restore defaults, change skins, or enable/disable the System Tray icon. ASUS A8R-MVP 6-11 - Asus A8R-MVP | A8R-MVP User's Manual for English Edtion - Page 150
Help Click the H e l p tab on the Catalyst™ Control Center to access the online help system, generate a Problem Report, and get the Catalyst™ Control Center version information. 6-12 C h a p t e r 6 : A T I® M V P t e c h n o l o g y s u p p o r t
-
 1
1 -
 2
2 -
 3
3 -
 4
4 -
 5
5 -
 6
6 -
 7
7 -
8
-
9
-
10
-
11
-
12
-
13
-
14
-
15
-
16
-
17
-
18
-
19
-
20
-
21
-
22
-
23
-
24
-
25
-
26
-
27
-
28
-
29
-
30
-
31
-
32
-
33
-
34
-
35
-
36
-
37
-
38
-
39
-
40
-
41
-
42
-
43
-
44
-
45
-
46
-
47
-
48
-
49
-
50
-
51
-
52
-
53
-
54
-
55
-
56
-
57
-
58
-
59
-
60
-
61
-
62
-
63
-
64
-
65
-
66
-
67
-
68
-
69
-
70
-
71
-
72
-
73
-
74
-
75
-
76
-
77
-
78
-
79
-
80
-
81
-
82
-
83
-
84
-
85
-
86
-
87
-
88
-
89
-
90
-
91
-
92
-
93
-
94
-
95
-
96
-
97
-
98
-
99
-
100
-
101
-
102
-
103
-
104
-
105
-
106
-
107
-
108
-
109
-
110
-
111
-
112
-
113
-
114
-
115
-
116
-
117
-
118
-
119
-
120
-
121
-
122
-
123
-
124
-
125
-
126
-
127
-
128
-
129
-
130
-
131
-
132
-
133
-
134
-
135
-
136
-
137
-
138
-
139
-
140
-
141
-
142
-
143
-
144
-
145
-
146
-
147
-
148
-
149
-
150
 |
 |

Motherboard
A8R-MVP