Brother International BAS-326G PS Instruction Manual - English - Page 70
Adjusting the thread wiper, 10-13. Intermittent presser foot installation position
 |
View all Brother International BAS-326G PS manuals
Add to My Manuals
Save this manual to your list of manuals |
Page 70 highlights
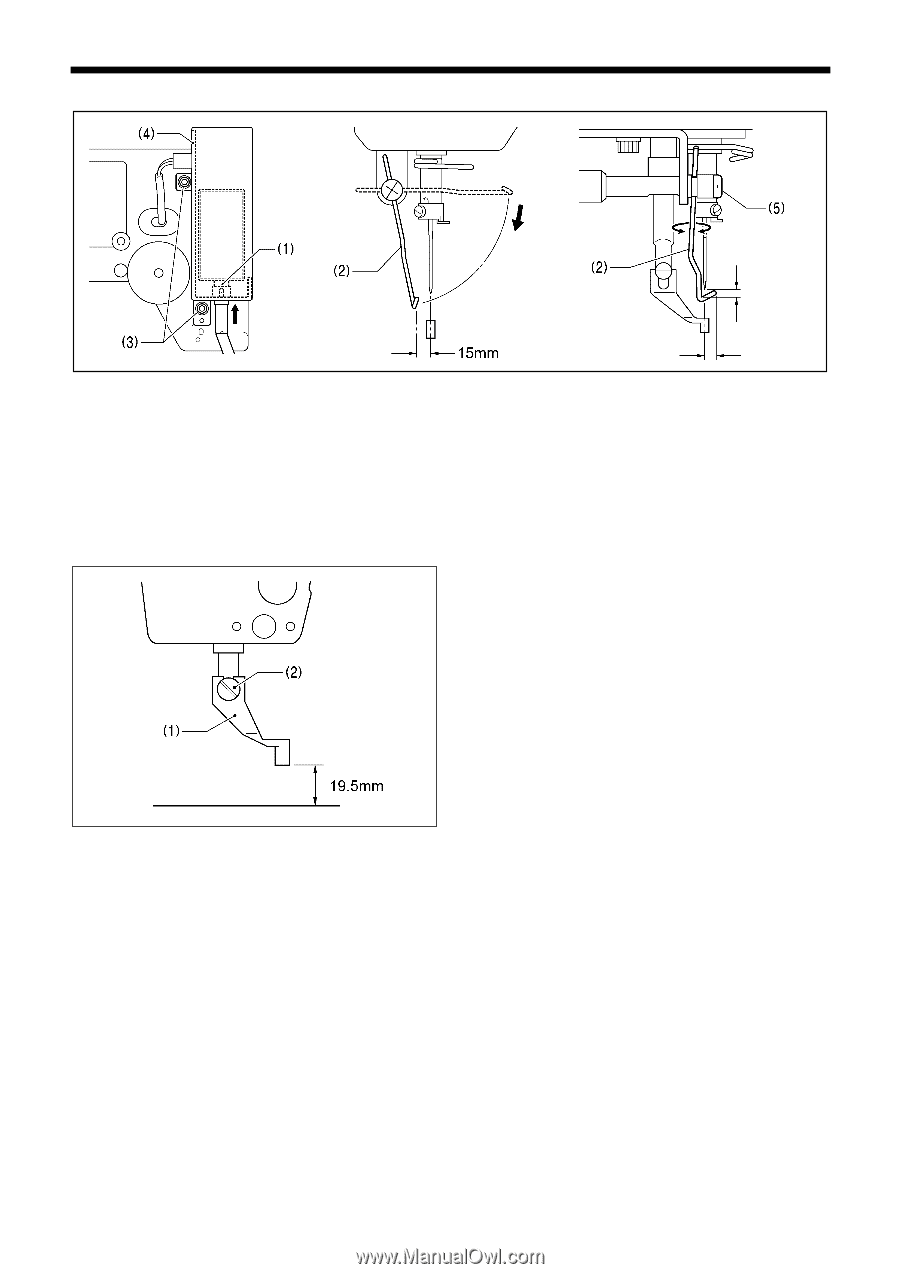
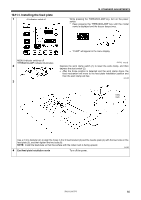
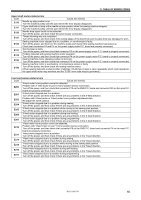
10. STANDARD ADJUSTMENTS 10-12. Adjusting the thread wiper Approx. 2mm 5007Q 1892B Approx. 3mm 1893B 1. Loosen the two screws (3) and shift the entire solenoid setting plate (4) up or down to adjust so that the thread wiper (2) is 15 mm in front of the needle center when the plunger (1) of the thread wiper solenoid is driven to the full stroke. 2. Loosen the screw (5) and adjust the position of the thread wiper (2) so that the distance from the thread wiper to the tip of the needle is approximately 2 mm and the tip of the thread wiper (2) is approximately 3 mm from the center of the needle when the thread wiper (2) passes below the needle during operation. Note: Check that the thread wiper (2) does not touch the finger guard. 10-13. Intermittent presser foot installation position Install the intermittent presser foot (1) with the screw (2) so that the distance from the bottom of the intermittent presser foot to the top of the needle plate is 19.5 mm when the sewing machine is stopped and the intermittent presser foot (1) is raised. 1894B 61 BAS-326G PS
-
 1
1 -
2
-
3
-
4
-
5
-
6
-
7
-
8
-
9
-
10
-
11
-
12
-
13
-
14
-
15
-
16
-
17
-
18
-
19
-
20
-
21
-
22
-
23
-
24
-
25
-
26
-
27
-
28
-
29
-
30
-
31
-
32
-
33
-
34
-
35
-
36
-
37
-
38
-
39
-
40
-
41
-
42
-
43
-
44
-
45
-
46
-
47
-
48
-
49
-
50
-
51
-
52
-
53
-
54
-
55
-
56
-
57
-
58
-
59
-
60
-
61
-
62
-
63
-
64
-
 65
65 -
 66
66 -
 67
67 -
 68
68 -
 69
69 -
 70
70 -
 71
71 -
 72
72 -
 73
73 -
 74
74 -
 75
75 -
76
-
77
-
78
-
79
-
80
-
81
-
82
-
83
-
84
 |
 |