Brother International BE-1204B Stand Alone Type Instruction Manual - English
Brother International BE-1204B Manual
 |
View all Brother International BE-1204B manuals
Add to My Manuals
Save this manual to your list of manuals |
Brother International BE-1204B manual content summary:
- Brother International BE-1204B | Stand Alone Type Instruction Manual - English - Page 1
BE-1204B-BC BE-1206B-BC INSTRUCTION MANUAL Stand-Alone type Please read this manual before using the machine. Please keep this manual within easy reach for quick reference. TWELVE NEEDLE FOUR HEAD EMBROIDERY MACHINE TWELVE NEEDLE SIX HEAD EMBROIDERY MACHINE - Brother International BE-1204B | Stand Alone Type Instruction Manual - English - Page 2
- Brother International BE-1204B | Stand Alone Type Instruction Manual - English - Page 3
you very much for buying a BROTHER sewing machine. Before using your new machine, please read the safety instructions below and the explanations given in the instruction manual. With industrial sewing machines, it symbol at left means "you must make the ground connection".) BE-1204B-BC • BE-1206B - Brother International BE-1204B | Stand Alone Type Instruction Manual - English - Page 4
use. Temperatures which are lower or higher than this may cause problems with correct operation. The relative humidity should be within the range of free from the accumulation of lint or dust. Contact your Brother dealer or a qualified electrician for any electrical work that 1204B-BC • BE-1206B - Brother International BE-1204B | Stand Alone Type Instruction Manual - English - Page 5
are being used or where oxygen is being administered. If the machine develops a problem, contact your nearest Brother dealer or a qualified technician. Cleaning Turn off the power switch before starting any and diarrhoea. Keep the oil out of the reach of children. BE-1204B-BC • BE-1206B - Brother International BE-1204B | Stand Alone Type Instruction Manual - English - Page 6
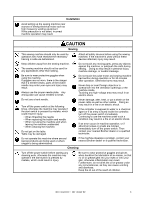
all safety precautions. Use only the proper replacement parts as specified by Brother. When replacing a fluorescent lamp, use the same-type lamp having Any problems in machine operation which result from unauthorized modifications to the machine will not be covered by the warranty. 4 BE-1204B-BC - Brother International BE-1204B | Stand Alone Type Instruction Manual - English - Page 7
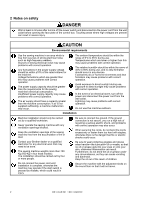
difficult to read, please contact your nearest Brother dealer. 1 Electric shock danger display 2 Electric shock danger display W1408Q 3 Injury warning display Hazardous voltage will cause injury. 4 Injury caution display W1410Q 5 Injury caution display W1200Q W1202Q BE-1204B-BC • BE-1206B - Brother International BE-1204B | Stand Alone Type Instruction Manual - English - Page 8
mark W1201Q Be sure to connect the ground. If the ground connection is not secure, you run a high risk of receiving a serious electric shock, and problems with correct operation may also occur. 11 Direction of operation W1205Q 6 BE-1204B-BC • BE-1206B - Brother International BE-1204B | Stand Alone Type Instruction Manual - English - Page 9
5 4 2 10 8 8 4 1 9 4 BE-1204B-BC • BE-1206B-BC 6 7 5 W1207Q 8 3 11 4 W1208Q 7 - Brother International BE-1204B | Stand Alone Type Instruction Manual - English - Page 10
head of the floppy disk drive periodically. W1217Q Do not remove the disk out of the drive during the access lamp is lit. W1218Q 8 BE-1204B-BC • BE-1206B - Brother International BE-1204B | Stand Alone Type Instruction Manual - English - Page 11
shown below. Slide the notch in this direction to prevent data loss or overwriting. Slide the notch in this direction to write data. W1219Q BE-1204B-BC • BE-1206B - Brother International BE-1204B | Stand Alone Type Instruction Manual - English - Page 12
information on error codes and action to be taken. Chapter 10 Troubleshooting Provides troubleshooting for the machine. Chapter 11 Connection and Installation of Optional Equipment Describes connections between the machine/computer and optional equipment available. 10 BE-1204B-BC • BE-1206B - Brother International BE-1204B | Stand Alone Type Instruction Manual - English - Page 13
BE-1204B-BC • BE-1206B-BC 11 - Brother International BE-1204B | Stand Alone Type Instruction Manual - English - Page 14
of Sewing Thread trimming W0397Q Setting of Needle Bars (→ page 5-4) Hoop Retract Area Check W0481Q Editing of Embroidery data (→ page 4-1) W0451Q W0465Q W0601Q 12 BE-1204B-BC • BE-1206B - Brother International BE-1204B | Stand Alone Type Instruction Manual - English - Page 15
Setting of thread breakage sensor (→ page 5-6) W0488Q W0490Q W0494Q Setting of Machine (→ page 5-9) W0609Q W0620Q W0621Q BE-1204B-BC • BE-1206B-BC 13 - Brother International BE-1204B | Stand Alone Type Instruction Manual - English - Page 16
Contents Contents SAFETY INSTRUCTIONS...1 Before Starting Operation...8 Procedure of Reading This Manual...10 Screen Composition...12 Chapter 1 Preparation of Embroidery Machine 1. Specifications ...1-2 2. ...3-19 Setting Amount or Timing of Step Forward/Step-Back 3-19 14 BE-1204B-BC • BE-1206B - Brother International BE-1204B | Stand Alone Type Instruction Manual - English - Page 17
Setting of RS-232C Communication Speed ...5-23 Display Language ...5-24 Alarm Sound ...5-25 Motive Speed ...5-26 Small-Pitch Deletion...5-27 Automatic pause insertion...5-28 BE-1204B-BC • BE-1206B-BC 15 - Brother International BE-1204B | Stand Alone Type Instruction Manual - English - Page 18
of Rotary Hook ...7-2 1-2 Cleaning of Needle Plate...7-3 2. Oiling ...7-4 2-1 Head...7-4 2-2 Lower shaft ...7-5 3. Greasing...7-6 3-1 Cam grooves ...7-6 3-2 Lower gear ...7-8 3-3 Diving shaft...7-8 3-4 Needle bar flip-up mechanism ...7-9 3-5 Feed Guide Section...7-10 16 BE-1204B-BC • BE-1206B - Brother International BE-1204B | Stand Alone Type Instruction Manual - English - Page 19
the Movable Knife Position...8-9 5. Thread Wiper Adjustment ...8-12 Chapter 9 Error code list Chapter 10 Troubleshooting Mechanical Section...10-2 Electrical Section ...10-4 Chapter 11 Connection and Installation of Optional Equipment 1. Attaching Bobbin Winder ...11-2 BE-1204B-BC • BE-1206B-BC 17 - Brother International BE-1204B | Stand Alone Type Instruction Manual - English - Page 20
Contents 18 BE-1204B-BC • BE-1206B-BC - Brother International BE-1204B | Stand Alone Type Instruction Manual - English - Page 21
Chapter 1 Preparation of Embroidery Machine - Brother International BE-1204B | Stand Alone Type Instruction Manual - English - Page 22
FDR/FMC format) 3.5 2DD floppy disk (ZSK format) 3.5 floppy disk (brother ECS format) Automatic thread trimmer Upper and lower thread breakage detector Single phase 200 setup) 2320 (W) × 1360 (L) × 1750 (H) mm Embroidery hoops in different sizes, Bobbin winder 1-2 BE-1204B-BC • BE-1206B - Brother International BE-1204B | Stand Alone Type Instruction Manual - English - Page 23
in different sizes • Sash frame assembly * Other Tajima embroidery hoops that can be used with BE-1201A-AC etc. • Cap frame (6 head: 6, 4 head: 4) Cap frame drive assembly (6 head: 6, 4 head: 4) Base frame set (6 head: 12, 4 head: 8) Set frame base set (1) • Bobbin winder BE-1204B-BC • BE-1206B - Brother International BE-1204B | Stand Alone Type Instruction Manual - English - Page 24
guide A Fluorescent lamp switch Table Emergency stop switch Start switch Stop switch Leg Rotary hook cover (Safety device) Power switch Control box Main power switch W1220Q The machine heads are numbered 1 to 6 (1 to 4 in four head models) from the right front. 1-4 BE-1204B-BC • BE-1206B-BC - Brother International BE-1204B | Stand Alone Type Instruction Manual - English - Page 25
the ground connection is not secure, you run a high risk of receiving a serious electric shock, and problems with correct operation may also occur. Secure the machine with the adjustment bolts on the sound floor so that , insert the forks under the legs and lift the machine. BE-1204B-BC • BE-1206B - Brother International BE-1204B | Stand Alone Type Instruction Manual - English - Page 26
to lift up the machine. When lifting the machine, make sure that the belts do not contact the machine table or the tension plate. 1-6 BE-1204B-BC • BE-1206B - Brother International BE-1204B | Stand Alone Type Instruction Manual - English - Page 27
embroidery machine may be rocked during operation. In such a case, it is recommended that a secure base of concrete be placed below the embroidery machine. BE-1204B-BC • BE-1206B - Brother International BE-1204B | Stand Alone Type Instruction Manual - English - Page 28
Chapter 1 Preparations of operation 3-3 Preparation of Needle Bar Case [1] [2] [3] Repeat the procedures below for all the heads: 1. Unscrew the screw [1], then detach the bracket [3] and pin [2]. W1225Q 1-8 BE-1204B-BC • BE-1206B-BC - Brother International BE-1204B | Stand Alone Type Instruction Manual - English - Page 29
is required only when the table set is purchased separately from the machine. • The table is a standard attachment. 1. Tentatively mount 4 (3 in four-head models) table supports Front [1] on the leg front using 4 bolts each. BE-1204B-BC • BE-1206B - Brother International BE-1204B | Stand Alone Type Instruction Manual - English - Page 30
to the other side. Insert the table backing plate [4] into the table backing rubber on the table support Rear [6]. 3. Adjust table supports front [7] in height so as to make the table parallel with the floor. 4. Tighten all hexagon socket head cap screws [8] firmly. 1-10 BE-1204B-BC • BE-1206B - Brother International BE-1204B | Stand Alone Type Instruction Manual - English - Page 31
backing plate [4] of each table into the table backing rubber on the table support Middle [5]. 3. Adjust the height of the table support Front [6] to be even with the upper surface of the bed. 4. the leg section using table stays (4 pcs(3pcs in four head models)) [7]. BE-1204B-BC • BE-1206B-BC 1-11 - Brother International BE-1204B | Stand Alone Type Instruction Manual - English - Page 32
3. Mount the thread guide assembly [4] on the thread guide support bars [3] using the four screws [5]. •When mounting, use one flat washer [6] below the thread guide support bar [3]. •Pay careful attention to the front and back directions of the thread guides (A, B, C). 1-12 BE-1204B-BC • BE-1206B - Brother International BE-1204B | Stand Alone Type Instruction Manual - English - Page 33
of time, supply one or two drops of oil to each needle bar from the oil supply holes of the lower cover. • Use the Brother's specified oil (Nippon Oil, Embroidery Lube 10N; VG10) for this. • Supplying an excessive amount of oil will cause dripping onto the material. BE-1204B-BC • BE-1206B-BC 1-13 - Brother International BE-1204B | Stand Alone Type Instruction Manual - English - Page 34
to connect it to the grounding cable (with green and yellow stripes). When plugging in the outlet, use a plug suited to the outlet. 1-14 BE-1204B-BC • BE-1206B - Brother International BE-1204B | Stand Alone Type Instruction Manual - English - Page 35
9, 12 [3] Tension stand inner thread guide [2] Thread Guide tension disc No.2, 5, 8, 11 No.1, 4, 7, 10 Rotary disc Spring [4] Tension stand lower thread guide Inner thread guide [5] Lower thread guide [6] Needle bar thread guide Pressure foot W1232Q W1233Q BE-1204B-BC • BE-1206B-BC 1-15 - Brother International BE-1204B | Stand Alone Type Instruction Manual - English - Page 36
thread through the upper hole of the pretension[1]. Push up the thread guide tension disc with your finger, and pass it from the left to guide [6] and pass it through the needle eye. Pass it through the presser foot. Pass it to presser spring at the front of lower thread guide [5]. 1-16 BE-1204B-BC - Brother International BE-1204B | Stand Alone Type Instruction Manual - English - Page 37
prevention spring of the bobbin case does not work. Adjust the height of the spring or replace it with a new one. Bobbin 0.5mm W1237Q BE-1204B-BC • BE-1206B-BC 1-17 - Brother International BE-1204B | Stand Alone Type Instruction Manual - English - Page 38
thread from the hole of the tension spring [5]. 4. Pull out the thread by about 50 mm. 5. Pass the thread through the thread guide [6]. ! Attaching bobbin case [2] [1] 1. Hold the knob [2] and attach the bobbin case securely. 2. Close the rotary hook cover [1]. W1241Q 1-18 BE-1204B-BC • BE-1206B - Brother International BE-1204B | Stand Alone Type Instruction Manual - English - Page 39
the notched part will come on the rotary hook side. • The needle should not be angled to the left (when viewed from the front). BE-1204B-BC • BE-1206B-BC 1-19 - Brother International BE-1204B | Stand Alone Type Instruction Manual - English - Page 40
. 3. While keeping the nut in the hole, slide the thumb bolt M6 toward the edge and tighten it firmly at the outermost point. 1-20 BE-1204B-BC • BE-1206B - Brother International BE-1204B | Stand Alone Type Instruction Manual - English - Page 41
flat frame C6-360 [2] and the table is even when viewed from the machine front. If adjustments are needed, loosen bolts of the F table support Front [12] and move it in the direction of the arrow. 6. Tighten each bolt securely after the adjustment is completed. BE-1204B-BC • BE-1206B-BC 1-21 - Brother International BE-1204B | Stand Alone Type Instruction Manual - English - Page 42
Chapter 1 Preparations of operation Attaching the holder base 1. Mount the holder base vertically to the X-axis feed sash [1] and flat frame C6-360 [2] using the thumb bolts [3]. [3] [1] [3] [2] W1246Q 1-22 BE-1204B-BC • BE-1206B-BC - Brother International BE-1204B | Stand Alone Type Instruction Manual - English - Page 43
head models: Sash clips 290 12 units, sash clips 220 10 units Four head models: Sash clips 290 10 units, sash clips 220 6 units BE-1204B-BC • BE-1206B-BC 1-23 - Brother International BE-1204B | Stand Alone Type Instruction Manual - English - Page 44
width W1249Q Adjust upper thread tension to 0.8~1.4N when the thread is pulled at the needle bar thread guide. * Correct adjustment Turn the upper thread tension dial so that the needle thread can be pulled to upper thread is pulled out slowly from the presser foot. 1-24 BE-1204B-BC • BE-1206B - Brother International BE-1204B | Stand Alone Type Instruction Manual - English - Page 45
it with a new one. (Refer to "Replacing Bobbin" on page 1-17.) We recommend the use of the optional gauge set TM-3 (S59956-001). W1396Q BE-1204B-BC • BE-1206B-BC 1-25 - Brother International BE-1204B | Stand Alone Type Instruction Manual - English - Page 46
Chapter 1 Preparations of operation 1-26 BE-1204B-BC • BE-1206B-BC - Brother International BE-1204B | Stand Alone Type Instruction Manual - English - Page 47
Chapter 2 Embroidering Procedures After installation of machine start embroidering. This chapter explains about the operation panel on the machine as well as precautions for the actual embroidering process. - Brother International BE-1204B | Stand Alone Type Instruction Manual - English - Page 48
data. (→ "Chapter 3 Selection of Data and Embroidering" page 3-1) Specifies a sequence of colors (sequence of needle changes) in sewing data. (→ "Setting of Needle Bars" page 5-4) 2-2 BE-1204B-BC • BE-1206B - Brother International BE-1204B | Stand Alone Type Instruction Manual - English - Page 49
before turning the power ON to the machine. The setting will not be changed if the selection is done after turning the power OFF. BE-1204B-BC • BE-1206B - Brother International BE-1204B | Stand Alone Type Instruction Manual - English - Page 50
screen contrast. SBUS interface connector Not used (Do not connects anything.) W1256Q RS-232C interface connector Connect personal computer with BE-100 installed, etc. 2-4 BE-1204B-BC • BE-1206B - Brother International BE-1204B | Stand Alone Type Instruction Manual - English - Page 51
soon as the machine stops. Refer to "Stopping the machine" ( page 6-3) to stop flashing. In BE-1206B-BC models, this switch is located between the head 2 and 3, and also between the head 5 and 6. In BE-1204B-BC models, this switch is located between the head 1 and 2, and also between the head 3 and - Brother International BE-1204B | Stand Alone Type Instruction Manual - English - Page 52
to suspend the head. Flip up the switch further to switch ON/OFF the mending. Flip the switch down to suspend the head. W1259Q 2-6 BE-1204B-BC • BE-1206B - Brother International BE-1204B | Stand Alone Type Instruction Manual - English - Page 53
and Embroidering" (→ page 3-1) Edit the retrieved embroidery data. "Chapter 4 Editing of Embroidering Data" (→ page 4-1) Press on the operation panel. Press on the operation panel. BE-1204B-BC • BE-1206B - Brother International BE-1204B | Stand Alone Type Instruction Manual - English - Page 54
hoop to be used. 4. Press the power switch. 5. A message is displayed on the LCD as soon as the power is turned ON. BE-1204B-BC W1263Q BE-1206B-BC W1264Q 6. The alarm sounds three times. The hoop moves back to the zero point and the sewing screen is displayed. The speed range and - Brother International BE-1204B | Stand Alone Type Instruction Manual - English - Page 55
Start Embroidering W0406Q 1. Press 2. Press to check the embroidering area. to start embroidering. W0406Q Sewing is started and the next screen is displayed. W0439Q BE-1204B-BC • BE-1206B - Brother International BE-1204B | Stand Alone Type Instruction Manual - English - Page 56
Chapter 2 Embroidering Procedures 2-10 BE-1204B-BC • BE-1206B-BC - Brother International BE-1204B | Stand Alone Type Instruction Manual - English - Page 57
Chapter 3 Selection of Data and Embroidering This Chapter describes how to select embroidery data in order to start embroidering. - Brother International BE-1204B | Stand Alone Type Instruction Manual - English - Page 58
a next color change Step forward (back) to the embroidering start point of a next pattern Step forward (back) by a specified number of stitches (→ Page 3-19) 3-2 BE-1204B-BC • BE-1206B - Brother International BE-1204B | Stand Alone Type Instruction Manual - English - Page 59
the screen.) • Other data Data format Icon Barudan FDR Barudan FMC Zanks ZSK (These icons are displayed in the lower right of the screen.) BE-1204B-BC • BE-1206B - Brother International BE-1204B | Stand Alone Type Instruction Manual - English - Page 60
floppy disk may be destroyed. Eject switch Registration of Sewing Data into Machine Memory 1. Load a floppy disk with sewing data. Access lamp W0396Q W0395Q 3-4 BE-1204B-BC • BE-1206B - Brother International BE-1204B | Stand Alone Type Instruction Manual - English - Page 61
Icon indicating a kind of selected data W0400Q displays a pattern name. Name of a selected embroidery pattern (It may be the same as a file name.) W0401Q BE-1204B-BC • BE-1206B - Brother International BE-1204B | Stand Alone Type Instruction Manual - English - Page 62
registration is done without loading a floppy disk, the following screen is displayed after the step 4 is finished. Load a floppy disk for data registration. W0588Q 3-6 BE-1204B-BC • BE-1206B - Brother International BE-1204B | Stand Alone Type Instruction Manual - English - Page 63
floppy disk is displayed. Refer to "Registration of Sewing Data into Machine Memory" (steps 5 and afterward on Page 3-5). 5. The initial screen is displayed. W0406Q BE-1204B-BC • BE-1206B - Brother International BE-1204B | Stand Alone Type Instruction Manual - English - Page 64
ten keys or , and then press the key. 5. Press the . W0399Q When a floppy disk is set W0400Q When no floppy disk is set W0588Q 3-8 BE-1204B-BC • BE-1206B - Brother International BE-1204B | Stand Alone Type Instruction Manual - English - Page 65
a screen by pressing . Currently displayed screen No. of screens to be selected W0397Q 3. Select embroidery data to delete by pressing ten keys or . W0410Q BE-1204B-BC • BE-1206B - Brother International BE-1204B | Stand Alone Type Instruction Manual - English - Page 66
is displayed. 2. Confirm the description to delete, press switch. W0770Q Delete all embroidery data. Reset settings. Delete all embroidery data and reset settings. 3-10 BE-1204B-BC • BE-1206B - Brother International BE-1204B | Stand Alone Type Instruction Manual - English - Page 67
memory. Refer to "Automatic input setting" (→ page 5-34) for the setting procedure. 4. Press four times. The tape data selection screen is shown. W0593Q W0416Q BE-1204B-BC • BE-1206B-BC 3-11 - Brother International BE-1204B | Stand Alone Type Instruction Manual - English - Page 68
Chapter 3 Selection of Data and Embroidering 5. Choose the type of the tape data with keys. 6. Press . The data will be read now. W0417Q W0594Q 3-12 BE-1204B-BC • BE-1206B-BC - Brother International BE-1204B | Stand Alone Type Instruction Manual - English - Page 69
by pressing . Currently displayed screen No. of screens to be selected W0397Q 3. Select embroidery data to modify the name by pressing ten keys or . BE-1204B-BC • BE-1206B-BC 3-13 - Brother International BE-1204B | Stand Alone Type Instruction Manual - English - Page 70
6. Pressing deletes currently reversed characters. 7. Press twice. "T" is input. W0423Q 8. Press three times. "E" is input. W0424Q 9. Press five times. "S" is input. W0425Q W0426Q 3-14 BE-1204B-BC • BE-1206B - Brother International BE-1204B | Stand Alone Type Instruction Manual - English - Page 71
input. W0429Q 14. Press once. "3" is input. W0430Q W0431Q 15. After inputting a data name, press . A data name is modified by the above procedures. W0432Q BE-1204B-BC • BE-1206B-BC 3-15 - Brother International BE-1204B | Stand Alone Type Instruction Manual - English - Page 72
"N" reversely. 8. Press . "N" is deleted. W0434Q 9. Press four times. "O" is input. W0435Q W0436Q 10. Press . A data name is modified by the above procedures. W0437Q 3-16 BE-1204B-BC • BE-1206B - Brother International BE-1204B | Stand Alone Type Instruction Manual - English - Page 73
used for sewing. Indicates the number of data currently used for sewing. Currently selected speed range The range can be modified by pressing . W0439Q BE-1204B-BC • BE-1206B-BC 3-17 - Brother International BE-1204B | Stand Alone Type Instruction Manual - English - Page 74
is currently being sewn is canceled. When canceling all patterns, press once again. 2. A message for confirmation is displayed. When canceling sewing, press . W0595Q 3-18 BE-1204B-BC • BE-1206B - Brother International BE-1204B | Stand Alone Type Instruction Manual - English - Page 75
five times. 2. Input the number of stitches to move by pressing ten keys. W0596Q 3. Press the . The needle steps forward (back) as specified. W0597Q BE-1204B-BC • BE-1206B-BC 3-19 - Brother International BE-1204B | Stand Alone Type Instruction Manual - English - Page 76
a specified number of stitches. W0598Q For Step Forward (Back) 1. Press . Stitches steps forward (back) by a specified amount. Resuming Sewing 1. Press . Sewing is started. 3-20 BE-1204B-BC • BE-1206B- - Brother International BE-1204B | Stand Alone Type Instruction Manual - English - Page 77
of the machine is written to the floppy disk. ! The format of the data to be written is brother ESC or TAJIMA TFD. 1. Press the button. The embroidering data stored in the memory is displayed. 2. . and designate validating or 8. Set the formatted floppy disk. BE-1204B-BC • BE-1206B-BC 3-21 - Brother International BE-1204B | Stand Alone Type Instruction Manual - English - Page 78
Chapter 3 Selection of Data and Embroidering 9. Press the button. The selected embroidering data is stored on the floppy disk. W0600Q W0476Q 3-22 BE-1204B-BC • BE-1206B-BC - Brother International BE-1204B | Stand Alone Type Instruction Manual - English - Page 79
Chapter 4 Editing of Embroidering Data Pressing on the operation panel after read- ing embroidering data displays the embroidering data editing screen. Simple operation by using embroidering data is available on this screen. - Brother International BE-1204B | Stand Alone Type Instruction Manual - English - Page 80
right Vertical direction from lower right to upper left 0 stitch deletion (→ Page 4-10) Thread trimming feed number (→ Page 4-10) Swing width correction (→ Page 4-11) 4-2 BE-1204B-BC • BE-1206B - Brother International BE-1204B | Stand Alone Type Instruction Manual - English - Page 81
data. 2. Press . 3. Press to select an angle or use ten keys to specify an angle. W0451Q 4. Press . The initial screen is displayed again. W0452Q BE-1204B-BC • BE-1206B - Brother International BE-1204B | Stand Alone Type Instruction Manual - English - Page 82
X/Y directions 3. Press . are reversed in black. W0451Q 4. Input enlargement/reduction ratio by pressing ten keys. W0453Q 5. Press . The initial screen is displayed again. W0454Q 4-4 BE-1204B-BC • BE-1206B - Brother International BE-1204B | Stand Alone Type Instruction Manual - English - Page 83
in black. W0455Q W0456Q 6. Input enlargement/reduction ratio in the Y direction by pressing ten keys. W0457Q 7. Press . The initial screen is displayed again. W0458Q BE-1204B-BC • BE-1206B - Brother International BE-1204B | Stand Alone Type Instruction Manual - English - Page 84
point. 1. Sewing data is read. 2. Press . Right/Left Mirror Pattern 3. Keep pressing until is displayed. W0451Q 4. Press . The initial screen is displayed again. W0461Q 4-6 BE-1204B-BC • BE-1206B - Brother International BE-1204B | Stand Alone Type Instruction Manual - English - Page 85
Zero Point-Symmetric Mirror Pattern 3. Keep pressing until is displayed. W0451Q 4. Press . The initial screen is displayed again. W0463Q Chapter 4 Editing of Embroidering Data BE-1204B-BC • BE-1206B - Brother International BE-1204B | Stand Alone Type Instruction Manual - English - Page 86
number of repetitions in the vertical and horizontal directions, by pressing ten keys. The vertical and horizontal directions are changed over by pressing . W0465Q 4-8 BE-1204B-BC • BE-1206B - Brother International BE-1204B | Stand Alone Type Instruction Manual - English - Page 87
a distance between the centers of each pattern W0468Q 6. Select the direction of repetitions by pressing . W0469Q 7. Press . The initial screen is displayed again. W0470Q BE-1204B-BC • BE-1206B - Brother International BE-1204B | Stand Alone Type Instruction Manual - English - Page 88
by pressing . 4. Press Press W0601Q after setting is finished. when setting continuously. W0602Q Thread Trimming Feed Number 3. Select this function by pressing . W0601Q 4-10 BE-1204B-BC • BE-1206B - Brother International BE-1204B | Stand Alone Type Instruction Manual - English - Page 89
. 5. Reverse by pressing. W0605Q W0606Q 6. Input a correction amount in the Y direction by pressing . 7. Press Press W0607Q after setting is finished. when setting continuously. W0607Q BE-1204B-BC • BE-1206B-BC 4-11 - Brother International BE-1204B | Stand Alone Type Instruction Manual - English - Page 90
Chapter 4 Editing of Embroidering Data 4-12 BE-1204B-BC • BE-1206B-BC - Brother International BE-1204B | Stand Alone Type Instruction Manual - English - Page 91
Chapter 5 Setting This Chapter describes how to set a sewing speed, correct trouble including thread breakage and others related to machine motions. - Brother International BE-1204B | Stand Alone Type Instruction Manual - English - Page 92
(→ Page 5-23) Display language (→ Page 5-24) Alarm sound (→ Page 5-25) Motive speed (→ Page 5-26) Small-pitch deletion (→ Page 5-27) Auto pause ins. (→ Page 5-28) 5-2 BE-1204B-BC • BE-1206B - Brother International BE-1204B | Stand Alone Type Instruction Manual - English - Page 93
) Automatic hoop retract ON/OFF (→ Page 5-19) Hoop Movement Registration of embroidering start point (→ Page 5-18) Movement to registered sewing start point (→ Page 5-19) BE-1204B-BC • BE-1206B - Brother International BE-1204B | Stand Alone Type Instruction Manual - English - Page 94
the sequence of sewing can be modified. ! This setting is explained on the basis of the BE-1206B-BC screen. ! Either feedhold or hoop retract can be inserted. 1. Press . 2. Select a sewing sequence to to the position to insert the hoop retract, then press . W0486Q 5-4 BE-1204B-BC • BE-1206B - Brother International BE-1204B | Stand Alone Type Instruction Manual - English - Page 95
4. Press . Modified setting is saved and the previous screen is displayed again. W0485Q Chapter 5 Setting BE-1204B-BC • BE-1206B-BC 5-5 - Brother International BE-1204B | Stand Alone Type Instruction Manual - English - Page 96
bars changes in the sequence of : ALL (all needle bars) → 1 → 2 → ... 9 or 12 (max.) → ALL → ... Selected needle bar (All needle bars : Each needle bar : ) W0490Q 5-6 BE-1204B-BC • BE-1206B - Brother International BE-1204B | Stand Alone Type Instruction Manual - English - Page 97
breakage sensor W0492Q When stepping back by preset number of stitches W0493Q 4. Press . Modified setting is saved and the previous screen is displayed again. BE-1204B-BC • BE-1206B - Brother International BE-1204B | Stand Alone Type Instruction Manual - English - Page 98
counter by pressing ten keys. Number of stitches W0494Q 3. Press . Modified setting is saved and the initial screen or halt screen is displayed again. 5-8 BE-1204B-BC • BE-1206B - Brother International BE-1204B | Stand Alone Type Instruction Manual - English - Page 99
. W0609Q 4. Select a type of a hoop by pressing . Currently selected hoop W0496Q 5. Press . Modified setting is saved and the previous screen is displayed again. W0497Q BE-1204B-BC • BE-1206B - Brother International BE-1204B | Stand Alone Type Instruction Manual - English - Page 100
A range of speed for each needle bar can be set. ! This setting is explained on the basis of the BE-1206B-BC screen. ! The speed range can be set within the range of 1 ~ 6. 1. Press . 2. Select by pressing is saved and the previous screen is displayed again. 5-10 BE-1204B-BC • BE-1206B - Brother International BE-1204B | Stand Alone Type Instruction Manual - English - Page 101
a required speed by pressing ten keys. W0504Q 6. After modification is finished, press . Modified setting is saved and the previous screen is displayed again. W0505Q BE-1204B-BC • BE-1206B-BC 5-11 - Brother International BE-1204B | Stand Alone Type Instruction Manual - English - Page 102
heads automatically For not stopping embroidering at the mending end point and continuing embroidering Manually trim the lower thread immediately after resetting a thread breakage error if feeding by 1. Press . 2. Select by pressing . 3. Press . W0609Q W0612Q 5-12 BE-1204B-BC • BE-1206B - Brother International BE-1204B | Stand Alone Type Instruction Manual - English - Page 103
than the input value. Modify this figure. W0509Q After setting all items, press . Modified setting is saved and the initial screen is displayed again. BE-1204B-BC • BE-1206B-BC 5-13 - Brother International BE-1204B | Stand Alone Type Instruction Manual - English - Page 104
first. W0513Q 6. After setting is finished with all needle bars, press . Modified setting is saved and the previous screen is displayed again. W0514Q 5-14 BE-1204B-BC • BE-1206B - Brother International BE-1204B | Stand Alone Type Instruction Manual - English - Page 105
W0619Q 4. Input thread withdrawal length by pressing ten keys. W0516Q 5. Press . Modified setting is saved and the previous screen is displayed again. Chapter 5 Setting BE-1204B-BC • BE-1206B-BC 5-15 - Brother International BE-1204B | Stand Alone Type Instruction Manual - English - Page 106
. W0609Q 4. Set whether to select the inching mode by pressing . W0518Q 5. Press . Modified setting is saved and the previous screen is displayed again. 5-16 BE-1204B-BC • BE-1206B - Brother International BE-1204B | Stand Alone Type Instruction Manual - English - Page 107
the lower right of the sewing area. Move the hoop by pressing . 7. Press . Modified setting is saved and the previous screen is displayed again. BE-1204B-BC • BE-1206B-BC 5-17 - Brother International BE-1204B | Stand Alone Type Instruction Manual - English - Page 108
once again. Modified setting is canceled and the initial screen or halt screen is displayed again. The hoop returns to the initial point. 5-18 BE-1204B-BC • BE-1206B - Brother International BE-1204B | Stand Alone Type Instruction Manual - English - Page 109
moves and the zero point is detected. Then the hoop moves to a registered start point. W0617Q W0618Q W0619Q 3. The initial screen is displayed again. BE-1204B-BC • BE-1206B-BC 5-19 - Brother International BE-1204B | Stand Alone Type Instruction Manual - English - Page 110
is valid W0532Q When the start point return is invalid W0533Q 6. Press . Modified setting is saved and the previous screen is displayed again. 5-20 BE-1204B-BC • BE-1206B - Brother International BE-1204B | Stand Alone Type Instruction Manual - English - Page 111
by rectangle tracing with the needle bar No. 1 used. Checking by octagon tracing with the needle bar No. 1 used. 1. Press twice. 2. Select with . W0620Q BE-1204B-BC • BE-1206B-BC 5-21 - Brother International BE-1204B | Stand Alone Type Instruction Manual - English - Page 112
the lowest speed in the beginning or restarting. ! The setting range is 1 to 10 needles. 1. Press two times. 2. Press or to select . 5-22 W0620Q BE-1204B-BC • BE-1206B - Brother International BE-1204B | Stand Alone Type Instruction Manual - English - Page 113
[RS Speed] by pressing W0621Q . W0622Q 5. Select communication speed by pressing . 6. Press . Modified setting is saved and the previous screen is displayed again. W0623Q BE-1204B-BC • BE-1206B-BC 5-23 - Brother International BE-1204B | Stand Alone Type Instruction Manual - English - Page 114
] by pressing W0621Q . W0622Q 5. Select a language to display by pressing . W0624Q 6. Press . The previous screen is displayed again with a display in a selected language. 5-24 BE-1204B-BC • BE-1206B - Brother International BE-1204B | Stand Alone Type Instruction Manual - English - Page 115
] by pressing . W0622Q 5. Select a kind of sound by pressing . W0625Q 6. Press . Modified setting is saved and the previous screen is displayed again. Chapter 5 Setting BE-1204B-BC • BE-1206B-BC 5-25 - Brother International BE-1204B | Stand Alone Type Instruction Manual - English - Page 116
the startup speed of the main shaft with . W0627Q 6. Press the button. The changed settings are stored and the previous screen is displayed. 5-26 BE-1204B-BC • BE-1206B - Brother International BE-1204B | Stand Alone Type Instruction Manual - English - Page 117
5. Select the maximum stitch to be deleted with . 6. Press . W0629Q W0630Q The new setting is saved and calculation is performed. The previous screen appears. BE-1204B-BC • BE-1206B-BC 5-27 - Brother International BE-1204B | Stand Alone Type Instruction Manual - English - Page 118
. W0634Q 6. Press . The renewed setting is stored and the screen changes into the previous one. Pressing will cancel the modification of the setting. 5-28 BE-1204B-BC • BE-1206B - Brother International BE-1204B | Stand Alone Type Instruction Manual - English - Page 119
. Validating the lock stitch W0562Q Invalidating the lock stitch W0563Q 6. Press the button. The changed settings are stored and the previous screen is displayed. BE-1204B-BC • BE-1206B-BC 5-29 - Brother International BE-1204B | Stand Alone Type Instruction Manual - English - Page 120
the lock stitch W0564Q Invalidating the lock stitch W0565Q 6. Press the button. The changed settings are stored and the previous screen is displayed. 5-30 BE-1204B-BC • BE-1206B - Brother International BE-1204B | Stand Alone Type Instruction Manual - English - Page 121
. Validating the lock stitch W0566Q Invalidating the lock stitch W0567Q 6. Press the button. The changed settings are stored and the previous screen is displayed. BE-1204B-BC • BE-1206B-BC 5-31 - Brother International BE-1204B | Stand Alone Type Instruction Manual - English - Page 122
5. Designate the speed to be limited with . W0570Q 6. Press the button. The changed settings are stored and the previous screen is displayed. W0571Q 5-32 BE-1204B-BC • BE-1206B - Brother International BE-1204B | Stand Alone Type Instruction Manual - English - Page 123
. W0638Q W0639Q 4. Designate the feed end angle with . W0575Q 5. Press the button. The changed settings are stored and the previous screen is displayed. W0576Q BE-1204B-BC • BE-1206B-BC 5-33 - Brother International BE-1204B | Stand Alone Type Instruction Manual - English - Page 124
file selection screen is shown at the first reading only. Data for the reading cannot be changed manually. This mode is not available when the device to read from is set to network. Choose so on. Please consult our sales office or service station nearby in this case. 5-34 BE-1204B-BC • BE-1206B - Brother International BE-1204B | Stand Alone Type Instruction Manual - English - Page 125
W0580Q to change the order of the data. Each pressing on the key will switch to the registered date order or the alphabetical order. BE-1204B-BC • BE-1206B-BC 5-35 - Brother International BE-1204B | Stand Alone Type Instruction Manual - English - Page 126
of MANU (manual), AUTO (automatic manual) is selected, the next data to be read will be shown here. Choose the required data with keys and press . W0582Q 11. To discontinue the automatic sewing, follow the steps 1 to 4 then set the device to read from to memory, and press . 5-36 BE-1204B-BC - Brother International BE-1204B | Stand Alone Type Instruction Manual - English - Page 127
of data 1. Press three times. 2. Select by pressing . Chapter 5 Setting 3. Press . W0638Q 4. Check information about patterns. W0583Q 5. Press . The previous screen is displayed again. BE-1204B-BC • BE-1206B-BC 5-37 - Brother International BE-1204B | Stand Alone Type Instruction Manual - English - Page 128
head 1. Press three times. 2. Select by pressing . 3. Press . W0638Q W0641Q 4. Check information about the machine. W0585Q 5. Press . The previous screen is displayed again. 5-38 BE-1204B-BC • BE-1206B - Brother International BE-1204B | Stand Alone Type Instruction Manual - English - Page 129
version Interface CPU ROM version Feed wave form table version Main CPU ROM version W0587Q 5. Press . The previous screen is displayed again. Chapter 5 Setting BE-1204B-BC • BE-1206B-BC 5-39 - Brother International BE-1204B | Stand Alone Type Instruction Manual - English - Page 130
Chapter 5 Setting 5-40 BE-1204B-BC • BE-1206B-BC - Brother International BE-1204B | Stand Alone Type Instruction Manual - English - Page 131
Chapter 6 Operation of Machine - Brother International BE-1204B | Stand Alone Type Instruction Manual - English - Page 132
LCD if a pattern comes out of the hoop. 3. Pressing starts embroidering. 4. After embroidering is finished, the machine is placed in the stand-by state. 6-2 BE-1204B-BC • BE-1206B - Brother International BE-1204B | Stand Alone Type Instruction Manual - English - Page 133
the switch, the knob of the switch pops up and emergency stop is reset. Press the power switch to turn on the power again. BE-1204B-BC • BE-1206B - Brother International BE-1204B | Stand Alone Type Instruction Manual - English - Page 134
to the opposite side. 5. Press the switch on the operation panel or the start switch located between the machine heads to resume operation. W1270Q 6-4 BE-1204B-BC • BE-1206B - Brother International BE-1204B | Stand Alone Type Instruction Manual - English - Page 135
the stitches reach the position of the thread breakage, all the heads will restart the sewing. However, heads already set to suspension are excluded. BE-1204B-BC • BE-1206B - Brother International BE-1204B | Stand Alone Type Instruction Manual - English - Page 136
Chapter 6 Operation of Machine Manual operation of the mending Setting or cancellation of the mending can be specified during the suspension of embroidering with : • The thread tension stand lamp will illuminate green, and mending is executed for the machine head. 6-6 BE-1204B-BC • BE-1206B - Brother International BE-1204B | Stand Alone Type Instruction Manual - English - Page 137
is held down. Never apply a tape on the switch to keep jog operation for a long time. Doing so may cause damage to the machine. BE-1204B-BC • BE-1206B - Brother International BE-1204B | Stand Alone Type Instruction Manual - English - Page 138
can also be moved to the feed position automatically after embroidering is finished. Refer to "Hoop Automatic Retract" on Page 5-19 for details. 1. Press . 6-8 BE-1204B-BC • BE-1206B - Brother International BE-1204B | Stand Alone Type Instruction Manual - English - Page 139
in the embroidering area as shown below, the hoop cannot move into the area. Enlarge the embroidering area on the operation panel. Embroidering area BE-1204B-BC • BE-1206B-BC W1281Q 6-9 - Brother International BE-1204B | Stand Alone Type Instruction Manual - English - Page 140
Chapter 6 Operation of Machine 7. Jog Switches 7-1 Hoop Movement to Start Position The hoop can be moved by pressing be set arbitrarily. W1282Q before starting embroidering and the start position can 6-10 BE-1204B-BC • BE-1206B-BC - Brother International BE-1204B | Stand Alone Type Instruction Manual - English - Page 141
and material are deviated from each other during embroidering, correct it by using the jog switches. 3. Pressing resets the inching mode. 4. Press restarts embroidering. BE-1204B-BC • BE-1206B-BC 6-11 - Brother International BE-1204B | Stand Alone Type Instruction Manual - English - Page 142
W0406Q 2. The hoop moves and the home position is detected. W1285Q W1286Q W1285Q 3. The initial screen is displayed again. Temporary stop screen W0440Q 6-12 BE-1204B-BC • BE-1206B - Brother International BE-1204B | Stand Alone Type Instruction Manual - English - Page 143
Chapter 7 Maintenance - Brother International BE-1204B | Stand Alone Type Instruction Manual - English - Page 144
of children. • Keep the machine clean at all times to prevent machine trouble. • Remove dirt with a soft, dry cloth. If necessary, clean with Use Brother's specified oil (Nippon Oil, Embroidery Lube 10N; VG10). • Supply a proper amount of oil. Any excess may stain fabrics, etc. 7-2 BE-1204B-BC • - Brother International BE-1204B | Stand Alone Type Instruction Manual - English - Page 145
the movable or fixed knives or the lower thread holding plate may result in thread trimming failure or parts damage. Clean them once a month. BE-1204B-BC • BE-1206B-BC 7-3 - Brother International BE-1204B | Stand Alone Type Instruction Manual - English - Page 146
Oiling Supply oil to the following places at regular intervals. • When oiling, be sure to supply Brother's specified oil (Nippon Oil, Embroidery Lube 10N; VG10) using the dropper. • Excessive oiling may cause the top surface of the head once a week. Felt W1221Q W1291Q 7-4 BE-1204B-BC • BE-1206B - Brother International BE-1204B | Stand Alone Type Instruction Manual - English - Page 147
2-2 Lower shaft ! Lubricate the lower shaft bush R through the hole once a month. Chapter 7 Maintenance ! Lubricate the lower shaft bush F every 3 months. W1292Q W1293Q BE-1204B-BC • BE-1206B-BC 7-5 - Brother International BE-1204B | Stand Alone Type Instruction Manual - English - Page 148
L [1)], and loosen the upper fixing screw [3]. Remove the head front cover L [1]. [4] [5] [3] [1] [2] W1295Q 4. Unscrew the two adjusting bolts [4] and detach the jump part stepping motor [5]. 7-6 BE-1204B-BC • BE-1206B - Brother International BE-1204B | Stand Alone Type Instruction Manual - English - Page 149
. Attach the head front cover R [9]. Apply seal adhesive (equivalent of Three Bond 1215) to the attaching face of the head before attaching the cover. BE-1204B-BC • BE-1206B - Brother International BE-1204B | Stand Alone Type Instruction Manual - English - Page 150
every three months. 1. Unscrew four screws fixing the table cover L, and remove the table cover L. 2. Grease the intermediate gear. 3. Attach the table cover L. W1397Q 7-8 BE-1204B-BC • BE-1206B - Brother International BE-1204B | Stand Alone Type Instruction Manual - English - Page 151
three screws fixing the head cover R, and remove the head cover R. 2. Grease all the cam grooves and two gears. 3. Attach the head cover R. W1398Q BE-1204B-BC • BE-1206B - Brother International BE-1204B | Stand Alone Type Instruction Manual - English - Page 152
the Y-feed covers R front [8], R rear [9], L front [10] and L rear [11]. 4. Grease the X-feed linear guide parts (2 positions) and Y-feed linear guide parts (2 positions), and slide those parts to spread the grease. 5. Assemble all the components in the reverse order. 7-10 BE-1204B-BC • BE-1206B - Brother International BE-1204B | Stand Alone Type Instruction Manual - English - Page 153
Chapter 8 Adjustment - Brother International BE-1204B | Stand Alone Type Instruction Manual - English - Page 154
Bar Height [1] W1304Q [5] [4] [6] W1306Q W1296Q [5] [6] [4] [2] [3] 11.3mm W1305Q Tighten the bolt [6] so that the clearance can be even. [7] Do not hit this section. [7] W1307Q 8-2 BE-1204B-BC • BE-1206B - Brother International BE-1204B | Stand Alone Type Instruction Manual - English - Page 155
Loosen Needle bar guide bracket set screw guide so that the set screw [3] on it is turned to the right by 25 ~ 30°. Tighten Needle bar guide bracket set screw [2] securely. When tightening the needle bar clamp set screw [2], the hole in the needle bar guide the needle bar guide rail [7] at this - Brother International BE-1204B | Stand Alone Type Instruction Manual - English - Page 156
W1304Q W1306Q [6] [7] [8] [4] [5] W1296Q [3] [7] [6] [8] Cutting section [2] 11.3 mm Tighten the bolt [8] so that the clearance can be even. [9] Do not hit this section. W1308Q [9] W1307Q 8-4 BE-1204B-BC • BE-1206B - Brother International BE-1204B | Stand Alone Type Instruction Manual - English - Page 157
not hit the needle bar guide rail [9] at this time. • When tightening the upper dead point stopper bolt [8], insert the longer side of the attached wrench into the bolt and tighten it by using the shorter side. Excessive tightening may make the needle bar movement sluggish. BE-1204B-BC • BE-1206B - Brother International BE-1204B | Stand Alone Type Instruction Manual - English - Page 158
hook manually until the point of rotary hook [5] turns up. 6. Loosen the screw [6] of the rotary hook cutting section and adjust the clearance between the needle and the rotary hook to be within 0.1 to 0.3 mm. Confirm that the height of the needle bar is 1.8 mm then. 8-6 BE-1204B-BC • BE-1206B-BC - Brother International BE-1204B | Stand Alone Type Instruction Manual - English - Page 159
0.3 mm. If there are any needles with clearances out of the range above, adjust them again to get proper clearances. 9. Fully tighten the screw [6]. BE-1204B-BC • BE-1206B - Brother International BE-1204B | Stand Alone Type Instruction Manual - English - Page 160
presser foot hole. 4. Adjust the arrow plate to align with 100 degrees, and then change colors. Adjust the needle bar No.2 - No.12 similarly. 8-8 BE-1204B-BC • BE-1206B - Brother International BE-1204B | Stand Alone Type Instruction Manual - English - Page 161
W1319Q 1mm [4] W1320Q Triangle part of movable knife W1321Q 1. Turn the power switch on and wait until the hoop home position detection is finished. BE-1204B-BC • BE-1206B - Brother International BE-1204B | Stand Alone Type Instruction Manual - English - Page 162
them forward by the backlash amount. • Tighten the two bolts [3] so that the thread trimmer connecting rods A [2] and B [1] are positioned in a straight line. 8-10 BE-1204B-BC • BE-1206B - Brother International BE-1204B | Stand Alone Type Instruction Manual - English - Page 163
on again. Check that the clearance between the movable knife [4] and the fixed knife [5] is 1 mm. 7. When adjusting again, follow the step 2 and after. BE-1204B-BC • BE-1206B-BC 8-11 - Brother International BE-1204B | Stand Alone Type Instruction Manual - English - Page 164
interference will occur when pressure foot [6] return to home position. 3. After the above steps are complete, check upper thread hook [2] for smooth movements. 8-12 BE-1204B-BC • BE-1206B - Brother International BE-1204B | Stand Alone Type Instruction Manual - English - Page 165
Chapter 9 Error code list - Brother International BE-1204B | Stand Alone Type Instruction Manual - English - Page 166
the or turn on the F/B switch on the head to either side. Adjust the position of needle bar case manually, then press the or turn ON the F/B switch on the head to either side. If the same error . If the same error occurs again, the I/O CPU communication is faulty. 9-2 BE-1204B-BC • BE-1206B - Brother International BE-1204B | Stand Alone Type Instruction Manual - English - Page 167
to press the again to start sewing.) Errors E-1C and E-1D are not displayed due to mechanical problems. Remove unused presser foot, or it may be damaged Presser foot down error When the power is E-28 Area over Hoop overhang (-Y) E-29 Area over Hoop overhang (+X, -Y) BE-1204B-BC • BE-1206B - Brother International BE-1204B | Stand Alone Type Instruction Manual - English - Page 168
Remove unused presser foot, or it may be damaged This function is not supported. Turn off the power Needle overhang (-X, -Y) The status of presser foot and on once. If the same error occurs again, the main PC is faulty. E-44 Inter-head CPU communication error Failed in the 1204B-BC • BE-1206B - Brother International BE-1204B | Stand Alone Type Instruction Manual - English - Page 169
trimming motor origin point error Power supply frequency error No power error Spindle motor lock Main PC board temperature too high Spindle motor voltage too low Spindle motor voltage too high Spindle motor occurs when the machine is on, it is a power failure detection error. BE-1204B-BC • BE-1206B - Brother International BE-1204B | Stand Alone Type Instruction Manual - English - Page 170
C7 ERROR C8 Embroidering start error ERROR CA Error Lower shaft flash memory error Lower shaft the lower shaft motor CPU. Power PC board error Cooling fan motor stop. Power troubles of the thread trimming motor, troubles of the main PCB, and troubles of the drive PCB. 9-6 BE-1204B-BC • BE-1206B - Brother International BE-1204B | Stand Alone Type Instruction Manual - English - Page 171
filter has any clogging. Turn OFF the power. The possible causes for this error are troubles of the thermistor and troubles of the drive PCB. X-axis pulse motor overcurrent stop Y-axis pulse motor overcurrent stop Turn displayed in this model. This is not usually displayed. BE-1204B-BC • BE-1206B - Brother International BE-1204B | Stand Alone Type Instruction Manual - English - Page 172
check sum error Send time up error No status is returned from spindle, lower shaft motor, or CPU. Measures This is not usually displayed. 9-8 BE-1204B-BC • BE-1206B - Brother International BE-1204B | Stand Alone Type Instruction Manual - English - Page 173
Chapter 10 Troubleshooting If there is any indication of trouble with the machine, check and correct as described in the table. If the trouble cannot be corrected, turn off the power and contact your distributor for corrective actions. - Brother International BE-1204B | Stand Alone Type Instruction Manual - English - Page 174
Chapter 10 Troubleshooting Mechanical Section Check these points once again Problem ! Thread breakage ! Needle (presser foot) interference with embroidery hoop ! Needle breakage ! Not embroidered any fixing screws for the coupling of the Y drive shaft loosened? 10-2 BE-1204B-BC • BE-1206B - Brother International BE-1204B | Stand Alone Type Instruction Manual - English - Page 175
Check these points once again Problem ! Upper shaft locks at a certain point in one cycle Chapter 10 Troubleshooting Check point • Is the thread take-up stopped due to interference with the thread properly? • Is the timing of the needle and rotary hook correct? BE-1204B-BC • BE-1206B-BC 10-3 - Brother International BE-1204B | Stand Alone Type Instruction Manual - English - Page 176
Troubleshooting Electrical Section Cautions • Be sure to turn off the power of the machine and unplug the power cord before checking cable connections. • When you check connection of the cables as instructed in this manual needle position detection sensor with a new one. 10-4 BE-1204B-BC • BE-1206B - Brother International BE-1204B | Stand Alone Type Instruction Manual - English - Page 177
Troubleshooting red LED on the head blinks. → If there is no problem, lower the thread breakage sensitivity value of the machine controller. right to the main PCB. • Enter the encoder signal mode and manually turn the main shaft pulley. → If it is abnormally heavy, the 1204B-BC • BE-1206B-BC 10-5 - Brother International BE-1204B | Stand Alone Type Instruction Manual - English - Page 178
Chapter 10 Troubleshooting Symptom ERROR A8 frequently occurs. again, replace the main PCB with a new one. • Enter the encoder signal test mode and manually turn the main shaft pulley. → If it is abnormally heavy, the main shaft mechanism is replace it with a new one. 10-6 BE-1204B-BC • BE-1206B - Brother International BE-1204B | Stand Alone Type Instruction Manual - English - Page 179
Chapter 10 Troubleshooting Symptom Power voltage upper or lower limit error occurs. Only a certain head does not operate. Jump motor does not operate. Wiper motor the wiper motor to connector P8 and P9 of the head PCB is proper. • Replace the head PCB with a new one. BE-1204B-BC • BE-1206B-BC 10-7 - Brother International BE-1204B | Stand Alone Type Instruction Manual - English - Page 180
Chapter 10 Troubleshooting 10-8 BE-1204B-BC • BE-1206B-BC - Brother International BE-1204B | Stand Alone Type Instruction Manual - English - Page 181
Chapter 11 Connection and Installation of Optional Equipment - Brother International BE-1204B | Stand Alone Type Instruction Manual - English - Page 182
the thread winder assembly (set) [3] on the thread winder stay [1] with the tightening screw [11]. 3. Mount the thread guide [4] with the drilling bolt set 6 × 20 [14] and nut 6 [13]. 4. Mount the spool shaft B [5] 2P (No. 6) connectors on the rear of the control box. 11-2 BE-1204B-BC • BE-1206B - Brother International BE-1204B | Stand Alone Type Instruction Manual - English - Page 183
the bobbin hold [4]. If the thread cannot be wound evenly, loosen the screw [5] and move the thread guide [3] right and left for adjustment. In order to wind more threads around the bobbin, loosen the thread [6] does not come out when the motor is not cooled enough.) BE-1204B-BC • BE-1206B-BC 11-3 - Brother International BE-1204B | Stand Alone Type Instruction Manual - English - Page 184
Chapter 11 Connection and Installation of Optional Equipment 11-4 BE-1204B-BC • BE-1206B-BC - Brother International BE-1204B | Stand Alone Type Instruction Manual - English - Page 185
- Brother International BE-1204B | Stand Alone Type Instruction Manual - English - Page 186
INSTRUCTION MANUAL BROTHER INDUSTRIES, LTD. 15-1.Naeshiro-cho, Mizuho-ku, Nagoya 467-8561, Japan. Phone: 81-52-824-2177 855-C43, C65 SA2108-001 2003.04.WB(1)
-
 1
1 -
 2
2 -
 3
3 -
 4
4 -
 5
5 -
 6
6 -
 7
7 -
8
-
9
-
10
-
11
-
12
-
13
-
14
-
15
-
16
-
17
-
18
-
19
-
20
-
21
-
22
-
23
-
24
-
25
-
26
-
27
-
28
-
29
-
30
-
31
-
32
-
33
-
34
-
35
-
36
-
37
-
38
-
39
-
40
-
41
-
42
-
43
-
44
-
45
-
46
-
47
-
48
-
49
-
50
-
51
-
52
-
53
-
54
-
55
-
56
-
57
-
58
-
59
-
60
-
61
-
62
-
63
-
64
-
65
-
66
-
67
-
68
-
69
-
70
-
71
-
72
-
73
-
74
-
75
-
76
-
77
-
78
-
79
-
80
-
81
-
82
-
83
-
84
-
85
-
86
-
87
-
88
-
89
-
90
-
91
-
92
-
93
-
94
-
95
-
96
-
97
-
98
-
99
-
100
-
101
-
102
-
103
-
104
-
105
-
106
-
107
-
108
-
109
-
110
-
111
-
112
-
113
-
114
-
115
-
116
-
117
-
118
-
119
-
120
-
121
-
122
-
123
-
124
-
125
-
126
-
127
-
128
-
129
-
130
-
131
-
132
-
133
-
134
-
135
-
136
-
137
-
138
-
139
-
140
-
141
-
142
-
143
-
144
-
145
-
146
-
147
-
148
-
149
-
150
-
151
-
152
-
153
-
154
-
155
-
156
-
157
-
158
-
159
-
160
-
161
-
162
-
163
-
164
-
165
-
166
-
167
-
168
-
169
-
170
-
171
-
172
-
173
-
174
-
175
-
176
-
177
-
178
-
179
-
180
-
181
-
182
-
183
-
184
-
185
-
186
 |
 |
BE-1204B-BC
BE-1206B-BC
Stand-Alone type
Please read this manual before using the machine.
Please keep this manual within easy reach for quick reference.
TWELVE NEEDLE FOUR HEAD EMBROIDERY MACHINE
TWELVE NEEDLE SIX HEAD EMBROIDERY MACHINE
INSTRUCTION MANUAL