Brother International LK3-B430 Service Manual - Page 19
Threading, Needle
 |
View all Brother International LK3-B430 manuals
Add to My Manuals
Save this manual to your list of manuals |
Page 19 highlights
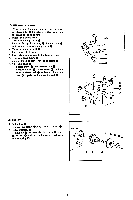
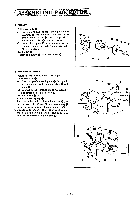
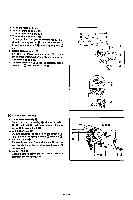
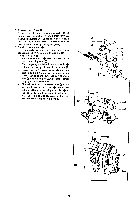
THREADING I. Tension release bar plate 0 Connect it to the tip of the tension release bar. and temporarily fasten it with two each screws 0 and washers 0. 2. Guide stud 0 Install it on the thread take-up guide bearing, using a screwdriver. 3. Thread take-up lever 0 Install it with two screws and 0. 4. Sub-tension 0 Temporarily fasten it to the arm with screw 0. 5. Main tension (j) Install it on the arm with screw S. 1 NEEDLE BAR I. Thread take-up lever Install it with stud O. and tighten it with screw 0. 2. Needle bar crank 0 Insert it into the lower end of thread take-up lever 0, and tighten one of the two screws, whichever is ahead in the rotating direction, until it hits the screw stop. 3. Put oil cap 0 on. 0 4. Needle bar connecting rod Fasten it to the needle bar crank with screw 0 (left-handed). 5. Needle bar 0 0 Fit slide block m onto needle bar clamp 0, insert it into the needle bar connecting rod and needle 0. bar guide. insert needle bar 0 into the arm from above, and temporarily tighten it with screw 0 000 %a> 0 • • 1s 4ro 00 0 0 • • -17-
-
 1
1 -
2
-
3
-
4
-
5
-
6
-
7
-
8
-
9
-
10
-
11
-
12
-
13
-
 14
14 -
 15
15 -
 16
16 -
 17
17 -
 18
18 -
 19
19 -
 20
20 -
 21
21 -
 22
22 -
 23
23 -
 24
24 -
25
-
26
-
27
-
28
-
29
-
30
-
31
-
32
-
33
-
34
-
35
-
36
-
37
-
38
-
39
-
40
-
41
-
42
-
43
-
44
-
45
 |
 |
