Brother International LK3-B430 Service Manual - Page 23
Brother International LK3-B430 Manual
 |
View all Brother International LK3-B430 manuals
Add to My Manuals
Save this manual to your list of manuals |
Page 23 highlights
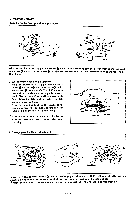
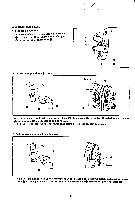
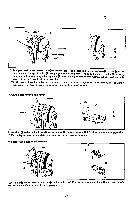
L- A L 9 9 I 1 NEEDLE BAR 1. Needle bar height adjustment -0 A 0 © Turn the pulley to lower the needle bar to its 2st position. Then loosen screw and move the needle bar up or down so that the uppermost reference line® 0! pie needle bar is flush with the lower end of the needle bar bushing OIf using a DP x 17 needle. adjust the needle bar so that the reference line second from the buttom 0 is flush with the base of the bushing. 2. Needle bar stroke adjustment r Turn the pulley to move the needle bar up from its lowest position and set the reference line a second from the top of the needle bar. flush with the lower end of the needle bar bushing O. Then, with the needle bar in this position. loosen bolt Q and move the dr'ver so that the top of the shuttle hook is in line with the center of the needle. * If using a DP x 17 needle. adjust the needle bar so that the lowest reference line is flush with the base of the needle bar bushing. 3. Driver and needle contact adjustment 0 • •I t O $ • Turn the pulley to bring the top of the shuttle hook into line with the center of the needle. Loosen screw() and turn the eccentric shaft Q so that the needle comes into contact with the driver. If the needle is received deeper than necessary it may cause skipped stitches. Again. if the needle does not contact the driver, the top of the shuttle hook ma be subjected to great wear and tear. Take care when making this adjustment. - 23 -
-
 1
1 -
2
-
3
-
4
-
5
-
6
-
7
-
8
-
9
-
10
-
11
-
12
-
13
-
14
-
15
-
16
-
17
-
 18
18 -
 19
19 -
 20
20 -
 21
21 -
 22
22 -
 23
23 -
 24
24 -
 25
25 -
 26
26 -
 27
27 -
 28
28 -
29
-
30
-
31
-
32
-
33
-
34
-
35
-
36
-
37
-
38
-
39
-
40
-
41
-
42
-
43
-
44
-
45
 |
 |
