Brother International LK3-B430 Service Manual - Page 21
-0.08mm
 |
View all Brother International LK3-B430 manuals
Add to My Manuals
Save this manual to your list of manuals |
Page 21 highlights
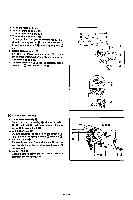
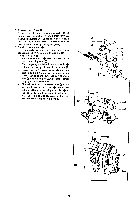
7. Clearance between needle and shuttle hook Turn the pulley so that the point of the shuttle 0hook meets the center of the needle. Loosen screw and turn eccentric shaft so that the clearance between the point of the shuttle hook and the needle is 0.01 to 0.08 mm. 8. Clearance between needle and driver Loosen screw (f) and turn eccentric shaft (I) so that the driver contacts needle lightly when the point of the shuttle hook meets the center of the needle. 9. After the adjustment. put the needle bar oil cap on. 10. Remove the shuttle hook and needle. 0.01-0.08mm 0 0- • gg 8 PRESSER ARM I. Feed plate 0 Temporarily tighten two screws 0. 2. Presser arm 0 Install presser arm Q with two each bolts 0 and washers O. When installing it. turn the pulley until the needle bar is down lowest (Reference needle position varies specifications), and make sure that the needle falls in the center of the work clamp opening. 3. Position feed plate 410 as suitable to the work clamp. and tighten screws 0. * Refer to the Feed Adjustment on page 24. 9 4 • 4r 0 0 0 0 -19-
-
 1
1 -
2
-
3
-
4
-
5
-
6
-
7
-
8
-
9
-
10
-
11
-
12
-
13
-
14
-
15
-
 16
16 -
 17
17 -
 18
18 -
 19
19 -
 20
20 -
 21
21 -
 22
22 -
 23
23 -
 24
24 -
 25
25 -
 26
26 -
27
-
28
-
29
-
30
-
31
-
32
-
33
-
34
-
35
-
36
-
37
-
38
-
39
-
40
-
41
-
42
-
43
-
44
-
45
 |
 |
