Brother International LK3-B430 Service Manual - Page 36
ORDINARY, STITCHES, DENIM, STITCHS, Necessary, replacement, parts, Procedure
 |
View all Brother International LK3-B430 manuals
Add to My Manuals
Save this manual to your list of manuals |
Page 36 highlights
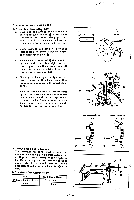
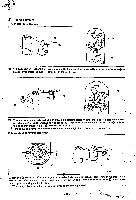
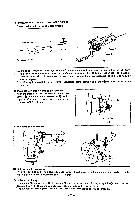
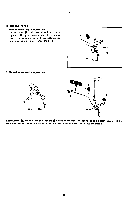
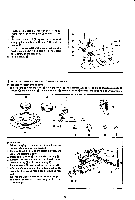
0 0 00 0 0 6. Fasten needle hole plate with two screws (D. 7. Temporarily fasten feed plate with two screws e • 8. Fit work clamps L. R in place. and fasten work clamp guide brackets A 0) and B 0) with six e. screws G. 9. Tighten two screws making sure that when the work clamp is lowered, it does not deviate from the opening in the feed plate. 10. Install needle 0. 0-- 0- 0- 0- 00 - --- -0 ! -0 T. FROM ORDINARY STITCHES TO DENIM STITCHS • Necessary replacement parts 49 0 Feed cam 0 Change gear C Change gear W Work clamps L. R 0 Feed plate 0 Needle hole plate Needle 0 Shuttle hook 0 Shuttle race ring Tension spring 0Thread take-up spring Presser spring /if 11111 Nor • ca. • 4... 40 0 O • 0- --© (Procedure) When changing the number of stitches, be sure to do so at the machine stop position. I. Refer to Steps I to 10 on the preceding page, and install the respective parts. 2. Install shuttle hook 0 and shuttle race ring 0. 3. Remove the tension bracket, and install thread e, take-up spring 0 and tension spring (D. 4. Remove screw and install presser spring 41). 5. After the above-mentioned installation, adjust the needle bar height and needle bar stroke. (See Page 23.) * Refer to the List of Replacement Parts on Page 37, and have the necessary parts ready on hand for stitch change. I 0 0 a • 0 - 36 -
-
 1
1 -
2
-
3
-
4
-
5
-
6
-
7
-
8
-
9
-
10
-
11
-
12
-
13
-
14
-
15
-
16
-
17
-
18
-
19
-
20
-
21
-
22
-
23
-
24
-
25
-
26
-
27
-
28
-
29
-
30
-
 31
31 -
 32
32 -
 33
33 -
 34
34 -
 35
35 -
 36
36 -
 37
37 -
 38
38 -
 39
39 -
 40
40 -
 41
41 -
42
-
43
-
44
-
45
 |
 |
