Brother International MFC-9010CN Users Manual - English - Page 64
Network difficulties, f - scanner problem
 |
UPC - 012502622383
View all Brother International MFC-9010CN manuals
Add to My Manuals
Save this manual to your list of manuals |
Page 64 highlights
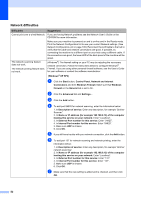
Network difficulties Difficulties Suggestions Cannot print over a wired Network. If you are having Network problems see the Network User's Guide on the CD-ROM for more information. The network scanning feature does not work. The network printing feature does not work. Make sure your machine is powered on and is on-line and in the Ready mode. Print the Network Configuration list to see your current Network settings. (See Network Configuration List on page 106.) Reconnect the LAN cable to the hub to verify that the cable and network connections are good. If possible, try connecting the machine to a different port on your hub using a different cable. If the connections are good, the lower LED of the back panel of the machine will be green. (Windows®) The firewall setting on your PC may be rejecting the necessary network connection. Follow the instructions below to configure Windows® Firewall. If you are using other personal firewall software, see the User's Guide for your software or contact the software manufacturer. (Windows® XP SP2) a Click the Start button, Control Panel, Network and Internet Connections and then Windows Firewall. Make sure that Windows Firewall on the General tab is set to On. b Click the Advanced tab and Settings... c Click the Add button. d To add port 54925 for network scanning, enter the information below: 1. In Description of service: Enter any description, for example "Brother Scanner". 2. In Name or IP address (for example 192.168.0.12) of the computer hosting this service on your network: Enter "Localhost". 3. In External Port number for this service: Enter "54925". 4. In Internal Port number for this service: Enter "54925". 5. Make sure UDP is chosen. 6. Click OK. e If you still have trouble with your network connection, click the Add button. f To add port 137 for network scanning and network printing, enter the information below: 1. In Description of service: Enter any description, for example "Brother network scanning". 2. In Name or IP address (for example 192.168.0.12) of the computer hosting this service on your network: Enter "Localhost". 3. In External Port number for this service: Enter "137". 4. In Internal Port number for this service: Enter "137". 5. Make sure UDP is chosen. 6. Click OK. g Make sure that the new setting is added and is checked, and then click OK. 52
-
 1
1 -
2
-
3
-
4
-
5
-
6
-
7
-
8
-
9
-
10
-
11
-
12
-
13
-
14
-
15
-
16
-
17
-
18
-
19
-
20
-
21
-
22
-
23
-
24
-
25
-
26
-
27
-
28
-
29
-
30
-
31
-
32
-
33
-
34
-
35
-
36
-
37
-
38
-
39
-
40
-
41
-
42
-
43
-
44
-
45
-
46
-
47
-
48
-
49
-
50
-
51
-
52
-
53
-
54
-
55
-
56
-
57
-
58
-
 59
59 -
 60
60 -
 61
61 -
 62
62 -
 63
63 -
 64
64 -
 65
65 -
 66
66 -
 67
67 -
 68
68 -
 69
69 -
70
-
71
-
72
-
73
-
74
-
75
-
76
-
77
-
78
-
79
-
80
-
81
-
82
-
83
-
84
-
85
-
86
-
87
-
88
-
89
-
90
-
91
-
92
-
93
-
94
-
95
-
96
-
97
-
98
-
99
-
100
-
101
-
102
-
103
-
104
-
105
-
106
-
107
-
108
-
109
-
110
-
111
-
112
-
113
-
114
-
115
-
116
-
117
-
118
-
119
-
120
-
121
-
122
-
123
-
124
-
125
-
126
-
127
-
128
-
129
-
130
-
131
-
132
-
133
-
134
-
135
-
136
-
137
-
138
-
139
-
140
-
141
-
142
-
143
-
144
-
145
-
146
-
147
-
148
 |
 |