Brother International S-7200B Instruction Manual - English - Page 15
Lubrication (-[]0[],[]3[] specifications
 |
View all Brother International S-7200B manuals
Add to My Manuals
Save this manual to your list of manuals |
Page 15 highlights
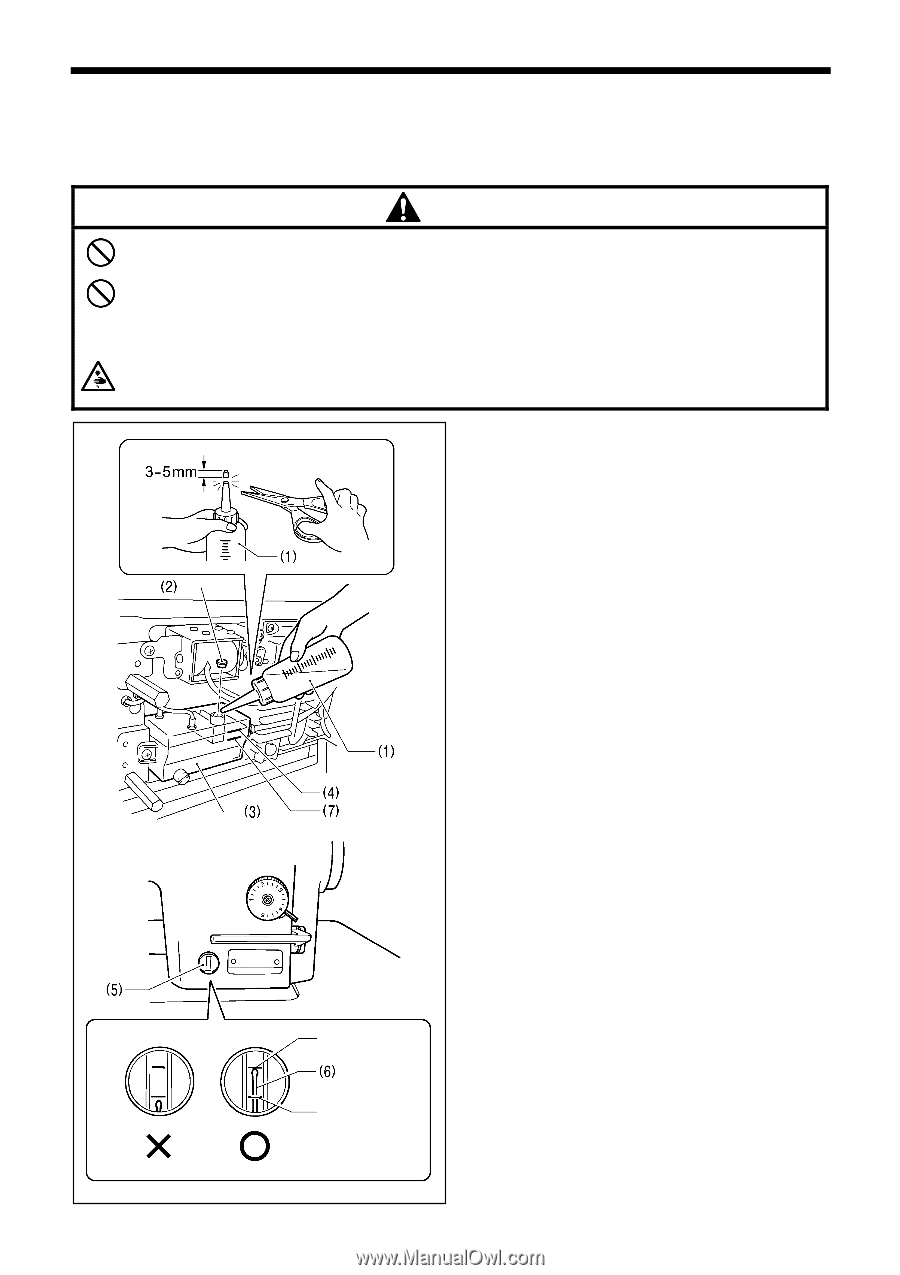
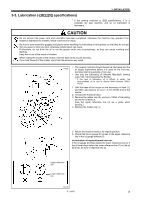
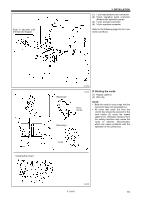
3. INSTALLATION 3-3. Lubrication (-[]0[],[]3[] specifications) * If the sewing machine is -[]5[] specifications, it is a complete dry type machine, and so no lubrication is necessary. CAUTION Do not connect the power cord until lubrication has been completed, otherwise the machine may operate if the treadle is depressed by mistake, which could result in injury. Be sure to wear protective goggles and gloves when handling the lubricating oil and grease, so that they do not get into your eyes or onto your skin, otherwise inflammation can result. Furthermore, do not drink the oil or eat the grease under any circumstances, as they can cause vomiting and diarrhea. Keep the oil out of the reach of children. When cutting the nozzle of the oil tank, hold the base of the nozzle securely. If you hold the end of the nozzle, injury from the scissors may result. 3640M The sewing machine should always be lubricated and the oil supply replenished before it is used for the first time, and also after long periods of non-use. Use only the lubricating oil (Nisseki Mitsubishi Sewing Lube 10N; VG10) specified by Brother. * If this type of lubricating oil is difficult to obtain, the recommended oil to use is . 1. Hold the base of the nozzle on the accessory oil tank (1), and then use scissors to cut 3 - 5 mm off the end of the nozzle. 2. Tilt back the machine head. 3. Remove the rubber cap (2), and pour 120ml of lubricating oil into the oil tank (3). (Use the upper reference line (4) as a guide when pouring.) 4. Replace the rubber cap (1). 5. Return the machine head to its original position. 6. Check that the oil gauge (6) comes to the upper reference line in the oil gauge window (5). If the oil gauge (6) drops below the lower reference line (or if the oil level drops below the lower reference line (7) on the oil tank (3)), be sure to replenish the oil. Upper reference line Lower reference line 3641M S-7200B 8
-
 1
1 -
2
-
3
-
4
-
5
-
6
-
7
-
8
-
9
-
 10
10 -
 11
11 -
 12
12 -
 13
13 -
 14
14 -
 15
15 -
 16
16 -
 17
17 -
 18
18 -
 19
19 -
 20
20 -
21
-
22
-
23
-
24
-
25
-
26
-
27
-
28
-
29
-
30
-
31
-
32
-
33
-
34
-
35
-
36
-
37
-
38
-
39
-
40
-
41
-
42
-
43
-
44
-
45
-
46
-
47
-
48
-
49
-
50
-
51
-
52
-
53
-
54
-
55
-
56
-
57
-
58
-
59
-
60
-
61
-
62
-
63
-
64
-
65
-
66
-
67
-
68
-
69
-
70
-
71
-
72
-
73
-
74
 |
 |