Brother International S-7200B Instruction Manual - English - Page 39
USING THE CONTROL BOX PANEL 8. USING THE CONTROL BOX PANEL, 8-1. Before setting any functions
 |
View all Brother International S-7200B manuals
Add to My Manuals
Save this manual to your list of manuals |
Page 39 highlights
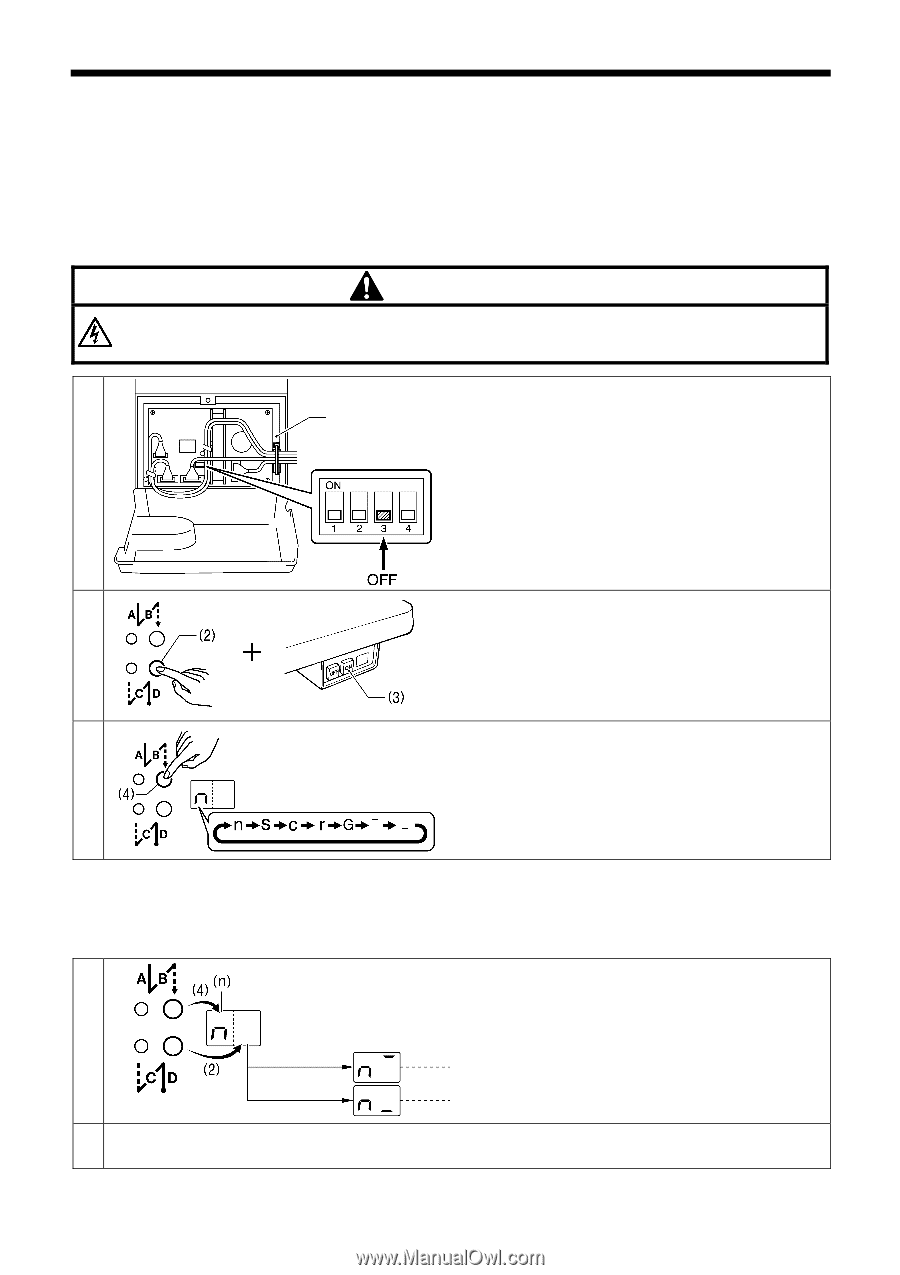
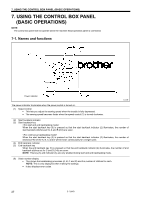
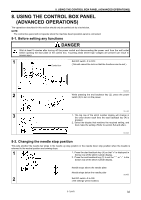
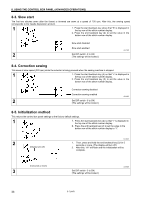
8. USING THE CONTROL BOX PANEL (ADVANCED OPERATIONS) 8. USING THE CONTROL BOX PANEL (ADVANCED OPERATIONS) The operations described in this section should only be carried out by a technician. NOTE: The control box panel will not operate when the machine head operation panel is connected. 8-1. Before setting any functions DANGER Wait at least 5 minutes after turning off the power switch and disconnecting the power cord from the wall outlet before opening the face plate of the control box. Touching areas where high voltages are present can result in severe injury. 1 Set DIP switch -3 to OFF. Control box (This will cancel the lock so that the functions can be set.) 3143M 2 While pressing the end backtack key (2), press the power switch (3) to turn on the power. 3144M 3 1. The top row of the stitch number display will change in the order shown each time the start backtack key (4) is pressed. 2. Select the display that matches the required setting, and then make the setting. (Refer to section 8-2 and after.) 3145M 8-2. Changing the needle stop position This sets whether the needle bar stops in the needle up stop position or the needle down stop position when the treadle is returned to the neutral position and sewing stops. 1 1. Press the start backtack key (4) so that "n" is displayed in the top row of the stitch number display. 2. Press the end backtack key (2) to set the " ¯ " or " - " in the bottom row of the stitch number display. Needle stops above the needle plate Needle stops below the needle plate 3146M 2 Set DIP switch -3 to ON. (The settings will be locked.) S-7200B 32
-
 1
1 -
2
-
3
-
4
-
5
-
6
-
7
-
8
-
9
-
10
-
11
-
12
-
13
-
14
-
15
-
16
-
17
-
18
-
19
-
20
-
21
-
22
-
23
-
24
-
25
-
26
-
27
-
28
-
29
-
30
-
31
-
32
-
33
-
 34
34 -
 35
35 -
 36
36 -
 37
37 -
 38
38 -
 39
39 -
 40
40 -
 41
41 -
 42
42 -
 43
43 -
 44
44 -
45
-
46
-
47
-
48
-
49
-
50
-
51
-
52
-
53
-
54
-
55
-
56
-
57
-
58
-
59
-
60
-
61
-
62
-
63
-
64
-
65
-
66
-
67
-
68
-
69
-
70
-
71
-
72
-
73
-
74
 |
 |