Canon EOS50D EOS 50D Instruction Manual - Page 58
Picture Style
 |
View all Canon EOS50D manuals
Add to My Manuals
Save this manual to your list of manuals |
Page 58 highlights
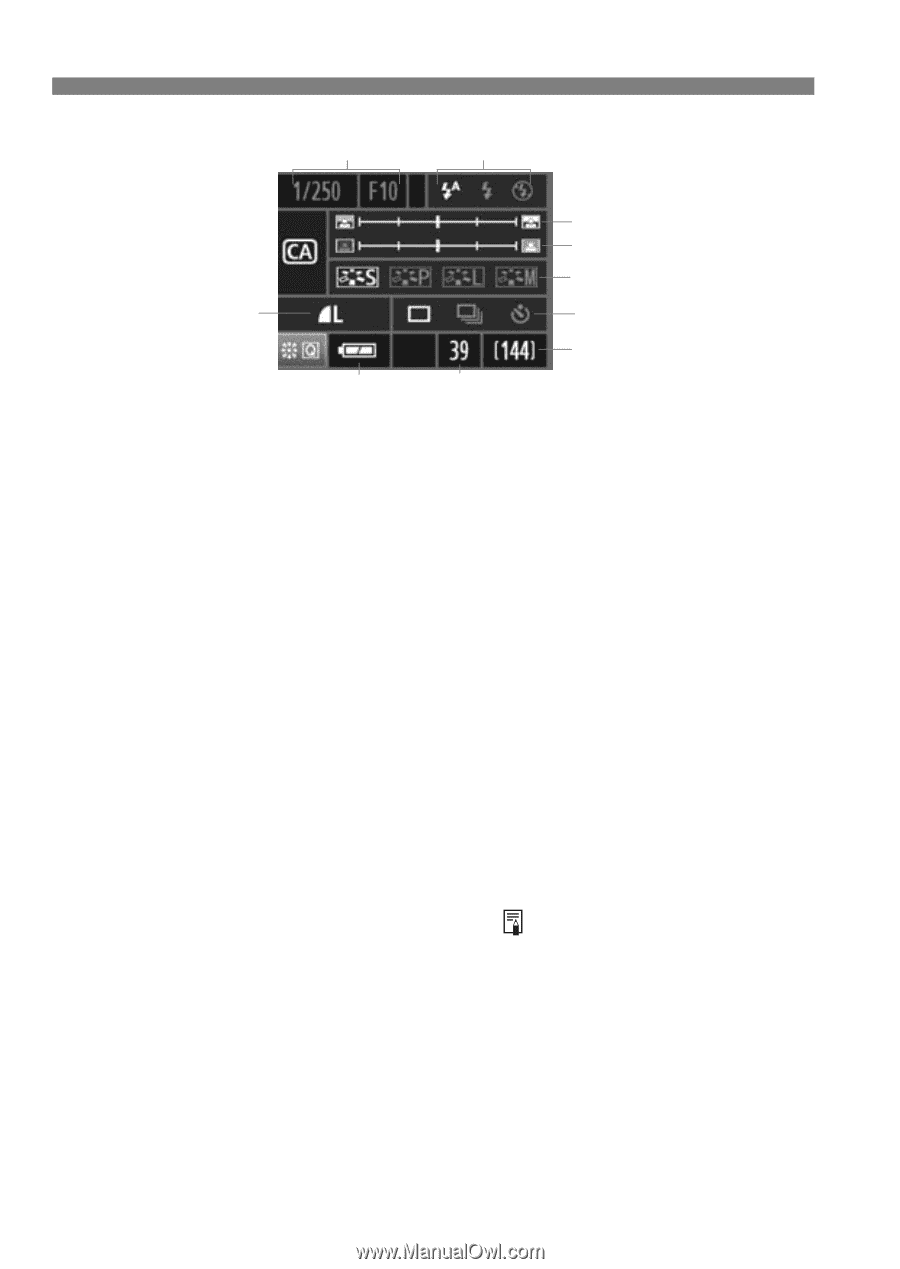
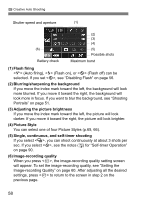
C Creative Auto Shooting Shutter speed and aperture (1) (6) Battery check (2) (3) (4) (5) Possible shots Maximum burst (1) Flash firing (Auto firing), (Flash on), or (Flash off) can be selected. If you set , see "Disabling Flash" on page 56. (2) Blurring/sharpening the background If you move the index mark toward the left, the background will look more blurred. If you move it toward the right, the background will look more in focus. If you want to blur the background, see "Shooting Portraits" on page 51. (3) Adjusting the picture brightness If you move the index mark toward the left, the picture will look darker. If you move it toward the right, the picture will look brighter. (4) Picture Style You can select one of four Picture Styles (p.65, 66). (5) Single, continuous, and self-timer shooting If you select , you can shoot continuously at about 3 shots per sec. If you select , see the notes ( ) for "Self-timer Operation" on page 90. (6) Image-recording quality When you press , the image-recording quality setting screen will appear. To set the image-recording quality, see "Setting the Image-recording Quality" on page 60. After adjusting all the desired settings, press to return to the screen in step 2 on the previous page. 58
-
 1
1 -
2
-
3
-
4
-
5
-
6
-
7
-
8
-
9
-
10
-
11
-
12
-
13
-
14
-
15
-
16
-
17
-
18
-
19
-
20
-
21
-
22
-
23
-
24
-
25
-
26
-
27
-
28
-
29
-
30
-
31
-
32
-
33
-
34
-
35
-
36
-
37
-
38
-
39
-
40
-
41
-
42
-
43
-
44
-
45
-
46
-
47
-
48
-
49
-
50
-
51
-
52
-
 53
53 -
 54
54 -
 55
55 -
 56
56 -
 57
57 -
 58
58 -
 59
59 -
 60
60 -
 61
61 -
 62
62 -
 63
63 -
64
-
65
-
66
-
67
-
68
-
69
-
70
-
71
-
72
-
73
-
74
-
75
-
76
-
77
-
78
-
79
-
80
-
81
-
82
-
83
-
84
-
85
-
86
-
87
-
88
-
89
-
90
-
91
-
92
-
93
-
94
-
95
-
96
-
97
-
98
-
99
-
100
-
101
-
102
-
103
-
104
-
105
-
106
-
107
-
108
-
109
-
110
-
111
-
112
-
113
-
114
-
115
-
116
-
117
-
118
-
119
-
120
-
121
-
122
-
123
-
124
-
125
-
126
-
127
-
128
-
129
-
130
-
131
-
132
-
133
-
134
-
135
-
136
-
137
-
138
-
139
-
140
-
141
-
142
-
143
-
144
-
145
-
146
-
147
-
148
-
149
-
150
-
151
-
152
-
153
-
154
-
155
-
156
-
157
-
158
-
159
-
160
-
161
-
162
-
163
-
164
-
165
-
166
-
167
-
168
-
169
-
170
-
171
-
172
-
173
-
174
-
175
-
176
-
177
-
178
-
179
-
180
-
181
-
182
-
183
-
184
-
185
-
186
-
187
-
188
-
189
-
190
-
191
-
192
-
193
-
194
-
195
-
196
-
197
-
198
-
199
-
200
-
201
-
202
-
203
-
204
-
205
-
206
-
207
-
208
-
209
-
210
-
211
-
212
-
213
-
214
-
215
-
216
-
217
-
218
-
219
-
220
-
221
-
222
-
223
-
224
-
225
-
226
-
227
-
228
 |
 |