Canon EOS50D EOS 50D Instruction Manual - Page 99
Automatic Depth-of-Field AE
 |
View all Canon EOS50D manuals
Add to My Manuals
Save this manual to your list of manuals |
Page 99 highlights
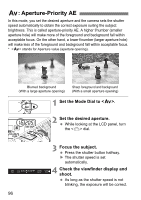
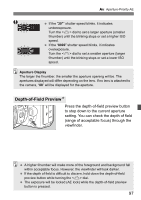
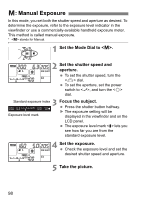
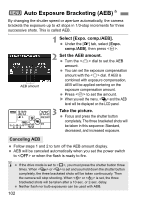
8: Automatic Depth-of-Field AE Objects in the foreground and background will be in focus automatically. All the AF points will function to detect the subject, and the aperture required to attain the necessary depth of field will be set automatically. * stands for Auto-Depth of field. This mode sets the depth of field automatically. 1 Set the Mode Dial to . 2 Focus the subject. Aim the AF points over the subjects and press the shutter button halfway (0). All the subjects covered by the AF points flashing in red will be in focus. 3 Take the picture. If the "30"" shutter speed blinks, it indicates that the subject is too dark. Increase the ISO speed. If the "8000" shutter speed blinks, it indicates that the subject is too bright. Decrease the ISO speed. If the aperture blinks, it indicates that the exposure level is correct but the desired depth of field cannot be obtained. Either use a wide-angle lens or move farther away from the subjects. If the camera sets a slow shutter speed, hold the camera steady or use a tripod. If you use flash, the result will be the same as using with flash. 99
-
 1
1 -
2
-
3
-
4
-
5
-
6
-
7
-
8
-
9
-
10
-
11
-
12
-
13
-
14
-
15
-
16
-
17
-
18
-
19
-
20
-
21
-
22
-
23
-
24
-
25
-
26
-
27
-
28
-
29
-
30
-
31
-
32
-
33
-
34
-
35
-
36
-
37
-
38
-
39
-
40
-
41
-
42
-
43
-
44
-
45
-
46
-
47
-
48
-
49
-
50
-
51
-
52
-
53
-
54
-
55
-
56
-
57
-
58
-
59
-
60
-
61
-
62
-
63
-
64
-
65
-
66
-
67
-
68
-
69
-
70
-
71
-
72
-
73
-
74
-
75
-
76
-
77
-
78
-
79
-
80
-
81
-
82
-
83
-
84
-
85
-
86
-
87
-
88
-
89
-
90
-
91
-
92
-
93
-
 94
94 -
 95
95 -
 96
96 -
 97
97 -
 98
98 -
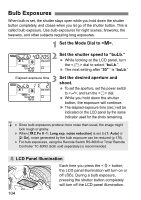
 99
99 -
 100
100 -
 101
101 -
 102
102 -
 103
103 -
 104
104 -
105
-
106
-
107
-
108
-
109
-
110
-
111
-
112
-
113
-
114
-
115
-
116
-
117
-
118
-
119
-
120
-
121
-
122
-
123
-
124
-
125
-
126
-
127
-
128
-
129
-
130
-
131
-
132
-
133
-
134
-
135
-
136
-
137
-
138
-
139
-
140
-
141
-
142
-
143
-
144
-
145
-
146
-
147
-
148
-
149
-
150
-
151
-
152
-
153
-
154
-
155
-
156
-
157
-
158
-
159
-
160
-
161
-
162
-
163
-
164
-
165
-
166
-
167
-
168
-
169
-
170
-
171
-
172
-
173
-
174
-
175
-
176
-
177
-
178
-
179
-
180
-
181
-
182
-
183
-
184
-
185
-
186
-
187
-
188
-
189
-
190
-
191
-
192
-
193
-
194
-
195
-
196
-
197
-
198
-
199
-
200
-
201
-
202
-
203
-
204
-
205
-
206
-
207
-
208
-
209
-
210
-
211
-
212
-
213
-
214
-
215
-
216
-
217
-
218
-
219
-
220
-
221
-
222
-
223
-
224
-
225
-
226
-
227
-
228
 |
 |
