Canon ES8600 ES8600 8mm Video Camcorder NTSC-E Instruction Manual - Page 16
When you have finished recording, Recording with the LCD screen, Demonstration
 |
UPC - 013803027174
View all Canon ES8600 manuals
Add to My Manuals
Save this manual to your list of manuals |
Page 16 highlights
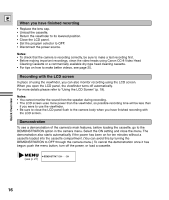
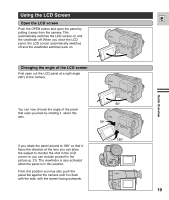
E When you have finished recording • Replace the lens cap. • Unload the cassette. • Return the viewfinder to its lowered position. • Close the LCD panel. • Set the program selector to OFF. • Disconnect the power source. Notes: • To check that the camera is recording correctly, be sure to make a test recording first. • Before making important recordings, clean the video heads using Canon CC-8 Video Head Cleaning Cassette or a commercially available dry-type head cleaning cassette. • For tips on how to make better videos, see page 25. Recording with the LCD screen In place of using the viewfinder, you can also monitor recording using the LCD screen. When you open the LCD panel, the viewfinder turns off automatically. For more details please refer to "Using the LCD Screen" (p. 19). Notes: • You cannot monitor the sound from the speaker during recording. • The LCD screen uses more power than the viewfinder, so possible recording time will be less than if you were to use the viewfinder. • Be sure to close the LCD panel flush to the camera body when you have finished recording with the LCD screen. Demonstration To see a demonstration of the camera's main features, before loading the cassette, go to the DEMONSTRATION option in the camera menu. Select the ON setting and close the menu. The demonstration also starts automatically if the power has been on for ten minutes without a cassette loaded into the cassette compartment. (You can avoid this by turning the DEMONSTRATION to OFF through the camera menu.) To cancel the demonstration once it has begun: push the menu button, turn off the power, or load a cassette. Quick Overview (see p. 27) DEMONSTRATION ...ON 16
-
 1
1 -
2
-
3
-
4
-
5
-
6
-
7
-
8
-
9
-
10
-
 11
11 -
 12
12 -
 13
13 -
 14
14 -
 15
15 -
 16
16 -
 17
17 -
 18
18 -
 19
19 -
 20
20 -
 21
21 -
22
-
23
-
24
-
25
-
26
-
27
-
28
-
29
-
30
-
31
-
32
-
33
-
34
-
35
-
36
-
37
-
38
-
39
-
40
-
41
-
42
-
43
-
44
-
45
-
46
-
47
-
48
-
49
-
50
-
51
-
52
-
53
-
54
-
55
-
56
-
57
-
58
-
59
-
60
-
61
-
62
-
63
-
64
-
65
-
66
-
67
-
68
-
69
-
70
-
71
-
72
-
73
-
74
-
75
 |
 |