Canon GL1 GL1 Instruction Manual - Page 25
Using the LCD Screen - 90
 |
View all Canon GL1 manuals
Add to My Manuals
Save this manual to your list of manuals |
Page 25 highlights
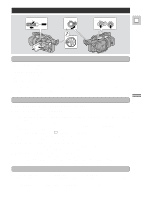
Using the LCD Screen Open the LCD screen E Push the LCD panel open button and open the panel by pulling it away from the camera. This automatically switches the LCD screen on and the viewfinder off. When you close the LCD panel, the LCD screen automatically switches off and the viewfinder switches back on. Changing the angle of the LCD screen First open out the LCD panel at a right angle (90°) to the camera. 90 K You can now choose the angle of the panel that suits you best by rotating it backwards (up to 180°) and forwards (up to 90°) about this axis. Quick Overview If you rotate the panel backwards around to 180° you can allow the subject to monitor the shot in the LCD screen or you can include yourself in the picture. The viewfinder is also activated when the panel is in this position. From this position you may also push the panel flat against the camera, with the screen facing outwards. Notes: • Avoid touching the LCD screen when moving the LCD panel. • Do not hold the camera by the LCD panel or the viewfinder. • Make sure you open the LCD panel at 90°, before attempting to rotate it backwards or forwards. • Always rotate the LCD panel vertically into place, before closing it or pushing it flat against the side of the camera. • Always fully close the LCD panel when it's not in use. • Be careful not to leave the LCD, viewfinder or lens exposed to direct sunlight outdoors or in a window. Doing so could cause damage. • Bright light falling on the LCD screen may cause glare that makes it difficult for you to view the image. In this case, switch to using the viewfinder. You are also able to adjust the brightness of the screen (see "Adjusting the LCD screen" p. 26). 25
-
 1
1 -
2
-
3
-
4
-
5
-
6
-
7
-
8
-
9
-
10
-
11
-
12
-
13
-
14
-
15
-
16
-
17
-
18
-
19
-
 20
20 -
 21
21 -
 22
22 -
 23
23 -
 24
24 -
 25
25 -
 26
26 -
 27
27 -
 28
28 -
 29
29 -
 30
30 -
31
-
32
-
33
-
34
-
35
-
36
-
37
-
38
-
39
-
40
-
41
-
42
-
43
-
44
-
45
-
46
-
47
-
48
-
49
-
50
-
51
-
52
-
53
-
54
-
55
-
56
-
57
-
58
-
59
-
60
-
61
-
62
-
63
-
64
-
65
-
66
-
67
-
68
-
69
-
70
-
71
-
72
-
73
-
74
-
75
-
76
-
77
-
78
-
79
-
80
-
81
-
82
-
83
-
84
-
85
-
86
-
87
-
88
-
89
-
90
-
91
-
92
-
93
-
94
-
95
-
96
-
97
-
98
-
99
-
100
-
101
-
102
-
103
-
104
 |
 |
