Canon GL2 DIGITAL VIDEO SOLUTION DISK Ver.3 Software Instruction Manual - Page 31
Delete the [Oem*] file., and [Inf] folder in succession. - digital video camera
 |
View all Canon GL2 manuals
Add to My Manuals
Save this manual to your list of manuals |
Page 31 highlights
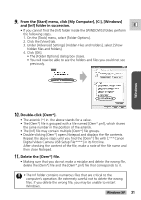
9. From the [Start] menu, click [My Computer], [C:], [Windows] and [Inf] folder in succession. E • If you cannot find the [Inf] folder inside the [WINDOWS] folder, perform the following steps. 1. On the [Tools] menu, select [Folder Options]. 2. Click the [View] tab. 3. Under [Advanced Settings] [Hidden Files and Folders], select [Show hidden files and folders]. 4. Click [OK]. • The [Folder Options] dialog box closes. • You will now be able to see the folders and files you could not see previously. Windows 10. Double-click [Oem*]. • The asterisk (*) in the above stands for a value. • The [Oem*] file is grouped with a file named [Oem*.pnf], which shares the same number in the position of the asterisk. • The [Inf] file may contain multiple [Oem*] file groups. • Double-clicking [Oem*] opens Notepad and displays the file contents. Repeat the above steps until you find the [Oem*] file with [;***Canon Digital Video Camera USB Setup File****] in its first line. After checking the content of the file, make a note of the file name and then close Notepad. 11. Delete the [Oem*] file. • Making sure that you do not make a mistake and delete the wrong file, delete the [Oem*] file and the [Oem*.pnf] file that corresponds to it. • The Inf folder contains numerous files that are critical to the computer's operation. Be extremely careful not to delete the wrong files. If you delete the wrong file, you may be unable to restart Windows. Windows XP 31
-
 1
1 -
2
-
3
-
4
-
5
-
6
-
7
-
8
-
9
-
10
-
11
-
12
-
13
-
14
-
15
-
16
-
17
-
18
-
19
-
20
-
21
-
22
-
23
-
24
-
25
-
 26
26 -
 27
27 -
 28
28 -
 29
29 -
 30
30 -
 31
31 -
 32
32 -
 33
33 -
 34
34 -
 35
35 -
 36
36 -
37
-
38
-
39
-
40
-
41
-
42
-
43
-
44
-
45
-
46
-
47
-
48
-
49
-
50
-
51
-
52
-
53
-
54
-
55
-
56
-
57
-
58
-
59
-
60
-
61
-
62
-
63
-
64
-
65
-
66
-
67
-
68
-
69
-
70
-
71
-
72
-
73
-
74
 |
 |
