Canon PIXMA iP5200 Service Manual - Page 59
Special Notes on Repair Servicing, User mode added to iP5200 - user guide
 |
View all Canon PIXMA iP5200 manuals
Add to My Manuals
Save this manual to your list of manuals |
Page 59 highlights
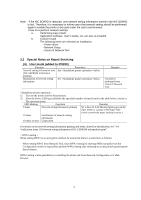
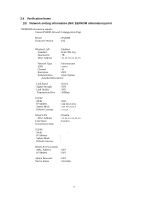
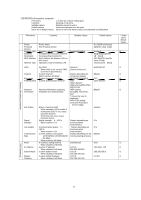
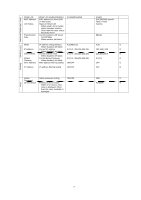
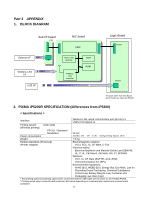
Note: If the NIC BOARD is replaced, user network setting information stored in the NIC BOARD is lost. Therefore, it is necessary to inform users that network setting should be performed again to enable the printer to be used under the user's environment. a. Performing Easy Install Application software, User's Guide, etc, are also re-installed. b. Custom Install The following items are selected as installation. - Printer driver - Network Setup - Canon IJ Network Tool 3.2 Special Notes on Repair Servicing (4) User mode (added to iP5200) Function Procedures Network setting information print See below. (NIC EEPROM information printing) Initialization of network setting See below. information Remarks Can also be performed from Canon IJ Network Tool 1) Turn on the printer and the Reset button. 2) After the Power LED (green) blinks the specified number of times listed in the table below, release it. The operation starts. LED blinking Operation Remarks 6 times Network setting information printing Set a sheet of A4/LTR-sized plain paper in the sheet feeder or cassette. (The Paper Feed switch controls the paper feeding location.) 10 times Initialization of network setting information 10 times or more Unspecified For details on the network setting information printing and items cleared by initialization, see "3.4. Verification Items (3) Network setting information (NIC EEPROM information) print". < WPA2 setting > When setting WPA2 as an encryption method, be aware that there is a restriction as follows. - When setting WPA2 from Network Tool, since WPA2 setting by entering SSID manually from the Configuration screen is impossible, perform WPA2 setting after selecting an access point by pressing the Search button . WPA2 setting is also possible by re-installing the driver and from Network Configuration of a Web browser. 4
-
 1
1 -
2
-
3
-
4
-
5
-
6
-
7
-
8
-
9
-
10
-
11
-
12
-
13
-
14
-
15
-
16
-
17
-
18
-
19
-
20
-
21
-
22
-
23
-
24
-
25
-
26
-
27
-
28
-
29
-
30
-
31
-
32
-
33
-
34
-
35
-
36
-
37
-
38
-
39
-
40
-
41
-
42
-
43
-
44
-
45
-
46
-
47
-
48
-
49
-
50
-
51
-
52
-
53
-
 54
54 -
 55
55 -
 56
56 -
 57
57 -
 58
58 -
 59
59 -
 60
60 -
 61
61 -
 62
62 -
 63
63 -
 64
64
 |
 |