Canon PowerShot A200 PowerShot A200/A100 Camera User Guide - Page 24
Stitch Assist Mode, Continuous Mode, Self-Timer
 |
View all Canon PowerShot A200 manuals
Add to My Manuals
Save this manual to your list of manuals |
Page 24 highlights
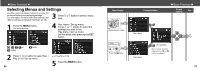
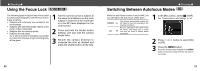
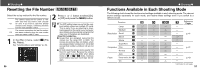
● Shooting ● Continuous Mode Self-Timer The camera will shoot continuously when the shutter button is pressed. The shooting speed is as follows.* PowerShot A200: approx. 2 images per second PowerShot A100: approx. 3 images per second * Large / Fine, LCD monitor off mode. (These figures reflect standard Canon testing conditions. The actual figures will vary according to the shooting conditions.) 1 Press the / button as necessary so that appears on the LCD monitor. 2 Shoot the image. 1 Press the / button as necessary so that appears on the LCD monitor. 2 Shoot the image. • The self-timer starts when the shutter button is pressed. The self-timer lamp will flash. The image will be shot after approximately 10 seconds. The blinking will speed up approximately 2 seconds before the shutter activates. If internal memory becomes full, interval between shots may lengthen slightly. If you are using the flash, shots are taken more slowly to allow time for the flash to recharge. 46 Stitch Assist Mode ● Shooting ● Use this mode when taking shots that you want to combine into a panorama. To create the panorama itself, you must stitch the images together on your computer. Framing a Subject The PhotoStitch program detects the overlapping portions of adjoining images and merges them. When shooting, try to include a distinctive item (landmark) in the overlapping portions. There are two stitch assist modes based on the shooting direction as shown in the following. Left→right Shoots horizontally from left to right. Right→left Shoots horizontally from right to left. To create the panorama at your computer, use the Photostitch software that came with your camera. • Compose each frame so that it overlaps 30 to 50 % of the adjoining image. Try to keep the vertical misalignment to within 10 % of the image height. • Do not include moving items in the overlap. • Do not try to stitch images that include both distant and close items. Objects may appear warped or doubled up. 47
-
 1
1 -
2
-
3
-
4
-
5
-
6
-
7
-
8
-
9
-
10
-
11
-
12
-
13
-
14
-
15
-
16
-
17
-
18
-
 19
19 -
 20
20 -
 21
21 -
 22
22 -
 23
23 -
 24
24 -
 25
25 -
 26
26 -
 27
27 -
 28
28 -
 29
29 -
30
-
31
-
32
-
33
-
34
-
35
-
36
-
37
-
38
-
39
-
40
-
41
-
42
-
43
-
44
-
45
-
46
-
47
-
48
-
49
-
50
-
51
-
52
-
53
-
54
-
55
-
56
-
57
-
58
-
59
-
60
-
61
 |
 |
