Canon PowerShot A200 PowerShot A200/A100 Camera User Guide - Page 27
Setting the White Balance, Adjusting the Exposure
 |
View all Canon PowerShot A200 manuals
Add to My Manuals
Save this manual to your list of manuals |
Page 27 highlights
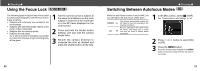
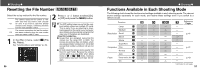
● Shooting ● Adjusting the Exposure If you are shooting against a bright background or strong backlight, you may need to correct the exposure so that the subject doesn't come out too dark. 1 Press the / / button. • You can check the results of the compensation by viewing the image on the LCD monitor when it is on. • You can shoot another image immediately after making a setting. You can check the result of your setting as the image will be displayed again after shooting. 3 Press the SET button. If you wish to turn compensation off, set the compensation value to 0. 2 Press or button to adjust the compensation. • You can set the adjustments from -2 to +2 in 1/3-step increments. 52 Setting the White Balance ● Shooting ● When the white balance is set to match the light source, the camera can reproduce colors more accurately. Auto Daylight Cloudy Tungsten Fluorescent Fluorescent H The camera sets the white balance automatically according to shooting conditions. Use when shooting outdoors in sunlight on a clear day. Use when shooting outdoors and the sunlight is not enough such as under cloudy skies, in shade or at dusk. For recording under tungsten and bulb-type 3-wavelength fluorescent lighting. For recording under warm-white, cool-white or warm-white (3wavelength) fluorescent lighting. For recording under daylight fluorescent, or daylight fluorescent-type (3-wavelength) fluorescent lighting. 1 Press the / / button (several times) until the white balance setting screen appears. 2 Press or button to select white balance. • If the LCD monitor is on, you can check the results by viewing the image on the LCD monitor. • A shot can be taken immediately by pressing the shutter button. The menu will reappear after the shot, allowing you to adjust the setting. 3 Press the SET button. • The white balance cannot be set when (sepia) or (B / W) photo effect is selected. 53
-
 1
1 -
2
-
3
-
4
-
5
-
6
-
7
-
8
-
9
-
10
-
11
-
12
-
13
-
14
-
15
-
16
-
17
-
18
-
19
-
20
-
21
-
 22
22 -
 23
23 -
 24
24 -
 25
25 -
 26
26 -
 27
27 -
 28
28 -
 29
29 -
 30
30 -
 31
31 -
 32
32 -
33
-
34
-
35
-
36
-
37
-
38
-
39
-
40
-
41
-
42
-
43
-
44
-
45
-
46
-
47
-
48
-
49
-
50
-
51
-
52
-
53
-
54
-
55
-
56
-
57
-
58
-
59
-
60
-
61
 |
 |
